I love to bake bread. It warms up my kitchen and the fills my house with delicious aromas, improving everyone’s mood. While my kids prefer a spoonful of sugar in their sandwich bread, I often want an adult-friendly loaf. While the best way to achieve my desired results is to make a biga or starter the night before; the fermentation gives great depth and complexity of flavor; today’s recipe is for those instances when I just need to make a quick loaf of sandwich bread. It’s fool-proof and ready in about 2 hours with a total of about 15 minutes of work. I use 6-ounces of beer to make up for the flavor lost by skipping the 12 hours required to make the biga. 4-1/2 stars.
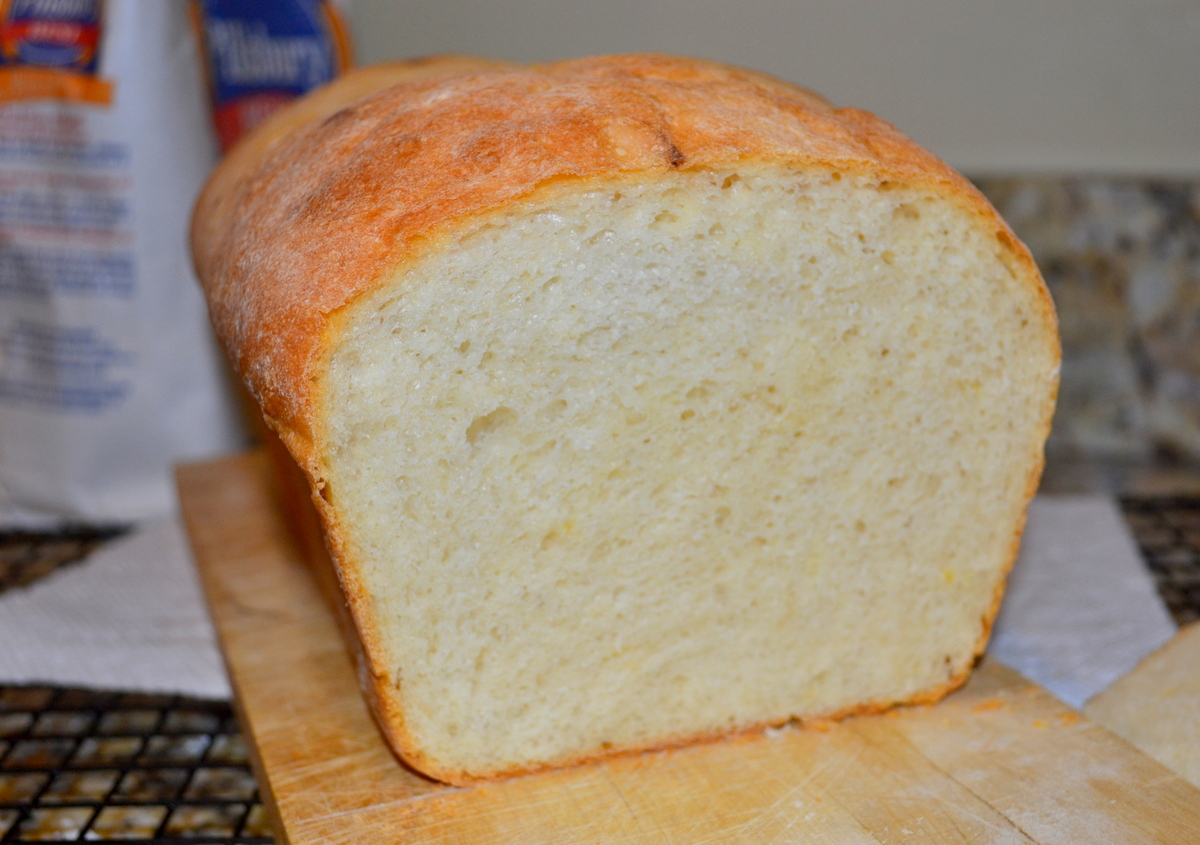
Nearly perfect crumb without any additives
When I make this loaf for my kids, I use 4-ounces of water instead of beer, 10-ounces of milk instead of 8-ounces. I also add 1-1/2 tablespoons sugar or honey (added to wet ingredients while hydrating yeast). Overall I’ve been making my kids homemade sandwich bread for a about 4 years and perfected this large 12-hour sandwich loaf. I also make a small 12-hour version here.
Comments:
- Of course, bread made without any preservatives goes stale relatively fast. I make this bread sans preservatives and is still good after 3 days. If you want it to last all week; e.g. to bake this bread on Sunday and have it stay fresh through Friday’s lunch. I found a list of natural preservatives that can use in sandwich bread. I sometimes use granulated lecithin (which I bought online).
- The keys to making bread without preservatives are: (1) Do not overcook. Bake only until the loaf reaches an internal temperature of 200-to-205-degrees. (2) Allow loaf to fully cool prior to slicing, or you will allow moisture to escape and give your loaf a head-start on becoming stale. (3) Use some olive oil to keep the loaf from being too dry.
- Do not cut your loaf before it has cooled to room temperature. In the past I had tried slicing my bread after 1 hour, placed the slices in large plastic bread bag and immediately saw condensation. 2 hours are minimum, but I recommend 3 hours of cooling time.
- Starting to bake the loaf at higher temperatures during the first 7 minutes (in Step 8) gives great “oven spring” so you don’t get a dense loaf. But reducing the temperature will also ensure that the crust doesn’t get too dark by the time the loaf reached an internal temperature of 200-to-205-degrees.
- The use of milk in this recipe keeps the final crumb relatively tight.
- Use 1 tablespoon in step 2, then cut down rising time to 1 hour.
Rating: 4-1/2 stars.
Cost: $1
How much work? Low.
How big of a mess? Low/Medium.
Start time 4:00 PM. Finish time 6:00 PM. (But don’t slice for another 3 hours)
Chris Kimball’s original recipe is here. The descriptions of how I prepared and baked the bread are given below:
Wet Ingredients:
1-1/8 cup milk (8 ounces)
3/4 cup beer or water (6 ounces)
1 tablespoon instant or rapid-rise yeast
3 tablespoons olive oil
Dry Ingredients:
4 cups bread flour (19-oz ounces)
2 teaspoons table salt
- Pre-heat oven to 200-degrees, and immediately turn off once it reaches the desired temperature. You will use the residual heat to cut the rising time down to 45 minutes.
- Add milk and beer/water to a Pyrex measuring cup (at least 2 cup capacity); heat in microwave for 1m15s mixture until it reaches about 105-degrees. Whisk in yeast; allowing it to hydrate for 5 minutes. Add in olive oil and stir to combine.
- Whisk together flour and salt in large bowl. Add yeast mixtures from step 1. Use a rubber spatula to fold until shaggy ball forms, scraping up dry flour from bottom of bowl. Kneed dough for 2 minutes. Spray bowl with non-spick cooking spray, put dough in bowl, cover with plastic wrap and place in warm, but turned off, oven for 40 to 45 minutes. The dough should double in size.
- Spray your loaf pan with non-stick cooking spray.
- Gently turn the dough out onto a very lightly-floured work surface. Gently press the dough into a rectangle so that it corresponds to the length of your loaf pan. Spray dough with water and roll up into a tight log. Move dough into pan and softly press so that it touches all four sides of the pan. Spray top with dough with non-stick cooking spray to prevent the dough from deflating in Step 8.
- Cover loosely with plastic wrap (realizing that the loaf will grow above the top of the pan). Place it in a warm spot in your kitchen for about 45 minutes; until the dough has doubled in size and does not readily spring back when you poke it with your finger.
- About 20 minutes prior to baking, begin pre-heating your oven to 425-degrees. Adjust an oven rack to middle position; any lower and your bottom crust will be too hard.
- Carefully remove plastic wrap, spray the loaf three times with water from a spray bottle, (optionally sprinkle top with a little bit of flour). Carefully place loaf pan in 425-degree oven. Set kitchen timer for 28 minutes corresponding to the total cooking time. After 7 minutes, reduce oven temperature to 375-degrees and turn loaf 180-degrees. Bake uncovered for 8 additional minutes. Tent with aluminum foil to keep the loaf top soft; baking for remaining 13 to 15 minutes. An instant-read thermometer inserted into the center of the loaf will reads 200-degrees when the loaf is done. Carefully remove bread from pan, and let cool on a wire rack for 2 to 3 hour before slicing.

Hearty bread; not overly fluffy


Looks great. What size/type loaf pan did you use? Do you ever make Pullman loaves?
Hi,
I used a 9″x5″ loaf pan, though Chris Kimball recommends 8-1/2″x4-1/2″ pan. I have made a pullman loaf, but no longer need 20 weekly slices (2 kids x 2 slices per sandwich x 5 weekdays). So this size is better for me now that I only need 12 weekly slices.
Here is my best Pullman recipe
Thanks.
Mark
Hi Mark,
Thanks for the post! I used your description and recipe to make this bread, it looks lovely but gotta wait for it to cool before I can slice it up. My dough was more moist than my typical loaf recipe, but in turn it was more elastic and beautiful. I hope it tastes as good as it looks.
Hi Sonia,
Did it taste as good as it looks? I made it again last night, but it over-rose in the loaf pan and deflated a little. But other than practice on timing the steps (which are different depending upon your kitchens temperature) it seems to come out great.
Mark
Mark,
YES! It tasted incredible and my kids love it. I had exact same problem second time I made it, I got busy and forgot about the bread when it was rising in the pan. The air pockets in the loaf were much larger than 1st (and appearance wasn’t same as 1st) but still tasted wonderful. So lesson learned, timing is important!
Also I should mention I used alcohol free beer both times. I am not sure how does the bread tastes with alcoholic beer but we loved it with substituted version 🙂
The alcohol bakes off, so your kids won’t get drunk. lol
If you have more time you can use less yeast and you will have a longer window of time. But using a tablespoon it is all about timing, and a change in kitchen temperature can make a huge difference. But in the end it always tastes great.