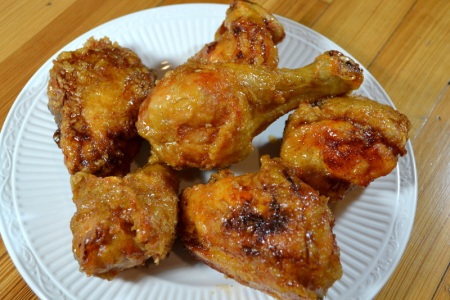
Every year Cook’s Country introduces a new fried chicken recipe, and each year Chris Kimball declares that new recipe to be the “best fried chicken recipe ever”. It seemed impossible to surpass this Spicy, Extra-Crunchy Fried Chicken from a few years ago. But Cook’s Country removed the milk, and the problem of brown-spots completely disappears. Later, I thought this Korean Fried Chicken was the pinnacle of fried chicken, which used pure corn starch (i.e. no flour). This year it was Honey Fried Chicken; “AAA, number one, best recipe of all-time for fried chicken”, Chris Kimball proclaimed. I was skeptical. This year’s chicken recipe includes all the past innovations; water instead of milk, corn starch instead of flour, liquid batter instead of dry coating. This year’s innovation: Twice frying the chicken, using a classic french fry technique.; to fully-crisp the exterior without overcooking the interior. 5-stars.
Actually, this recipe most closely resembles the Korean Fried Chicken, except that it is seasoned with sweet honey instead of sugar/soy sauce. Considering my audience; five teenaged boys; the sweetness made this a perfect meal.
Overall innovations:
- Use water instead of milk: The sugars in the milk solids browned too fast (not enough to adversely affect the flavor but it’s definitely visible; see photos here and here)
- Use corn starch instead of flour: This is a trick used by Chris Kimball to keep his shrimp tempura tender. The gluten-free results will be more tender than a coating made with flour.
- Use liquid batter instead of dry breading. This produces a more even coating, that is more prone to slicking on the chicken. A dry breading tends to lose a lot of breading during cooking.
- Twice frying the chicken, using a classic french fry technique: This allows the skin to fully-crisp, without overcooking the interior.
Comments/Issues:
- Because of the limitations of the number and size of my mixing bowls, I ended up using a small bowl to just the chicken in Step 3. But I had a hard time working with the steeper curves and am wondering if it would have been easier to use a pie plate.
- When cooking any fried chicken, you should try to use a splatter screen to make your stove-top cleanup a little easier.
Rating: 5-star.
Cost: $10 for 3 pounds.
How much work? Medium.
How big of a mess? Huge
Start time 5:00 PM. Dinner time 6:40pm
Chris Kimball’s original recipe is here. The descriptions of how I prepared the recipe today are given below:
Brine Ingredients:
1/2 cup salt (4 ounces)
1/2 cup sugar (4 ounces)
2 quarts cold water (4 ounces)
3-lbs bone-in chicken pieces
Batter Ingredients:
1-1/2 cups cornstarch (6-3/4 ounces)
3/4 cup cold water
2 teaspoons pepper
1 teaspoon salt
3 quarts vegetable oil
Honey Glaze Ingredients:
3/4 cup honey
2 tablespoons hot sauce
- Cut your split breasts cut in half so that they are approximately the same size as your drumsticks and thighs, then trim away any excess skin or fat. In a large bowl filled with 2 quarts cold water, add 1/2-cup salt and 1/2-cup sugar. Stir until dissolved; add chicken, cover with plastic wrap, and allow to sit in refrigerate for between 30 minutes to 1 hour.
- In a medium bowl, add 1 cup cornstarch, water, pepper, and salt. Whisk until smooth and refrigerate while the chicken brines.
- Sift 1/2-cup of cornstarch into a third, medium-sized bowl or pie plate. After chicken is done brining, remove and pat dry using paper towels. Coat chicken one piece at a time with cornstarch, then shake to remove any excess, and set on a clean platter.
- Add 3 quarts vegetable oil to a Dutch oven, which should measure about 2″ deep. Put over medium-high burner and begin to pre-heat oil.
- After about 6 to 7 minutes as the oil approaches 350-degrees, whisk batter to recombine ingredients and put half the chicken into batter and turn until entirely coated. Remove the chicken allowing the excess batter to drip back into the bowl, then add to 350-degree oil. Adjust burner as required to maintain the temperature between 325-and-350-degrees. The first batch you will need to crank up the heat, but during later batches that probably won’t be necessary.
- Fry for 6 to 7 minutes, until the chicken begins to become crispy. Remove partially cooked chicken from oil and set on a clean plate lined with paper towels. Once the oil is again approaching 350-degrees, repeat steps 5 and 6 with remaining raw chicken. While the chicken cooks, line a rimmed backing sheet with Aluminum foil and put a wire rack ontop.
- Again, heat the oil back up to 350-degrees and re-fry the fist batch for 5 to 7 minutes until the chicken is fully cooked; breasts reach 160-degrees and thighs/drumsticks are 175-degrees. Remove chicken back to wire rack, and repeat the second fry with the second batch.
- While the second batch is in it’s final frying, add together honey and hot sauce to a large bowl, stir to combine, and microwave for 1-1/2 minutes. Working one piece at a time, dip chicken in honey and turn until coated, then return to wire rack with the skin-side up, and allow to briefly drain before serving.


 Posted by My Year With Chris Kimball