Stromboli Disaster

September 27, 2011

Today was a great day, which I spent with my two sons at Central Park Zoo. Later was strolled around Central Park, fed Fritos to the fish in Bethesda’s fountain, and took a row boat ride on the lake. It was a full day and I was supposed make pepperoni pan pizza for dinner, but at the last minute I realized that my pantry didn’t have any crushed tomatoes to make the sauce. So it wasn’t until after the pizza dough had already risen that I decided to make this sauce-less Stromboli.

Flat like a pancake

Seldom has a recipe gone so wrong as this Stromboli. The main culprit was the pizza dough, which was too thin and sticky to properly roll up into a stromboli. My nice tight roll loosened in the oven and ended up flat-like-a-pancake instead of round-like-a-submarine-sandwhich. Chris Kimball says that you can substitute any pizza dough, but the results were a disaster. You need the structure of the bread flour and the extra kneading. I give it 2-1/2 stars; edible but a big disappointment.

The silver lining from tonight’s dinner is that I learned a few lessons:

  1. Do not substitute another pizza dough. Use the recommended dough recipe, which I’ve given below (or Chris Kimball’s instructions are here). Regular pizza dough is too thin and does not hold together well as a roll. It allowed the roll to flatten out as it cooked and will result in disappointment.
  2. I did implement a few of my recommendations from last year. I used parchment paper instead of oiling the baking sheet. This was an improvement; however the bottom crust was still too tough after 50 minutes in a 400-degree oven. I believe the best solution will be to lower the temperature for the first 20 minutes to 350-degrees, then increase to 425-degrees to brown the rest of the crust, removing as soon as the crust reached your desired degree of doneness.
  3. Tenting (bending foil) as opposed to just covering with oiled-foil worked better. It’s so obvious that perhaps that’s what they meant to have said in the original recipe.
  4. I tried reducing reducing the exposed time (i.e. without being covered by foil) to between 15 and 20 minutes. In the end, Chris Kimball was right. 15-to-20 minutes is not enough. Watch it closely for the final 10 minutes and pull it out of the oven when ready.
  5. Finally, the recipe neglects to remind you to rotate half way through baking. Of course, it is also necessary in this recipe, but I forgot because it wasn’t mentioned. It resulted in uneven browning.

Rating: 2-1/2 stars.
Cost: $3.
How much work? Medium.
How big of a mess?  Medium.
Start time 5:00 PM. Dinner time 7:30 PM.

The original recipe is here. The descriptions of the recommended dough (not the one I made tonight) is here and here.

Pizza Dough:

2 cups (11 ounces) bread flour
1-1/2 teaspoons Active Dry yeast
3/4 teaspoon salt
2 tablespoons olive oil
1 cup warm water

  1. I hydrated my teaspoon of Dry Active Yeast in 1 cup of 110-degree water for 10 minutes, a step that is not necessary for instant yeast.
  2. Combine 2-cups bread flour and 3/4 teaspoon salt in food processor fitted with dough blade.
  3. Add water/yeast mixture and 2 tablespoons olive oil with food processor running; mixing for 40 seconds.
  4. Let the dough rest for 2 minutes, then process again for another 30 seconds.
  5. Pour onto floured counter and knead by hand for 5 minutes.
  6. Place in a lightly oiled bowl and let rise for 1 hour in warm place, or until it has doubled in size.
  7. Gently punch down dough and turn out into an un-floured surface, reform into a ball, cover with plastic wrap and let rest for 20 minutes.

Pepperoni Stromboli:

4-oz thinly sliced deli pepperoni
6-oz mozzarella cheese
1 ounce Parmesan cheese
1 large egg
1 teaspoon sesame seeds

  1. Shredded mozzarella and grate Parmesan cheese. Line a rimmed baking sheet with parchment paper.
  2. Lightly flour a work surface, and roll the dough into a 12″x10″ rectangle, approximately 1/4″-thick.
  3. Evenly distribute the pepperoni and mozzarella over the dough, but leave a 1″ border along all four edges. Top with the grated Parmesan.
  4. Brush the edges of the dough with water so that the dough will properly seal. Start from a long side, roll the dough into a tight, 12″ cylinder, pressing the edges as you roll in order to seal.
  5. Pinch the seam closed and place on your parchment-lined baking sheet, seam side down. Cover with plastic wrap as you preheat the oven.
  6. Adjust oven rack to the middle position and preheat to 350-degrees.
  7. Remove the plastic wrap, lightly beat egg and brush over the top, and sprinkle with the sesame seeds.
  8. Tent with aluminum foil that has been sprayed lightly with non-stick cooking spray and bake for 25 minutes.
  9. Increase temperature to 425-degrees, remove foil, and bake until the crust is nicely golden, about 25 more minutes; rotating baking sheet after 10 minutes.
  10. Let cool on a wire rack for 5 minutes, then slice into 2-inch pieces for serving.

Kansas City Ribs and Smokey Beans

September 24, 2011

I haven’t made my kids favorite summertime recipe in more than a year, and with spare ribs on sale for $2/lb this was my best chance. I started them at noon, cooked them over indirect heat for four hours. They were ready for a 6pm dinner.  After an initial effort of 1 hour, most of the cooking time is unattended. You’ll need to be home to do something every 30 minutes or hour, but the heat is so low that you can rely on the clock rather than constant checking.

Slow-cooked ribs are fall-apart tender

Comments:

  1. If using St. Louis cut (as Chris Kimball recommends), then use 2 full racks of pork ribs, plus double the sauce recipe. I use 1 rack of regular spare ribs, because it cost so much less, and isn’t cryo-packed like the St. Louis cut.
  2. In the past there was some chance that the ribs would be overcooked, so I reduced the number of coals from 60 to 50. However, since Kingsford has reformulated their charcoal (and ruined what used to be a great product) you need to use the entire 60 coals.

Rating: 4-1/2 stars.
Cost: $12 for single rack of ribs, about 5 pounds.
How much work? Medium.
How big of a mess?  Medium.
Start time 12:00 PM. Dinner time 6:00 PM.

The original recipe for the ribs is here, the beans are here, and the sauce is here.  My descriptions of how I prepare it today are given below:

1 full racks pork spareribs.
3 tablespoons paprika
2 tablespoons light brown sugar
1 tablespoon ground black pepper
1 tablespoon table salt
1/4 teaspoon cayenne pepper
2 cups wood chips
2 disposable aluminum pans (13″x9″ )

  1. Use a paring knife to loosen the membrane from the back of the ribs, then use paper towels to rip it off. Pat the ribs dry with paper towels.
  2. Combine 3 tablespoons paprika, 2 tablespoons light brown sugar, 1 tablespoon ground black pepper, 1 tablespoon salt and 1/4 teaspoon cayenne pepper in small bowl. Massage the spice rub into both sides of ribs.
  3. Soak wood chips in bowl of water for at least 15 minutes. Open bottom grill vents fully. Light a chimney starter 2/3-rds full with charcoal (about 60 briquettes) and burn for 25 minutes until covered with fine gray ash.
  4. Meanwhile begin your preparations of smokey beans through step 4.
  5. Arrange a 13″x9″ disposable aluminum pan on one side of grill. Dump the hot coals into a pile on the opposite side. Sprinkle half the pre-soaked wood chips over coals. Replace grill grate.
  6. Position the ribs so that they are over pan; meat-side up. Place some aluminum foil directly on the ribs to trap heat.  Cover grill and place the lid vents directly over ribs to draw the smoke to the ribs. The vents should be 2/3 open.
  7. After 1 hour flip and rotate. Continue barbecuing ribs for another 1 hour.

Smokey BBQ Beans:

4 slice bacon
1 minced onion
4 cloves garlic
1 pound pinto beans
6 cups water
1 cup barbecue sauce
1/3 cup packed light brown sugar
2 tablespoons brown mustard
1 teaspoon hot sauce
2 teaspoons table salt

  1. The night before soak beans.
  2. Chop bacon and cook in Dutch oven over medium heat for 7 minutes until it begins to crisp. Meanwhile mince onion, peel garlic and drain and rinse your beans.
  3. Stir in minced onion and cook for 5 minutes until softened. Press garlic directly into skillet and cook for 30 seconds.
  4. Add beans and water and bring to simmer, then reduce stovetop to medium-low. Cover and cook for 1 hour until the beans are just soft.
  5. Add 1/2 cup barbecue sauce, 1/3 cup brown sugar, 2 tablespoons brown mustard, 1 teaspoon hot sauce, and 2 teaspoons table salt.  Simmer, uncovered, over medium-low heat for another 1 hour.
  6. Put beans to 13″x9″ disposable aluminum pan.  and wrap tightly with aluminum foil. Using paring knife or skewer, poke holes in foil.
  7. The beans will finish cooking by nestling disposable pan with beans inside disposable pan already in grill.

BBQ Sauce:

2 teaspoons vegetable oil
1 small onion
2 cups chicken broth
1/2 cup root beer
1/2 cup cider vinegar
1/2 cup dark corn syrup
1/4 cup molasses
1/4 cup tomato paste
1/4 cup ketchup
1 tablespoons brown mustard
1/2 tablespoon hot sauce
1/4 teaspoon garlic powder
1/8 teaspoon liquid smoke (optional)

  1. Mince onion. Heat oil in saucepan over medium-high heat until shimmering. Add onion and cook until softened, about 5 minutes.
  2. Add chicken stock first to stop the onions from cooking. Whisk in all the remaining ingredients (except for the optional liquid smoke).
  3. Bring the sauce to boil, then reduce stove-top to medium heat. Simmer, uncovered, for 1 hour until the sauce has reduced to 2 cups.
  4. Stir in liquid smoke, if using.

To Finish:

  1. About 1h30m after you begin grilling the ribs (About 30 minutes before coals are spent), light another 60 coals in chimney starter and burn until covered with fine gray ash.
  2. Remove cooking grill and place new coals from the chimney started right on top of spent coals. Sprinkle the second cup of soaked wood chips over coals.
  3. Nestle beans inside existing disposable aluminum pan. Replace cooking grill and place ribs directly above beans, so that the juices flavor the beans.
  4. Turn and rotate ribs and continue barbecuing for 1 hour.
  5. Brush ribs liberally with sauce, on both sides. Wrap with heavy-duty aluminum foil. Barbecue for 1 more hour.
  6. Transfer ribs (still in foil) to cutting board and rest 30 minutes.
  7. Let beans cook for 15 minutes longer than ribs; to keep them hot for serving. Discard foil, stir in 1/2-cup of barbecue sauce.
  8. Unwrap ribs and brush with additional barbecue sauce. Slice ribs between bones and serve with remaining sauce.

Cinnamon Raisin Swirl Bread

September 18, 2011

Part of my weekly ritual involves going to Panera Bread and blogging in the early morning hours before my two boys wake up on Saturday or Sunday. With every coffee refill, I pass by a beautiful Cinnamon Raisin loaf. The only problem is that the $4.50 price tag seems absurd. And since Chris Kimball doesn’t have a recipe, I had to resort to Martha Stewart. True to form; Martha’s recipe is basic and decent but is less fool-proof, omitting details that are “common sense” (at least to Martha Stewart). It also didn’t have enough raisins or cinnamon, plus I substituted 2 teaspoons of vanilla extract.

Can be messy if the filling oozes into the oven.

I first made this loaf one day before Huricanne Irene; as part of our “weathering the storm provisions”. The recipe includes my improvements; which I give 4-stars. My 12-year-old son called it the best bread I’ve ever made.

Issues:

  1. No matter what you do, there is a danger that the filling will overflow. So put a foil-lined baking sheet pan below the loaf pan for easy clean up.
  2. As with most of my bread, I made a 1/4″-deep slice using a serrated knife down the top of the loaf. I make this release cut to promote a higher rise during the fist few minutes of baking.  Unfortunately, my release cut sliced into the filling and let it ooze from the top during baking. In the future I will not make any release cuts.
  3. The original recipe called for 45 minutes in a 425-degree oven. After just 35 minutes the crust was thick and hard, but not burnt. I had tented the loaf after 15 minutes. To rectify the problem I reduce the over temperate to 375-degrees after 5 minutes; enough time to give the loaf an “over spring” but low enough keep the crust from becoming too tough.

Rating: 4 stars.
Cost: $1.30 for one 9″x5″ loaf
How much work? Low/Medium.
How big of a mess?  Low/Medium
Start time 2:00 PM. Ready at: 5:30 PM. (plus 1 to 2 hours of cooling time)

The original recipe is here , which she credit to Martha Stewart. My descriptions of how I prepare the loaf today are given below:

Dough Ingredients:
2 teaspoons active dry yeast
7-1/2 oz warm milk (1 cup, less 1 tablespoon)
18 oz. all-purpose flour. (3-1/4 cups)
4 tablespoons unsalted butter
1/4 cup sugar
1 egg
1-1/4 teaspoons salt.
2 teaspoons ground cinnamon
1 cup raisins
Non-stick cooking spray
Confectioner’s sugar for dusting

Filling Ingredients:
3/4 cup sugar
1 tablespoon ground cinnamon
2 teaspoons vanilla extract
1 tablespoon water
1 egg

  1. If desired, measure out your 1/4-cup of sugar of which you can mix about 1 teaspoon in with your hydrating yeast. This will give the yeast additional food to give it a nice kick start.
  2. Microwave milk in 2-cup Pyrex measuring cup for 30 seconds to 105-degrees. Whisk in yeast and allow to hydrate for 5 minutes, after which you should see some bubbling.
  3. Add flour, butter, sugar, egg, salt and cinnamon to bowl of standing mixer equipped with dough hook attachment. Turn mixer to low (2 on a kitchen-aide) and slowly add yeast mixture.  When ingredients become incorporated, increase mixer speed to 4 and mix for 3 minutes until the dough is mostly smooth and clears the sides of the bowl.
  4. Slowly add the raisins until they become incorporated. Increase to 6 and continue to knead for another 3 minutes. The dough should be smooth and the raisins are evenly distributed.
  5. Spray a glass bowl and rubber spatula with non-stick cooking spray. Put the dough in the bowl and turn once to coat lightly with oil.  Cover with plastic wrap and let rise in a warm place for 1 hour until doubled in size. In winter, you’ll have to use your warmed, but turned off oven to help.
  6. Using a greased spatula, fold the dough over onto itself; rotate bowl quarter turn and fold again. Rotate bowl again and fold twice more (a total of 4 folds). Cover with plastic wrap and let rise another 40 minutes.
  7. Spray a 9″x5″ loaf pan with nonstick cooking spray.
  8. To make the filling, combined sugar, cinnamon, vanilla and water in a small bowl.
  9. Turn out dough onto a lightly floured work surface.  Use a rolling pin to roll into a 10″x12″ rectangle.  Brush lightly with beaten egg, leaving a thin border around the edges.  Sprinkle the entire surface (less borders) evenly with cinnamon-sugar mixture.
  10. Fold in the edges along the long sides of the dough about 1″; resulting in a 10″-square.  Beginning with unfolded ends (the folds will form the loaf ends), roll the dough up into a tight spiral log, gently pressing as you go.  Pinch the seam to close, and place seam side-down in the prepared loaf pan.
  11. Cover loosely with plastic wrap and allow to rise for another 30 to 40 minutes or until the dough rises just above the edge of the pan. Meanwhile, preheat your oven to 425-degrees. Place a foil-lined baking sheet on the lower shelf to catch any drippings.
  12. After the loaf has risen, brush the top of the loaf lightly with the remaining beaten egg.  Bake at 425-degrees for 5 minutes, then reduce to 375-degrees without opening the oven. Continue baking for another 35 minutes; rotating the pan after 10 minutes. Tent loosely with foil when the top crust reaches your desired darkness (I tented mine about halfway through baking).   The loaf will be done when the internal temparture reaches 195-degrees.
  13. Cool the loaf in the pan for 5 minutes. Turn out the loaf and allow to cool on a wire rack for 1-1/2 to 2 hours before slicing. Dust lightly with confectioners sugar.

35-Minute Taco Salad

September 13, 2011

I originally made this recipe almost a year ago. I was completely surprised and happily gave the recipe 5-stars. The only down-side was that it made a huge mess. I’ve added some details to the recipe below to help choreograph the preparation and reduced the mess to medium. I also better used my time and reduced the preparation time from 60 minutes down to 35.  Without the avocado I could only give it 4-1/2 stars.

World's Best Taco Salad

Issues:

  1. I accidentally used a regular, rather than non-stick, skillet. It made cleanup more difficult, but I don’t believe it changed any flavors.
  2. The recipe calls for 90% lean ground beef, but 80% was on sale for $1.79/lb. To prevent the salad from being too greasy, I cooked the onion/chili powder longer on it’s own; then removed it from the skillet while browning the beef. I then used power towels to mop up some of the excess grease, before adding the onion/chili powder back to the skillet.
  3. Unfortunately, Hass avocados are out-of-season, so I decided to skip the green, Florida avocado.

Rating: 4-1/2 stars.
Cost: $9.
How much work? Medium.
How big of a mess?  Medium.
Start time 6:00pm. Dinner time at 6:35pm.

Chris Kimball’s original is here. and the dressing recipe is here. The descriptions of how I prepared the salad today are given below:

Beef Mixture:

1 tablespoon vegetable oil
1 onion
2 tablespoons chili powder
4 garlic cloves
1-lb 90% lean ground beef
8-oz can tomato sauce
1/2 teaspoon salt
1/4 teaspoon pepper
1 head romaine lettuce
2 tomatoes
1 avocado
4-oz cheddar cheese, or Mexican cheese blend
Tortila chips for serving

  1. Mince onion and peel 4 garlic cloves.
  2. Preheat 1 tablespoon vegetable oil in 12” non-stick skillet over medium heat. Saute onion and chili powder for 4 minutes until the onion has softened. Press 4 cloves of garlic directly into skillet and cook for 30 seconds.
  3. Stir in ground beef, breaking into smallish pieces. Cook for 9 minutes until slightly browned. Add tomato sauce and simmer for 2 minutes.
  4. While beef cooks tear romaine lettuce into bit-sized pieces and put on a very large serving platter. Grate cheese; set aside. Also core and cut your two tomatoes into medium-sized dice, and cut your avocado into 1/2” cubes. Set tomatoes and avocado aside separately.
  5. Season beef mixture with 1/2 teaspoon salt and 1/4 teaspoon pepper, then set aside to cool slightly while making dressing.

Lime Vinaigrette Dressing:

1 shallot
1 jalapeño chile
1 small garlic clove
5 tablespoons fresh lime juice (from 2-1/2 to 3 limes)
1 teaspoon sugar
1/2 teaspoon ground cumin
1/2 teaspoon salt
1/2 cup fresh cilantro leaves
3/4 cup extra virgin olive oil

  1. Peel garlic and shallot, and cut into rough quarters. Add to blender.
  2. Stem jalapeno and remove seeds. Add to blender.
  3. Freshly squeezed lime juice is key for flavor here, so squeeze the limes into measuring cup for more accurate measuring.
  4. Add 5 tablespoons lime juice, 1 teaspoon sugar, 1/2 teaspoon ground cumin, and 1/2 teaspoon salt to blender.
  5. Process for 15 seconds.
  6. Roughly chop cilantro and measure 1/2-cup. Add to blender.
  7. With blender running, add oil, and continue to process for 15 more seconds, or until the dressing is smooth and emulsified.

Final Assemly:

  1. Toss 1/2-cup of vinaigrette with torn lettuce until evenly coated.
  2. Place a ring of tortilla chips around the outer edge of serving plate, tucking under the lettuce if necessary. Top with beef. Sprinkle grated cheese, diced tomatoes, and avocado cubes. Drizzle anther 1/4-cup of vinaigrette over top of salad. Pass the remaining dressing separately.
  3. When serving to individual plates I like to first lay down a bed of tortilla chips. It can also be served with salsa or sour cream.

Easy Chicken Tacos

September 11, 2011

In Mexico they serve everything as tacos; beef, pork, fish, chicken. I’ve even had tripe, octopus, and iguana. But my two sons mostly think of ground beef tacos; a stereotype that I definitely want to change. These kid-friendly chicken tacos are lightly seasoned, so be careful not to overwhelm them with toppings. The recipe itself is very unconventional: orange juice, Worcestershire sauce and yellow mustard.  Oddly, these non-Mexican ingredients combine to form complex flavors that resemble somethings that took hours of slow-cooking. But these can be ready in just 35-minutes.

Easy; but subtle flavors risk being overwhelmed by toppings.

Overall, I’d rate these as 3-1/2 stars. Interesting flavors, delicious, but the flavors are a little too subtle.

  1. My chicken breasts were huge. So I only used three breasts, but still they were 2-pounds. Overall, the tacos are very lightly seasoned, so I would recommend limiting your chicken to no more than 1-1/2 pounds.
  2. To warm the tortillas the recipe instructs to, “wrap them in aluminum foil and heat in an oven set to 350-degrees for 15 minutes.” However, this will ruin at least half your tortillas. The two outermost tortillas because hard and crusty like a tostada shell (except that baked flour tortillas aren’t tasty like fried corn tortillas). Also some of the inner tortillas fused together and ripped as I tried to separate them. Next time, I will try this technique, which seems like it will work better based upon lower temperature and added moisture. I modified my instructions below to use this new technique.
  3. I couldn’t find 6″-flour tortillas, so instead used about eight 10″ tortillas.

Rating: 3-1/2-stars.
Cost: $6.75.
How much work? Low.
How big of a mess?  Low/Medium
Start time 6:00 PM. Dinnertime: 6:45 PM.

Chris Kimball’s original recipe from Cook’s Country is here (e-mail is required, but no credit card). My descriptions of how I prepare them today are given below:

3 tablespoons unsalted butter
4 garlic cloves
2 teaspoons chipotle chiles in adobo sauce
1/2 cup orange juice
1 tablespoon Worcestershire sauce
3/4 cup chopped cilantro leaves
4 boneless, skinless chicken breasts (approx. 1-1/2 pounds)
1 teaspoon yellow mustard
1/2 teaspoon salt
1/4 teaspoon pepper
12 (6″) flour tortillas

Possible toppings:  shredded lettuce, grated cheese, diced avocado, tomato, salsa, lime wedges, and sour cream.

  1. To warm the tortillas, wrap tortillas in a clean, slightly-damp dishtowel. Place in a casserole dish and cover tightly with aluminum foil. Place in 250-degree oven for 20 minutes.
  2. Mince the chipotle chiles. Peel the garlic cloves. Chop enough cilantro to yield 3/4-cups (which will be added in two steps; first 1/2-cup then later 1/2-cup).
  3. Melt 3 tablespoons butter in large skillet over medium-high heat. Press garlic directly into skillet and add chipotle; cook for 30 seconds.  Stir in 1/2-cup orange juice, 1 tablespoon worcestershire sauce, and 1/2-cup chopped cilantro.
  4. Bring to a boil, then reduce to medium heat. Add chicken breasts, cover and simmer for about 8-minutes per side. When done, the chicken should registers 165-degrees. Put in a medium bowl and tent with aluminum foil.
  5. While the chicken cooks, prepare any toppings: e.g. shredded lettuce, grated cheese, diced avocado, diced tomato.
  6. Increase heat to medium-high and reduced to 1/4 cup; about 5 minutes. Remove the skillet from heat and whisk in yellow mustard.
  7. Use 2 forks to shred the chicken into bite-sized pieces. Return the shredded chicken and any accumulated juices to skillet.
  8. Add remaining 1/4-cup cilantro. Season with 1/2 teaspoon salt and 1/4 teaspoon pepper. Toss until everything is combined and serve in the same medium bowl you used to shred the chicken.

Chinese “Barbecued” Pork

September 8, 2011

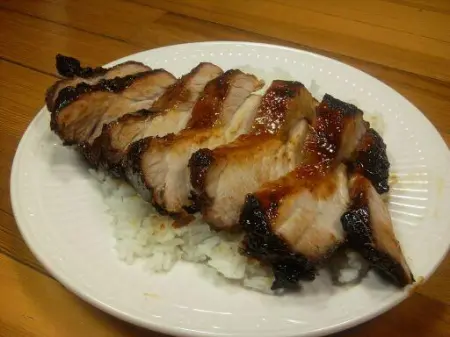
On Monday morning I began looking for a new Labor Day BBQ recipe.  Most recipe would have required me to start marinating the day before (obviously an improbability). Finally I came across this 2007 recipe for Chinese BBQ pork. The ingredient list looked delicious, plus it only required a few hours of marinating.  However after I brought the ingredients home, I noticed that the “barbecued” pork was cooked entirely in the oven. While technically meeting the definition of “barbecue”, I felt cheated out of my end-of-summer BBQ. In any case, the meal was a big hit. Nearly the entire four pounds of pork was gone by then end of the evening, so nobody else seemed to mind about the break in tradition.  Flavorful, but some of the thicker pieces could have used more sauce (see issues); 4-stars.

Delicious, but not really barbecued.

I made two cups of rice, but it turned out the boiling one cup of dried rice would have yielded more than enough.

Issues:

  1. The diagram on the cooks illustrated website of slicing a 4-lb Boston pork butt (actually the shoulder) is too idyllic to be helpful. They say to first slice vertically, then cut each piece into four even 1″-thick pieces. (total of eight 1″-slices). However, while removing the bone the butchers make all sorts of slices and tie it back together. So, just do your best to get 8 evenly sized pieces.
  2. I would recommend reserving 1/4 cup of sauce separately before you baste.  This will let you avoid cross contamination in case you don’t use it all during basting. Some of the extra sauce would have added better flavor for the thicker pieces.
  3. As I mentioned above, the pork is baked and broiled; not barbecued.
  4. Because I didn’t have “Chinese five-spice powder”, I substituted: 1/5 teaspoon cinnamon, 1/5 teaspoon fennel seed, 1/5 teaspoon cloves, 1/5 teaspoon black pepper, 1/3 teaspoon anise extract. Here is more on the substitution.

Rating: 4-stars.
Cost: $16.
How much work? Medium.
How big of a mess?  Medium
Start time 2:45 PM. Dinnertime: 7:00 PM.

Chris Kimball’s original recipe is here. My descriptions of how I prepare it today are given below:

4-lb boneless pork butt (Boston butt)
1/2 cup sugar
1/2 cup soy sauce
6 tablespoons hoisin sauce
1/4 cup dry sherry
1/4 teaspoon ground pepper (Recipe calls for white but  I used black)
1 teaspoon Chinese five-spice powder (see my substitute)
1 tablespoon toasted sesame oil
2 tablespoons grated fresh ginger (requires about a 5″ piece)
2 medium cloves garlic
1/4 cup ketchup
1/3 cup honey

  1. First slice your roast in half lengthwise.  Next, turn each piece cut-side down. If your pork butt is 4″ thick, then slice each half-roast lengthwise in 4 even slices. If using a pork butt that is less than 4″, cut each half-roast into 3 slices.  into six pieces instead of eight.
  2. Trim away any excess fat. Prick each piece of pork 10 to 12 times on each side using the tines of a fork. Put all pork into a 1-gallon zip-lock bag.
  3. Peel ginger and grate on the smallest holes of a box grater, adding 2 tablespoons to a medium bowl. Peel the 2 garlic cloves and press directly into the bowl.
  4. Add sugar, soy sauce, hoisin, sherry, pepper, five-spice powder, sesame oil to bowl.
  5. Whisk to combine and Reserve 1/2 cup marinade and set aside.
  6. Pour remaining marinade into bag with pork. Press out as much air as possible, and seal the zip-lock bag. Refrigerate and allow to for between 2 and 4 hours.
  7. While the meat marinates, combine ketchup and honey and the 1/2-cup marinade in small saucepan. Cook for 5 minutes over medium heat until it has reduced to 1 cup. Reserve 1/4-cup of the glaze for serving at table. (see issue #3)
  8. About 15 minutes before the pork is done marinating, adjust an oven rack to the middle position and preheat oven to 310-degrees. Line a rimmed baking sheet with heavy-duty aluminum foil and set wire rack onto sheet. Spray the rack with non-stick cooking spray to ease clean-up.
  9. Remove pork from marinade, letting any excess drip off, and place on wire rack. Pour 1/4 cup water into bottom of pan. Cover pan with heavy-duty aluminum foil. Crimping the edges tightly to form a better seal.
  10. Cook pork for 20 minutes, covered.
  11. Remove foil and continue to cook for 45 more minutes until the edges begin to brown.
  12. Turn on broiler onto high, and broil for 9 minutes until the meat is evenly caramelized. Remove from oven and brush pork with half of glaze. Broil for 4 minutes until it becomes a deep mahogany.
  13. Flip meat with tongs and broil for another 9 minutes until the other side becomes caramelized. Brush meat with remaining glaze and continue to broil until second side is deep mahogany, 4 minutes.
  14. Allow to rest for 10 minutes, then cut into thin strips and serve. Serve with final 1/4 cup sauce.

Grilled Thai Beef Satay with Peanut Sauce

September 4, 2011

When I order Thai food I rarely get peanut sauce. It’s just not my usual cup of tea. But I’ve seen online that other like-minded peanut-avoiders love this sauce, so made it anyway. The sauce does have a heavy peanut taste, but the slight heat and other complexities play off the beefy flavors very well. I’d recommend trying the sauce regardless on your preconceived opinions. The beef had great flavor and was a hit with both my two sons, but neither liked the sauce (one doesn’t like peanuts, and the other thought it was too spicy). Overall, it was a big hit, 4-stars, and I’m sure I will make it again. I might try this cucumber relish next time.

Delicious grilled Thai beef skewers. Worth the 3 hour investment.

Actually, Cooks Illustrated actually has two recipes for beef Satay. I made the 2007 recipe. It uses more common ingredients; for example, cilantro instead of lemon grass. The new recipe also uses Thai red curry paste, coconut milk, and roasted unsalted peanuts (I only every buy salted peanuts). Here is the brand new recipe from September 2011, which sounds even more authentic.  The new 2011 peanut sauce is here.

Issues:

  1. When slicing your beef into strips it important to get the correct angle. If you slice at only 45-degree angle will yield slices of 3/4-to-1″ wide. Keep cutting at a shallower angle until your slices are 1/4″-thick and 1-1/2″-wide.
  2. As usual, Chris Kimball’s recipes yield twice as much sauce. I’ve pared down the below recipe to yield half the original amount, which should be perfect. I find it wasteful to always make too much sauce, because realistically I wouldn’t use this for anything else.
  3. The original recipe calls for hardwood charcoal, but I just used my regular Kingsford (see issues here).

Rating: 4-stars.
Cost: $16.
How much work? Medium.
How big of a mess?  Medium
Start time 3:00 PM. Dinnertime: 6:10 PM.

Chris Kimball’s original 2007 recipe is here. My descriptions of how I prepare it today are given below:

Beef Satay:

1 large whole flank steak (2 pounds)
1/4 cup minced fresh cilantro leaves
2 medium garlic cloves
4 scallions
1/4 cup packed dark brown sugar
1/4 cup fish sauce
1/4 cup vegetable oil
2 tablespoons Asian chili sauce
24 bamboo or other wooden skewers

Peanut Sauce:
1/4 cup smooth peanut butter (2-1/2 oz)
2 Tablespoons cold water (heated for 15 seconds in microwave)
1 tablespoons lime juice
1 tablespoons Asian chili sauce
1 tablespoon fish sauce
1-1/2 teaspoons dark brown sugar
1-1/2 teaspoons minced fresh cilantro leaves
1 small garlic clove
1 scallions

  1. Cut flank steak in half lengthwise (with the grain) and freeze for 30 minutes.
  2. While the meat is freezing, slice white and green part of 4 scallions thin in large glass bowl. Mince enough fresh cilantro leaves to yield 1/4 cup. Peel and press 2 garlic clove. Combine fish sauce, oil, chili sauce, brown sugar. Stir to combine. Soak 20 to 24 bamboo skewers in water in a Pyrex casserole dish, to prevent the skewers from burning.
  3. Slice the two pieces of flank steak across grain into 1/4″-thick strips. At a 30-degree angle your slices should be 1-1/2″ wide.  If they are not 1-1/2″ wide, then make your angle shallower until you get wider strips.
  4. Add steak strips with sauce and use a spatula to coat evenly. Cover with plastic wrap and refrigerate for 1 hour.
  5. While the meat marinates make the peanut sauce which will take about 15 minutes. Heat 2 tablespoons of cold water in microwave for 20 seconds in a small mixing bowl. Whisk 1/4 cup of peanut butter together with the hot water. Slice white and green part of scallion thin and add to sauce. Peel and press 1 small garlic clove directly into bowl. Stir in the remaining sauce ingredients. If desired put the peanut sauce in a separate serving bowl. Set aside until dinner at room temperature.
  6. Remove the soaking wooden skewers from Pyrex casserole dish. Dry the casserole so that you can re-use to carry your prepared beef skewers.
  7. Weave the meat onto skewers. I was able to get 2-to-3 strips on meat per skewers.  Lay flat in your flat casserole dish. Cover again with plastic wrap and refrigerate until the charcoal is ready.
  8. Light a large chimney starter filled with 6-quarts of hardwood charcoal. Allow to ignite for 30 minutes until covered with layer of fine gray ash.
  9. Spread coals over bottom of grill into an even layer. Replace cooking grate, cover with lid, and let cooking grate heat up for 5 minutes. That will allow your grill brush to be much more effective..
  10. Spread half of skewers over the hot cooking grate. Cook, uncovered, for 4 minutes per side. The meat should be lightly charred around edges.
  11. Put on a large serving platter and cover tightly with aluminum foil to keep warm while you cook the remaining skewers.
  12. Serve immediately with the peanut sauce.

Greek Shrimp with Tomatoes and Feta

September 2, 2011

Last week on a hot summer’s day I was browsing for a fresh salad-type dinner and found this Greek Shrimp with Tomatoes and Feta. It called for Ouzo, which I confused with Orzo (the rice-shaped pasta), but which is in fact an anise-flavored Greek liquor. Fortunately I noticed the difference while still in the grocery store, and bough Anise-extract to use in my substitution.  At dinner time, I was very surprised that it was served piping hot; more like a stew than a salad. I sweated all through dinner.  I was good, but not great.  Perhaps because my expectations were for cool and refreshing I could only give it 3-1/2 stars.

Almost stew-like was the wrong call for the dog days of summer.

Issues:

  1. First I used smaller shrimp than called for in the recipe. Larger shrimp come at a huge premium, and my little shrimp only cost $5/lb.
  2. I didn’t want to buy a whole bottle of Greek Anise Liquor, so I substituted 1 teaspoon of Anise-extract for every 1 tablespoon of Ouzo.
  3. Instead of using two pepper halves of different colors, I used a single green pepper. Certainly the multicolored presentation was one of the things that drew me to this recipe, but I ultimately chose to keep the clutter down in my already overstuffed refrigerator.

P.S. A roving crew from southern New Jersey repaired my power line last night, so I finally have refrigerator just in time for the long weekend. The hardest part of cooking during the post-Irene blackout was my lack of ingredients, because all my “refrigerate after opening” ingredients were in neighbors’ refrigerators.

Rating: 3-1/2 stars.
Cost: $15.
How much work? Medium.
How big of a mess?  Medium
Start time 5:00 PM. Dinnertime: 7:00 PM.

Chris Kimball’s original recipe is here (requires an e-mail address, but no credit card). My descriptions of how I prepare it today are given below:

1-1/2 pounds shrimp
4 tablespoons extra-virgin olive oil
3 tablespoons ouzo
5 medium garlic cloves
1 teaspoon grated zest
Table salt and ground black pepper
1 small onion
1/2 medium red bell pepper
1/2 medium green bell pepper
1/2 teaspoon red pepper flakes
28-ounce can diced tomato
1/4 cup dry white wine
2 tablespoons coarsely chopped fresh parsley leaves
6 ounces feta cheese ,
2 tablespoons chopped fresh dill leaves

  1. Peeled and deveine the shrimp, then peel garlic cloves so that they are ready to press.
  2. Add prepared shrimp, 1 tablespoon oil, 1 tablespoon ouzo, lemon zest, 1/4 teaspoon salt, and 1/8 teaspoon black pepper to a small glass bowl. Press 1 garlic clove directly into the bowl. Gentry mix to combine, then set aside while preparing the sauce.
  3. Dice a medium onion which should yield about 3/4 of a cup. Remove the stems and seeds from the peppers and cut into a medium dice. Drain the canned tomatoes, reserving 1/3 cup of the juices.
  4. Preheat a 12″ regular skillet over medium heat, then add 2 tablespoons olive oil for 3 minutes until shimmering. Add diced onion and peppers, and sprinkle 1/4 teaspoon salt. Stir well, then cover and cook for 4 minutes. Stir occasionally and will be ready when the vegetables have released their moisture.
  5. Continue to cook, uncovered, for 5 minutes more. Stir occasionally and will be ready when the moisture has cooked off and the vegetables have softened.
  6. Press remaining 4 garlic cloves directly into skillet; add red pepper flakes; and cook for 1 minute.
  7. Add drained tomatoes, 1/3 cup tomato juice, 1/4 cup white wine, and the final 2 tablespoons ouzo. Turn up to medium-high heat until simmering, then reduce heat slightly to medium heat. Continue simmering for 7 minutes. Stir occasionally. It will be ready when the sauce has thickened slightly (but is not completely dry).
  8. Add chopped parsley, and season with salt and pepper to taste.
  9. Reduce heat again to medium-low and add shrimp and accumulated juices back to the skillet. Stir to combine, then cook, covered for 6 to 9 minutes until the shrimp are cooked, stirring occasionally. If you are using extra-large shrimp you may need to cook for 7 to 11 minutes. If the simmer becomes too vigorous, reduce heat to maintain a bare simmer. Meanwhile crumble your feta, which should yield about 1-1/2 cups.
  10. Remove pan from heat and sprinkle evenly with feta. Drizzle remaining tablespoon oil evenly over top and sprinkle with dill. Serve immediately.