Matt’s First Pumpkin Pie

November 29, 2011

Nobody in the family has every loved pumpkin pie more than my oldest son, Matt. This year, at age 12, he was in charge of making the pumpkin pie for the fist time. For him it was a labor of love, and the pie turned out fantastic. We took his pie to a friends’ house for Thanksgiving dinner and it quickly disappeared, while a store-bought pie sitting nearby was barely touched. 5-stars on his first attempt.

Deservedly proud of his first pumpkin pie.

In general, Matt followed the King Arthur recipe. Because my son loves traditional pumpkin pie, I have been hesitant to made Chris Kimball’s pie, which includes 1-cup of candied yams and 1/4-cup of maple syrup. Chris Kimball does have a more traditional recipe from 1993, which is here, except that I am no longer in charge of the pumpkin pie.

Rating: 5-stars.
Cost: $3.50.
How much work? Low.
How big of a mess?  Low.
Start time 11:00 AM. Ready at 11:10 AM.

King Arthur’s original recipe is here. The descriptions of Matt prepared his pie today are given below:

1/2 cup granulated sugar
1/2 cup brown sugar (3-1/8 oz)
1 tablespoon all-purpose flour
1/2 teaspoon salt
1 teaspoon ground ginger
1 teaspoon ground cinnamon
1/2 teaspoon nutmeg
1/8 teaspoon ground cloves
3 large eggs
15-oz can pumpkin
1-1/4 cups evaporated milk

  1. Whisk together the granulated and brown sugar, flour, salt, and spices in a large bowl.
  2. Whisk together the eggs, pumpkin, and evaporated milk together in a medium bowl.
  3. Whisk the egg mixture into the dry ingredients, and cover with plastic wrap. Refrigerate the mixture overnight to allow the flavors to combine. However if you want to serve the pie tonight, then waiting overnight is not absolutely required.
  4. Set an oven rack to middle position. Pre-heat to 400-degrees.
  5. When the oven reaches 400-degrees, place the pie crust on a foil-lined baking sheet, and pour filling into the unbaked pie shell.
  6. Bake for 35 to 45 minutes, or until an instant-read thermometer inserted in center of the pie reads 175-degrees. The filling should be set about 2″ in from the edge, and the center should still be a bit shaky. The center will finish cooking from the residual heat of the pie. If you wait until the center is completely set, the proteins in the eggs will seize and the center will crack.
  7. Remove from the oven and cool on a wire rack for 2 to 3 hours.

Perfectly cooked with no cracks.


Cranberry-Orange Sauce

November 27, 2011

As a kid I never knew that the sweet/tart flavor of cranberry sauce would perfectly complement my lean, mild turkey. That’s because every year of my childhood there was a mysterious gelatinous red log that sat, untouched, on our Thanksgiving table. How could it indefinitely retain it’s perfect canned shape? As an adult I now understand the “how”, but will never “why” people still buy that stuff. As a child I never ate the congealed red goo growing up, so now as a parent would never pass on such an absurd “tradition” to my own children. Why would I spend 6 hours making a Turkey, and then not spend 15 or 20 minutes on fresh cranberry sauce.

No cranberry flavored Jell-O in my house.

Comments:

  1. Ocean Spray supplies 75% of the total world-wide market of cranberries, but has a 100% monopoly on the supermarket supply of cranberries in my area. The lack of competition has resulted in inferior berries. I usually have to throw away up to 1/4 of the bag, because they sell unripe berries intermixed with ripe one. The monopoly means that I have no alternative.

Rating: 4-stars.
Cost: $2.20 for 2-1/4 cups.
How much work? Low.
How big of a mess?  Low.
Start time 1:00 PM. Ready at 1:25 PM.

Chris Kimball’s original recipe is here. The descriptions of how I prepared the recipe today are given below:

1 cup sugar (7-1/2 ounces)
3/4-cup water
1 tablespoon grated orange zest, from 2 oranges.
1/4 teaspoon salt
12-oz bag cranberries.
2 tablespoons orange Triple Sec or Grand Marnier

  1. Picked through your cranberries and discard those that are not ripe. Wash in cold water.
  2. In a medium saucepan set over high heat, bring water, sugar, orange zest, and salt to boil. Stir occasionally while the sugar dissolves.
  3. Add washed cranberries to pan, return the mixture to a boil over medium burner for 5 minutes, without stirring.
  4. Reduce to medium/low heat and simmer until about two-thirds of berries have popped open and sauce thickens, about 15 minutes, stirring occasionally.
  5. Remove from heat and stir in the Triple Sec.
  6. Place in serving bowl and allow to cool to room temperature. You can make cranberry sauce up to 7 days ahead; but be sure to allow  to stand at room temperature for 30 minutes before serving.

Old-Fashioned Roast Turkey

November 25, 2011

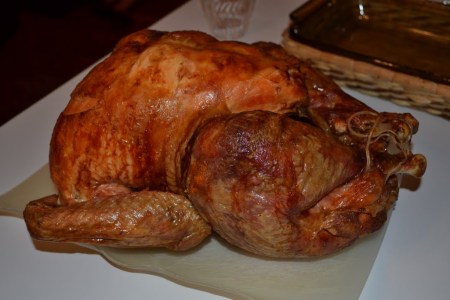
I hope everyone had a great Thanksgiving. While I ate dinner at a friends’ house, I still ended up cooking my 22-lb turkey. Though a little miscommunication meant that we didn’t have gravy, fortunately we did have cranberry sauce. While Chris Kimball has quite a few recipes for Roasted Turkey, they all boil down to one basic choice; to brine, or not to brine. Brining will help to ensure the chicken is moist and flavorful, but at the expense of a crispy skin. Because I wanted a beautifully roasted bird, I chose not to brine.

Roasted our 22-lb turkey at home, then brought to friends' house.

Chris Kimball’s secret to perfectly rendered skin requires two extra steps. First, loosen then skin from the breast and legs. Use your fingers to work skin free, taking extra care not to tear the skin. Using kosher salt under the skin performs the same basic function as brining, but won’t turn the skin flabby. Second, while the turkey is roasting breast side down, line the back with sliced salt pork. The salt pork will provide constant basting during the initial few hours of cooking, and provides some extra flavor. This falls under the theory that bacon makes everything better.

Final results were 4-stars. The meat was a little dry, mostly because of the logistics of finishing the turkey at 4pm, for a 6pm dinner. But it was flavorful, and the skin was perfectly crisp. However, I have noticed that the Thanksgiving crowd is generally a very forgiving bunch. The festive mood glosses over any imperfections, and by dinnertime a few glasses of wine makes everyone even happier.

Rating: 4-stars.
Cost: $1.50, because the turkey was free.
How much work? Low/Medium.
How big of a mess?  Low/Medium.
Start time 11:00 AM. Ready at 4:00 PM.

Chris Kimball’s original recipe is here. The descriptions of how I prepared the recipe today are given below:

Plenty of turkey for everyone

1 turkey (22 pounds),
3 tablespoons + 2 teaspoons kosher salt
2 teaspoons baking powder
12-oz salt pork

  1. One or two days before your dinner, remove the giblets and neck and set aside for making the gravy. Use your fingers to separate the skin from the turkey meat on the breast, legs, thighs, and back. Be careful not to tear the skin. Evenly rub 1 tablespoon kosher salt inside the cavity, 1-1/2 teaspoons under the skin of each breast, and 1-1/2 teaspoons under skin of each leg.
  2. Use plastic wrap to tightly cover the turkey. Place on rimmed baking sheet and put on lowest rack of refrigerator for between 24 to 48 hours.
  3. Combine 2 teaspoons kosher salt and 2 teaspoons of baking powder in a small bowl. Unwrap turkey and use paper towels to dry inside/outside of turkey.
  4. Use a metal skewer to poke the fat deposits 5 times for each breast and and each thighs; a total of 20 times.
  5. Sprinkle the entire skin with the salt/baking powder mixture and use your hands to work into skin. Fold the wings back and tuck underneath the turkey.
  6. If you are going to stuff the turkey, line the cavity with cheesecloth and put 4 to 5 cups of stuffing inside, then tie the cheesecloth closed using kitchen twine. Also, use kitchen twine to tie the legs.
  7. Remove the rind from your salt pork, rinse and cut into 1/4″-thick slices. Place the turkey breast-side-down in a V-rack, and lay the slices of salt pork over the back of entire turkey.
  8. Roast at 325-degrees for between 2 and 4 hours; depending upon the size of your turkey; until an instant-read thermometer reads 130-degrees in the thickest part of the breast.
  9. Remove from oven and increase oven to 450-degrees. Discard the spend salt pork, and pour the drippings from the roasting pan into a fat separator, which you can use for the gravy.
  10. Use clean kitchen towels or wads of paper towels to flip the turkey. Cut twine binding legs and remove stuffing bag.
  11. Return the turkey to oven and cook for between 45 minutes and 1-1/2 hours until the breast registers 160-degrees, and the thigh registers 175-degrees. Rotate the pan halfway through cooking. When the skin turns golden brown and crisp, transfer to a carving board and let rest for 30 minutes.
  12. Carve turkey and serve.

Beer-Braised Short Ribs

November 24, 2011

It seems crazy to fix a meal that require two days preparation for the Wednesday dinner just before Thanksgiving, but that’s exactly what I did. In my own defense, I’m going to a friends house for Thanksgiving so there’s no other culinary pressure this week. I salted the ribs 48 hours before dinner, which makes braised meat more succulent. I did the bulk of the preparation Tuesday; about 4 hours. Finally, on Wednesday evening I reheated the ribs and prepared the sauce. It was similar to this 4-star Carbonnade a la Flamande, which used a chuck roast instead of beef ribs. Today’s results were moist and flavorful, 4-stars. Overall, on par with the Carbonnade. I think beef roast is easier to work with, but the more expensive ribs taste better.

48 hours in the making

Incidentally, I think that these ribs could be made in just one day. The 24-hour refrigerating of the salted beef could be considered optional. You could also de-fat the sauce using a fat separator, instead of Chris Kimball’s cool and scrape method.

Issues:

  1. I didn’t use the minute tapioca and didn’t have any prunes.
  2. Three tablespoons of Dijon mustard seemed like way too much, so I cut it back to 1 tablespoon and like the result.

Rating: 4-stars.
Cost: $14.50.
How much work? Medium.
How big of a mess?  Medium.
Start time 3:00 PM. Dinner time 7:00 PM.

Chris Kimball’s original recipe is here. The descriptions of how I prepared the recipe today are given below:

3-1/2 pounds beef short ribs (about 8 ribs)
2 teaspoons kosher salt
1/4 teaspoon pepper
1-1/2 tablespoons vegetable oil
1-1/2 tablespoons unsalted butter
2 pounds yellow onions
1-1/2 tablespoons tomato paste
2 12-oz bottles of dark beer
1 bay leaves
2 sprigs of thyme
3 tablespoons soy sauce
1 tablespoons Dijon mustard
1 tablespoons minced fresh parsley leaves

  1. Two days before dinner: Trim any excess fat from the ribs. Sprinkle evenly with two teaspoons of kosher salt. Cover with plastic wrap and refrigerate for 24 hours.
  2. The day before dinner: Pat ribs dry with paper towels and season with pepper. Preheat oven to 300-degrees.
  3. Heat 1-1/2 tablespoons oil in dutch oven over medium-high heat until just smoking. Cook ribs in small batches until well browned. Cook with meaty side down for 5 minutes. Turn each rib on each side and down for about 1 minute. If the ribs won’t stand on their own, then lean them against each other. Repeat browning with remaining sides. Put cooked ribs on a plate and continue cooking the remaining batches of ribs.
  4. While the ribs are cooking cut the onions in half, peel and slice them thin from pole to pole.
  5. Tip the pan and discard all but 1 tablespoon of fat. Add 1-1/2 tablespoons butter and reduce heat to medium. After the butter has melted, saute the onions until well browned for between 25 to 30 minutes, stirring every 5 minutes. Add tomato paste, stir to coat the onions, and cook for 5 minutes. They will be ready when the paste begins to brown.
  6. Add beer, and use it to deglaze the pan using a wooden spoon. Bring to a simmer, and cook for 5 minutes until foaming subsides.
  7. Remove from heat and add bay leaves, 1 teaspoon thyme, and soy sauce. Place the browned short ribs back into the dutch oven; meat-side down, which will ensure they remain submerged.
  8. Place in oven Cook the meat for 2 hour to 2-1/2 hours until the meat it is very tender.
  9. Let cool for 30 minutes, then use tongs to put ribs into a clean baking dish. Strain liquid into bowl. Press to remove any extra liquids. Cover and refrigerate for 1 day.
  10. When finally ready to serve, use a spoon to skim off the hard fat from the liquid. Put ribs meat-side down, add liquid. If you have less than 1 cup of liquid, then supplement with beef stock. Re-heat on stovetop over medium heat for 20 minutes. Place ribs on a serving platter. Tent with aluminum foil while finishing sauce. Whisk in 1 tablespoon of Dijon, 1 teaspoon thyme. Taste sauce and adjust with salt and pepper.
  11. Pour 1 cup sauce over ribs. Sprinkle with parsley and serve, passing remaining sauce separately.

Sweet Avocado Pop Tarts With Lime Glaze

November 23, 2011

I absolutely love fresh avocados; so I added these to my “to do” list a few months ago when the recipe made the rounds on TasteSpotting and FoodGawker. When I read the recipe in detail they seemed overly sweet, so I cut back on the sugar. Unfortunately, they were still too sweet for my taste. While my kids loved the sweetness, they didn’t care for the avocado. I’d give them 3-stars, because the lime was over-powering and didn’t let me enjoy the avocado. The lime glaze was heavenly; only the lime mixed into the filling needs to be scaled back.

Overly sweet; not just an adult version of a Pop Tart.

The boys loved the idea of making home-made Pop Tarts, but next time I’ll have to stick to a more kid-friendly fruit; cherry, strawberry, orange.

Rating: 3 stars.
Cost: $5 for 4 large pastries.
How much work? Low/Medium.
How big of a mess?  Low/Medium.
Start time 11:00 AM. Lunch: 1:20 PM.

The original recipe that I got from another blog is here. My descriptions of how I prepare it today are given below:

Pastry Dough:
2-cups all-purpose flour
2 sticks unsalted butter, chilled
3 tablespoons granulated sugar
1/4-cup cold water
1/2 teaspoons salt

Avocado Filling:
2 Hass avocados
3 tablespoons lime juice, fresh
2 tablespoons granulated sugar

Lime Glaze:
1-cups confectioners’ sugar
2 tablespoons lime juice

  1. Cut 2 sticks of butter into 1/2″ cubes, then chill in freezer for 15 minutes. Add 2 cups flour, 3 tablespoons granulated sugar, and 1/2 teaspoons salt in the bowl of a food processor fitted with a steel blade. Pulse a few times to combine. Add the cubed butter and pulse for 10 one-second pulses until the mixture resembles a coarse meal with bits of butter sprinkled throughout. With the processor running, add the cold water and processing until dough forms.
  2. Remove to a floured surface and knead for 10 seconds and form a smooth, uniform ball. Separate into two evenly sized balls, wrap with plastic wrap and refrigerate for at least one hour or up to overnight.
  3. Preheat the oven to 350° and remove your chilled dough balls to a well-floured work surface. Roll each piece of dough out into an 8″ x 12″ rectangle; about 1/4″ thick. Cut out 16 rectangles measuring 3″ x 4″ each. You may need to assemble your scraps and re-roll your dough a few times to get even pieces. If the dough becomes too hard to work with stick your cut pieces of dough back in the refrigerator for 30 minutes to be sure that they’re chilled through once you assemble and bake the tarts.
  4. Lay your pieces onto parchment-lined baking sheets, cover with plastic wrap and set aside at room temperature.
  5. Peel, pit and chop your avocados into a small dice and place in large bowl. Add the lime juice and sugar, and mash into a chunky consistency.
  6. Spoon the avocado mixture onto 4 pieces of cut pastry. Use your fingers to pre-form the second rectangle of pastry so that it is slightly cupped. Carefully place on top of each mound of avocado and use a fork to press the top and bottom of each pastry together down all four sides. Using fork; gently pierce the top of each pastry several times to allow steam to vent. Bake for 28-32 minutes or until the edges are just turning a lightly, golden brown. Remove the baked tarts to cool for 10 minutes.
  7. Meanwhile, prepare your glaze by whisking the confectioners’ sugar and lime juice together in a small bowl.
  8. Finish by glazing the top of each with the lime glaze.

Mashed Potatoes with Scallions and Sour Cream

November 21, 2011

Insomnia had me watching some late night cooking show last week; they took regular mashed potatoes and spiced them up. Later I couldn’t find the recipe online, so I made this similar recipe from Rachel Ray. Unfortunately her recipe wasn’t very refined, as the seasonings tasted as though they still needed to be tweaked. Also, the texture of the potatoes was gritty with sour cream as the only dairy. They were okay, 3 stars, but still there is plenty of room for improvement.

Shown here with a delicious steak

As Chris Kimball always recommends, I boiled the potatoes with their skins on. This prevents them from becoming water logged and allows them to absorb more sour cream. To peel, I hold the hot potatoes using a fork then remove the skins with a paring knife. It’s a good idea to hold your potato over the strainer in which you drained your potatoes, because the tender potatoes are likely to fall. I had two fall apart right into my bacteria-filled kitchen sink. Better if it were to falls back into the strainer.

Also, I would like to try Chris Kimball’s recipe for Mashed Potatoes with Scallions and Horseradish, but I didn’t have any fresh horseradish, and the post-snow-storm blackout spoiled my prepared horseradish too. I’d like to try preparing my own horseradish someday soon.

Issues:

  1. Too gritty. They could use some butter, or more sour cream (or something) to improve the texture.
  2. The spices were not right; they need to be tweaked.

Rating: 3 stars.
Cost: $1.60.
How much work? Low.
How big of a mess?  Low.
Start time 5:00 PM. Dinnertime: 6:00 PM.

The original recipe from Rachel Ray is here. My descriptions of how I prepare it today are given below:

3 pounds Russet or Idaho potatoes
1-1/2 cups sour cream
6 scallions
Salt and ground black pepper

  1. Add potatoes with their skin on to an empty pot and fill with water to cover by 1″. Over medium-high heat to a boil, then reduce to medium and boil your potatoes for 20 minutes. They will be done when a paring knife inserted into the potato meets little resistance. Meanwhile finely chop both the white and green parts of your 6 scallions.
  2. Drain the potatoes into a colander.
  3. Quick Tip: If you need to hold your mashed potatoes while finishing the rest of your dinner, re-fill your pot with hot tap water and bring to a simmer. Once you’ve completed your mashed potatoes, cover your serving bowl tightly with a clean, damp kitchen towel, plastic wrap and a lid from your pot. Place snugly over pot of simmering water. They will hold for up to 2 hours, but for more than 1 hour add an extra 1/4 cup of milk, half-and-half or cream.
  4.  Peel your hot potatoes by holding them with a fork. With the other hand, use a paring knife peel away the skins. Use a ricer of food mill and process your potatoes directly into a serving bowl.
  5.  Add sour cream, chopped scallions, and salt and pepper. Stir to combine, and adjust salt and pepper to taste.
  6. Serve immediately or hold according to Quick tip mentioned in step 3.

American-Style Sandwich Bread

November 19, 2011

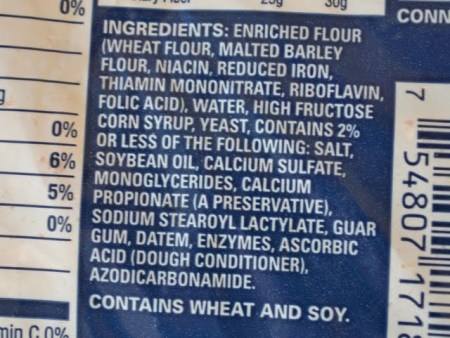
As you may remember, my goal for this school year was to make my two sons’ sandwich bread for their school lunches. While I’ve missed a few weeks, I have generally settled into my happy new routine of baking their sandwich bread every Sunday. The wonderful aroma of baking bread seems to make everyone in the house happier. In terms of my actual effort, it’s only 20 to 30 minutes of hands-on work, but clock time is between 2-1/2 to 3-1/2 hours. The boys love the bread, and I am satisfied to know that it’s low in sugar and Calcium-Propionate-free.

Best sandwich loaf made weekly for my kids lunches.

Because I need the bread to stay fresh for a full week of lunches, I added a few natural “dough conditioners”. I add a tablespoon of granulated lecithin which makes for a moister loaf.  Chris Kimball’s original loaf  would dry out after a few days. I include 1/4 teaspoon of ascorbic acid (Vitamin C ) to slightly change the pH to inhibit mold growth. When I made the loaf without this it grew mold in as little as 3 days. Finally 1/8 teaspoon powdered ginger helps the yeast rise, resulting in a lighter, fluffier loaf.  My final warning requires will-power: resist the urge to slice the bread until it has cooled for 3 full hours. Slicing warm bread will allow moisture to escape from the loaf. In the best case you’re left with dry loaf, but if you then put it in a plastic bag the escaping moisture will encouraged molding after only 3 days. Never put warm bread into a plastic bag.

Recent Changes:

  1. Compared to prior versions, I have divert 3-1/2 ounces of flour and water to make a sponge the night before. The pre-ferment adds nice complexities to the flavor, and also inhibits mold by increasing acidity levels. In fact, once I perfect the yeast-to-flour ratio to ensure that the sponge always reaches full maturation, I could eliminate the ascorbic acid from the recipe.  For those occasional weeks that I don’t adequately plan ahead, I simply add the sponge ingredients together with the other dry and wet ingredients as I make the dough.
  2. I am now using 3 tablespoons of olive oil in lieu of vegetable oil or butter. I switched away from butter to eliminate saturated fats, then switch to olive oil because it’s mono-unsaturated fat is healthier than the poly-unsaturated fat found in other vegetable oil. (more info on health effects of fat)
  3. My new loaf pan has a standard pullman sandwich bread shape. It yields a 15″ loaf, which makes 25 thick slices. That’s more than enough to satisfy the weekly allotment of 10 sandwich.

Rating: 4-stars.
Cost: $.90 for 29-ounce loaf.
How much work? Low.
How big of a mess?  Low/Medium.
Start time 4:00 PM. Finish time 7:30 PM. (But don’t slice for another 3 hours)

Chris Kimball’s original recipe is here. The descriptions of how I prepared and baked the bread today are given below:

Sponge:
3-1/2 oz warm water
1/8 teaspoon rapid-rise yeast or dry active yeast
3-1/2 oz flour

Wet Ingredients:
1 cup plus 1 tablespoon milk (9 ounces)
3 tablespoons olive oil
1-1/2 tablespoons sugar
1 tablespoon rapid-rise yeast or dry active yeast
1 tablespoon granulated lecithin

Dry Ingredients:
3 cups bread flour (15 ounces)
2 teaspoons table salt
1/4 teaspoon fruit fresh or other powdered Vitamin C
1/8 teaspoon powdered ginger

  1. About 12 to 24 hours before making the loaf, prepare the sponge by heating water in microwave for 15 seconds to 105-degrees. Whisk in yeast and let it hydrate for 5 minutes. Finally, whisk in flour, cover with plastic wrap and let sit in a warm spot in your kitchen for up to 24 hours.
  2. Adjust an oven rack to low-middle position. Pre-heat the oven to 200-degrees, then turn it off. You will use the residual heat of the oven to speed the first rise.
  3. Add 9 ounces of milk to a Pyrex measuring cup (at least 2 cup capacity). Heat in microwave for 40 seconds until mixture reaches 105-degrees. Mix in olive oil, sugar, yeast and granulated lecithin; allow to hydrate for 5 minutes.
  4. Add sponge and dry ingredients (15-oz bread flour, 2 teaspoons salt, ascorbic acid and powdered ginger) to the bowl of standing mixer fitted with dough hook.
  5. Turn on standing mixer to lowest speed and slowly add liquid; use a rubber spatula to scrape out measuring cup. After the dough has come together, increase speed to 4 on KitchenAid mixer (medium-low on other models). Continue mixing for 10 minutes, stopping twice to remove the dough from hook. The dough will become smooth, add a little more flour or water if necessary. Lightly flour a work surface and gently turn out the dough. Knead by hand for about 15 seconds to form a smooth ball.
  6. Lightly oil a large glass bowl with non-stick cooking spray, add dough and roll around to lightly coat the dough ball. Cover bowl with plastic wrap and place in your warm (but turned off) oven. The dough should take about 45 minutes to double in size.
  7. Spray your loaf pan with non-stick cooking spray. Gently turn the dough out onto floured surface. Gently press the dough into a rectangle that corresponds exactly to the length of your loaf pan. Lightly spray the dough rectangle with a water bottle before rolling to try to prevent large air bubbles (or brush water on using a pastry brush). Roll the dough into a tight cylinder so that it corresponds to the length of your loaf pan, firmly pressing down as you roll to ensure that the dough sticks to itself and that there are no large air bubbles. Pinch the seam closed along the length of the cylinder, and put into your loaf pan seem-side down. Softly press the dough so that it touches all four sides of the pan.
  8. Loosely cover the pan with plastic wrap, realizing that the loaf will grow above the top of the pan. Place it in a warm spot in your kitchen for between 1 to 2 hours. Depending upon pan size, wait until the dough grows to fill your loaf pan.
  9. About 20 minutes prior to baking, begin pre-heating your oven to 400-degrees. Adjust an oven rack to middle position; any lower and your bottom crust will be too hard.
  10. Carefully remove plastic wrap, spray the loaf three times with water from a spray bottle, and place loaf pan in oven. After 5 minutes, reduce oven temperature to 325-degrees and turn loaf 180-degrees. Bake uncovered for 8 additional minutes. Tent with aluminum foil to keep the loaf top very soft; baking for another 12 to 14 minutes until an instant-read thermometer inserted into the center of the loaf reads 195 degrees. Carefully remove bread from pan, and let cool on a wire rack for 3 hour before slicing.

Ingredient list from typical loaf of bread


Julia Child’s Boeuf Bourguignon

November 16, 2011

After my French dinner party was cancelled by the snow storm a few weeks ago, then spending 6 days without power, and weeks of heavy labor cleaning in the storm’s aftermath, I decided to relax this past weekend. I took the opportunity to make the recipe that I’ve most wanted to make over the past two years: Julia Child’s Boeuf Bourguignon. No ingredient substitutions, nothing frozen, cooked exactly according to Julia Child’s instructions in “Mastering the Art of French Cooking”. The results were a spectacular 5-stars.

My greatest meal in 2011

This recipe required more work; both in terms of cooking and cleanup; than any other recipe I’ve made. I washed some pans three times during the 6 hour cooking process, and as I brought the meal to the table, I found myself out of breath from all the last minute running around. Exhausting, but the spectacular results were worth the effort. Julia Child had truly created a culinary masterpiece; better than Chris Kimball’s, and better I was able to buy in Paris. Très magnifique.

Comments:

  1. While my goal was to make this without a single substitution, I couldn’t fund chunk bacon, so I used salt pork. By the time I blanched the bacon it probably wouldn’t have tasted any different. Plus if I used thick sliced bacon, then I wouldn’t have had the rind.
  2. The last 30 minutes were crazy as I brought all the parts together, and in the chaos I forgot to garnish with chopped parsley; my only mistake.
  3. I used my 7-quart dutch oven, because I don’t have a casserole pan.
  4. Be sure to choose and begin your side dish of boiled potatoes, mashed potatoes, buttered egg noodles or rice; start boiling the water as you begin to braise the boiler onions.

Rating: 5-stars.
Cost: $30.
How much work? High Effort.
How big of a mess? Huge Mess.
Started: 12:00 pm  Ready:  6:00 pm.

You can see a version of Julia Child’s original recipe here.  The descriptions of how I cooked it today are given below. I separated the recipe into sections so that I wouldn’t have to scroll so much while preparing the recipe.

Making the Stew:
6-oz piece of chunk bacon
1 tablespoons olive oil
3 pounds lean stewing beef, cut into 2-inch cubes
1 carrot, sliced into 1/2″ wheels.
1 onion, sliced against the grain.
Salt and pepper
2 tablespoons flour
1 bottle red wine, young and full-bodied (like Beaujolais, Cotes du Rhone or Burgundy)
2 to 3 cups brown beef stock
1 tablespoon tomato paste
2 cloves mashed garlic
1/2 teaspoon thyme
A crumbled bay leaf

  1. Cut the bacon rind away from the meat, then cut the bacon meat into lardons (sticks 1/4″ thick and 1-1/2″ long).
  2. Blanch the bacon by bring 1-1/2 quarts water to a boil. Reduce the heat and simmer the bacon rind and lardons for 10 minutes. Remove with a slotted spoon, set bacon rind aside separately, discard the blanching liquid, then dry lardons with paper towels.
  3. Sauté lardons in 1 tablespoon of the olive oil in a flameproof casserole over moderate heat for 2 to 3 minutes until lightly browned. Remove to a side dish with a slotted spoon.
  4. Preheat oven to 450-degrees.
  5. Cut beef into 2″ cubes then pat dry using paper towels; they will not brown if damp. Heat leftover bacon fat in casserole until almost smoking. Add up to four beef cubes at a time. Sauté until nicely browned on all six sides, then remove and let rest with the lardons. It will take 4 to 5 batches, between 8 to 10 minutes per batch.
  6. In the same fat, saute the sliced onions and carrots until slightly browned for about 5 minutes. Pour out any excess fat; of which I had none.
  7. Return the beef and bacon to the casserole and toss with 1/2 teaspoon salt and 1/4 teaspoon pepper.
  8. Evenly sprinkle 2 tablespoons of flour and toss again to coat the beef lightly. Set casserole uncovered in middle position of preheated oven for 4 minutes.
  9. Toss the meat again and return to oven for 4 minutes (this will brown the flour and give the meat a light crust).
  10. Remove casserole from oven and reduce temperature to 325-degrees.
  11. Stir in the bottle of red wine, and 2 to 3 cups beef stock; enough to barely submerge the meat.
  12. Add the 1 tablespoon tomato paste, 2 mashed garlic cloves, 1/2 teaspoon thyme, 1 crumbled bay leaf, and the bacon rind. Bring to a simmer on top of the stove.
  13. Cover casserole and set in lower third of oven. Regulate heat so that liquid simmers very slowly for 3 hours. The meat is done when a fork pierces it easily.

Brown Braising the Onions:
18 to 24 small, white, boiler onions
3-1/2 tablespoons butter
1-1/2 tablespoons of olive oil
1/2 cup beef stock
Herb bouquet (4 parsley sprigs, one-half bay leaf, one-quarter teaspoon thyme, tied in cheesecloth)
1 pound mushrooms, fresh and quartered

  1. About an hour before the meat is done, begin preparing the onions and mushrooms. Assemble you herb bouquet, by adding 4 parsley sprigs, 1/2 bay leaf, 1/4 teaspoon thyme in a small square of cheesecloth and tying with kitchen twine.
  2. Also, begin to heat your water for the accompaniment: potatoes, egg noodles or rice.
  3. Heat 1-1/2 tablespoons butter with 1-1/2 tablespoons of olive oil until bubbling in a skillet.
  4. Add boiler onions and sauté over moderate heat for about 10 minutes, rolling them so they will brown as evenly as possible. Be careful not to break their skins. They will not brown uniformly.
  5. Add 1/2-cup of beef stock, the herb bouquet, and salt and pepper to taste.
  6. Cover and simmer slowly for 40 to 50 minutes; swirling occasionally; until the onions are very tender but still hold their shape, and the liquid has evaporated. Discard the herb bouquet and set cooked onions aside.
  7. Wipe out skillet and heat 2 tablespoons of butter and 1 tablespoon olive oil over high heat. Once the bubbling begins to subside add the quartered mushrooms. Toss and swirl pan for 4 to 5 minutes. Remove from heat once they have begun to brown lightly.

Final assembly:

  1. After 3 to 4 hours in the oven you beef should be very tender. Pour the contents of the casserole into a sieve set over a saucepan. Wipe out the casserole and return the beef and lardons to it, then distribute the cooked onions and mushrooms on top. Discard the spent carrots and whatever else is left in your sieve.
  2. Use a wide, shallow spoon to skim fat off sauce in saucepan. Simmer sauce for 1 to 2 minutes, again skimming off additional fat as it rises. You should have about 2-1/2 cups of sauce; about the consistency of heavy cream. If too thin, boil it down rapidly. If too thick, mix in a few tablespoons stock. Taste carefully for seasoning and adjust salt and pepper according to taste.
  3. Pour sauce over meat and vegetables. Cover and simmer 2 to 3 minutes, basting the meat and vegetables with the sauce several times.
  4. Serve directly in casserole, or arrange stew on a platter surrounded with boiled or mashed potatoes, buttered noodles or rice. You can also decorate with parsley.

French Onion Soup Graitinee

November 14, 2011

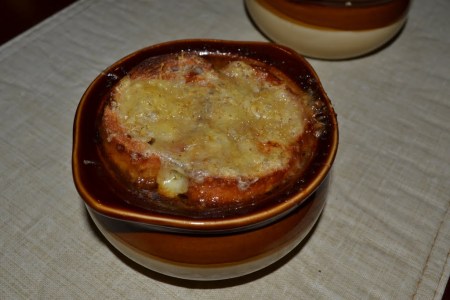
My emergency trip to France earlier this year gave me a chance to eat some great onion soup. While Chris Kimball has four recipes, it took me 6 months before I bought a set of broiler-safe crocs.  But finally I am able to give his recipes a try, and my first is this Best French Onion Soup. The onions are baked in the oven for 2-1/2 hours before spending another 1-1/2 hours on the stovetop. Unfortunately, the results were disappointing because the onion had become too dark in the oven; not allowing me to triple deglaze the pot on the stovetop. The end result tasted slightly burned. However other bloggers (here and here ) loved this recipe, and I see that my onions were darker than theirs in every stage of cooking. It must be my convection oven, which typically bakes “cooler” than Chris Kimball’s.  On the positive side, the Gruyere was amazing, and the long cooking time allowed the onions to deeply caramelize, so much so that I cannot imagine using any sweeter types of onion. I am disappointed that I can only give it 2-1/2 stars.

Burned onions and soggy bread.

Issues/Comments:

  1. 4 hours is too much cooking time. The onions became too dark and I was not able to triple deglaze the pot on the stovetop; which was supposed to be the “secret” to this recipe. Next time I’ve reduce the over temperature to 375-degrees and pay closer attention during the baking time. If I still have to cut down the cooking time, I want to be sure that I reduce the time in the oven rather than the triple deglazing on the stovetop.
  2. $18 for soup seems impossibly expensive; but $10 of that was the French Gruyere Comt, rather than the equally expensive, but proper Swiss Gruyere. To save money I may mix $2 worth of Jarlsberg with some fresh Parmesan.
  3. The final soup had to many onion slices, which  I realize is an odd complaint for onion soup. I wanted all the onion flavor but wished some of the slices had disintegrated.
  4. This other blogger had a brilliant idea for those without broiler-safe crocs. Broil the cheese and bread slices on a baking sheet, then slip
  5. 10 minutes in the oven to dry out the baguette slices didn’t do much to slow down them from quickly becoming mushy.

Rating: 2-1/2-stars.
Cost: $18.
How much work? Medium.
How big of a mess? Medium.
Started: 1:00 pm  Ready:  6:00 pm.

Chris Kimball’s original recipe is here.  The descriptions of how I cooked it today are given below.

3 tablespoons unsalted butter
4-lbs yellow onions
Table salt
2 cups water
1/2 cup dry sherry
4 cups chicken broth
2 cups beef broth
6 sprigs fresh thyme, tied together using kitchen twine
1 bay leaf
Ground black pepper

Cheese Croutons:
1 small baguette , cut into 1/2-inch slices
8 ounces shredded Gruyère cheese

  1. Cut your onions in half from pole to pole, and slice off the root end of onion. Peel and discard the the skin. Placing each onion half with the flat side down on cutting board, slice each onion half from pole to pole into 1/4″-thick slices. By cutting from pole to pole, the onions should maintain their shape during the 2-1/2 hours in the oven.
  2. Set an oven rack to the lower middle position in your oven. Preheat to 400 degrees.
  3. Spray the inside of a 7-quart dutch oven with non-stick cooking spray. Place 3 tablespoons of butter, and onion slices into your dutch oven. Sprinkle with 1 teaspoon salt.
  4. Fully cover and cook for 1 hour. Then remove from oven and stir and scrape the bottom and sides. Return to oven with the lid slightly ajar and cook for another 1-1/2 hours; stir and scrape the onions after 45 minutes. The onions should be very soft and golden brown.
  5. Remove the onions from the oven and put on stovetop over medium to medium-high heat. Be very careful to use oven mitts when handling the pot or lid.
  6. Cook the onions for 15 to 20 minutes until all the liquid has evaporated and the onions have browned; stir and scrape the bottom and sides frequently. Adjust the heat if your onions are browning too quickly.
  7. Continue to cook for another 6 to 8 minutes until the pot’s bottom becomes coated with dark, but not burned, crust. Again, you may need to adjusting the heat.
  8. To loosen the fond, stir in 1/4-cup water and scrape the bottom and sides. Continue to cook for another 6 to 8 minutes until the pot’s bottom again becomes coated with dark, but not burned, crust. Repeat this process of deglazing until the onions become very dark brown; 2 or 3 more times.
  9. Stir in 1/2-cup dry sherry scraping up any last bits of fond from on the bottom and sides of your pot. Cook for 5 minutes until the sherry has evaporated; stirring frequently.
  10. Now add both chicken and beef broth, 2-cups of water, thyme bundle, bay leaf, and 1/2-teaspoon table salt. Bring to a simmer over high heat, then cover and reduce to low heat and simmer for 30 minutes.
  11. Meanwhile, slice baguette into 1/2″-thick slices and place on foil-lined baking sheet. Bake slices for about 10 to 12 minutes in a 400-degree oven until the bread becomes crispy and golden along the edges.
  12. Remove and discard herbs, then season with pepper (and adjust salt if necessary).
  13. Adjust an oven rack so that it is 6″ from the broiler element. Preheat broiler on high for 5 to 10 minutes.
  14. Fill each broiler-safe crocks with soup and place on your foil-lined baking sheet.  Place 1 or 2 baguette slices with the crispy side down, being careful not to overlap your slices. Sprinkle with shredded Gruyère and broil for 3 to 5 minutes until the cheese has melted and is bubbling around edges. Allow to cool for 5 minutes before serving.

Delicious onion soup from my trip to France earlier this year.


Storm Cleanup Continues

November 13, 2011

After weeks of hard work, most of the tree branch has been removed and hauled to the front of my house. The city hasn’t yet hauled them away, and all my neighbors are adding their seasonal leaves. My street is nearly impassible. So I decided to take a mini-break to give the city a chance to catch up, or at least that’s the reason I’m telling myself why I’m not working this weekend. Instead I will spend this weekend cooking. After all, Man cannot live on fried chicken alone. So, stay tuned for a few highly anticipated recipes over the first part of this week.

By the way, I’ve resigned myself that there no chance that I’ll reach my goal of 100 recipes for 2011. My break in January, trips to France and Florida, and the double whammy of Hurricane Irene and the freak October snowstorm have put me irrecoverably off the pace.

Click on the pictures to zoom. The website is displaying the gallery with tiny images.