Happy New Year 2014

December 31, 2013

As the year winds down to its very last day, I wanted to wish everyone a Happy New Year.  While 2013 was a delicious year, I am hopeful that 2014 will be an even better year. One of my favorite end-of-year activities is to go back and revisit my favorite meals from past year.  So here are my top 10 favorite new recipes from the total of 44 recipes last year.

Happy New Year

Happy New Year

Here are my top 10 recipes from 2013.

  1. Blackened Red Snapper
  2. Garlicky Roasted Shrimp with Cilantro and Lime
  3. Rich Chocolate Tart
  4. Parmesan-Crusted Asparagus
  5. Salmon Cakes with Lemon-Herb Tartar Sauce
  6. Best Chicken Stew
  7. Cuban Shredded Beef (Vaca Frita)
  8. Pulled Pork Sandwiches
  9. Batter-Fried Chicken Nuggets with Homemade BBQ Dipping Sauce
  10. One Hour Grilled Baby Back Ribs with Lime Glaze

Here are past year’s best recipes. First, a review of favorite 2012 recipes, also review of top 2011 recipes, and finally review of my first year’s best recipes.


Best Chicken Stew

December 29, 2013

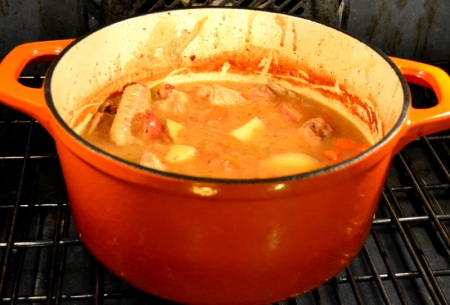
My favorite food at this time of year is stew, because of its depth of flavor, but also because it warms my kitchen and fills my home with wonderful aromas during the long cook time. I have always felt that Beef Stew has reigned supreme, as assumption recently confirmed by this disappointing Pork Stew that I made last month. So I was extremely surprised when today’s Chicken Stew turned out so rich and delicious. The collagen in the wings added great texture and richness, the bacon added depth and a meaty flavor. I recommend serve with rustic bread. Overall, a delicious, 4-1/2 stars, with perfect texture and meaty flavor.

Great stew from chicken thighs

Great stew from chicken thighs

Comments / Issues:

  1. The recipe says to cut each chicken thigh in half, but this leaves the chicken in chunks that are too big. So I had to eat my stew with a knife. I would recommend cutting into quarters, rather than halves in step 1.

Rating: 4-1/2 stars.
Cost: $9
How much work? Medium.
How big of a mess?  Medium.
Start time 4:00 PM. Ready at: 6:30 PM.

Chris Kimball’s original recipe is here. The descriptions of how I prepared the recipe today are given below:

2 pounds boneless, skinless chicken thighs
Kosher salt and pepper
3 slices bacon, chopped
1 pound chicken wings, halved at joint
1 onion, chopped fine
1 celery rib, minced
2 garlic cloves, minced
2 teaspoons anchovy paste
1 teaspoon minced fresh thyme
5 cups chicken broth
1 cup dry white wine, plus 2 tablespoons for seasoning
1 tablespoon soy sauce
3 tablespoons unsalted butter
1/3 cup all-purpose flour
1 pound small red potatoes
4 carrots
2 tablespoons chopped fresh parsley

  1. Set a rack to lower-middle of your oven and preheat to 325-degrees. Trim away any excess fat from chicken thighs, and cut in half crosswise. Lay thighs out onto a baking sheet and lightly sprinkle both sides with salt and pepper. Cover with plastic wrap and set thighs aside.
  2. Chop bacon into pieces and cook in large Dutch oven over medium-low burner for 6 to 8 minutes, stir occasionally. When the bacon has browned, use a slotted spoon to remove bacon to a medium bowl. While the bacon cooks, cut your wings at the joints, chop the onion fine and mince the celery.
  3. Increase burner to medium, add wings to your Dutch oven, and cook for 10 to 12 minutes flipping half way through cooking. After both sides are well-browned. move wings to bowl with browned bacon. While the wings brown, chop onion, celery, peel garlic cloves and mince thyme.
  4. Add onion, celery, garlic, anchovy paste, and thyme to fat in pot. Saute, still over medium burner, for 2 to 4 minutes until a dark fond forms.
  5. Increase burner to high, and use 1 cup broth, 1 cup wine, and 1 tablespoon soy sauce to deglaze the pan. Bring the liquid up to a boil, and continue to boil until the liquid evaporates; stirring occasionally for about 12 to 15 minutes.
  6. Add butter to the pot. After melting, spread flour evenly and stir until combined. Little by little, whisk in 4 cups chicken broth until it becomes smooth.
  7. Add wings, bacon, potatoes, carrots, and bring up to a simmer.
  8. Put in oven and bake, uncovered, for 30 minutes; stirring once after 15 minutes. Meanwhile, cut the unpeeled potatoes into quarters, and peel the carrots and cut into 1/2″ pieces.
  9. Remove Dutch oven from oven and place over high burner, and use a wooden spoon to moisten the brown ring around the top of the stew, and scrape browned ring to combine with stew.  Add thighs to pot, bring up to a simmer, and return to oven to continue to cook, uncovered, for 45 minutes more. Use a fork to ensure that the chicken offers no resistance and the vegetables tender. While the stew cooks, chop your 2 tablespoons of parsley.
  10. Fish out and discard chicken wings, and add 2 tablespoons wine. Adjust salt and pepper according to your taste, and sprinkle with parsley before serving.
Scrape down that ring of fond

Scrape down that ring of fond


Old-Fashioned Christmas Chocolate Fudge

December 23, 2013

I have tried to make fudge in the past, but have never been successful and always found it extremely fussy. Chris Kimball has devised an easy 15-minute fudge, which I’ve very successfully made a few times; see here and here. Simultaneously to Chris Kimball publishing his easy 15-minute fudge recipe in 2007, he also published this old-fashioned fudge recipe. My years of successfully following Chris Kimball’s recipe has given me renewed confidence in making traditional Christmas fudge; candy thermometer and all. Unfortunately, one small mis-read left me with burnt fingers and grainy fudge.

Delicious, but barely worked out

Delicious, but near catastrophe

Overall, fudge making is a slow process, and that slowness is supposed to ensure a smooth texture. I remember reading somewhere that Chris Kimball tested 1,000 pounds of chocolate to come up with this recipe, which he claimed to have perfected. First off, you need to be sure you have the right equipment: candy thermometer, pastry brush, wooden spoon, Dutch oven and a 13”x 9” baking dish (117 square-inches). I had a 14″x10″ baking dish (140 square-inches), so I used cardboard to reduce the volume by 20%. (see photo at bottom of post).

Most things in the recipe were clear, except for two crucial steps. In Step 7, I misread his instructions and didn’t realize that I was supposed to dunk the syrup-covered handle into the ice batch to cool. Instead, I burner my fingers and never got the syrup to form any kind of ball. Finally, I removed the pot from the stove-top when the temperature read 242-degrees, because that was already too hot. Secondly, step 9 and 10 were extremely unclear as to how long I should lift and stir fudge. After just 5 minutes (was expecting 8 to 12 minutes), my fudge had seized up and I had to re-heat it to get it to spread into my pan. The time period between glossy and solid was about 30 seconds. I’m assuming that the issue was because I over-heated the fudge because I misread step 7.

Overall, I can only give the results 2-stars, because of the dry, grainy texture.

UPDATE ON 12/24: By putting each piece of fudge in the microwave for ten seconds, the texture becomes soft and the Fudge jumps from 2-to-4-stars. Not good enough to give away to friends and neighbors, but good enough to eat myself.

Comments:

  1. This recipe makes 4 pounds of fudge. Fudge is one of those recipes that you cannot double.
  2. I found this website filled with helpful fudge-making hints.

Rating: 2-stars.
Cost: $10
How much work? Medium.
How big of a mess?  Medium.
Start time 2:00 PM. Ready at: 7:00 PM.

Chris Kimball’s original recipe is here. The descriptions of how I prepared the recipe today are given below:

6 tablespoons unsalted butter
12 ounces unsweetened chocolate (3 bars)
4-1/2 cups granulated sugar (31-1/2 ounces; 1/2 oz under 2 pounds)
1-1/2 cups light brown sugar (10-1/2 ounces)
1 teaspoon table salt
3 tablespoons chocolate syrup
2-1/4 cups whole milk
1 tablespoon vanilla extract

  1. Cut your butter into 1/2″ cubes. Roughly chopped  your chocolate and divide into two equal 6 ounce parts.  Place butter cubes and 6 ounces chocolate in freezer.
  2. To keep your utensils clean during the preparation, fill a large saucepan 3/4 full with water and heat on medium-low burner until bubbles just begin to form, then reduce burner to low to keep water warm. Put your candy thermometer, pastry brush, and wooden spoon in warm water. Prepare a medium bowl with ice and cold water, which you will also use to keep your utensils clean. Later, you will need to fill sink 1″ deep with room-temperature tap water, so make sure the sink is clean.
  3. Fold an 18” piece of aluminum foil and fold it lengthwise into an 8” by 18” strip. Lay foil into 13″x9″ baking dish. Pushing foil into corners and sides allowing the excess to hang over the pan ends. Next fold a 14” long piece of aluminum foil (If foil is more than 12″ wide fold it to fit pan) and put in pan perpendicular to first sheet of foil.
  4. Put a large Dutch oven over medium burner and heat sugars, salt, chocolate syrup, milk, and remaining unfrozen 6 ounces chocolate for 6 to 12 minutes, constantly stirring with wooden spoon, until the chocolate melts. Clean wooden spoon with hot running tap water to remove all sugar crystals, then set spoon in container filled with ice water with the handle-side down.
  5. Using pastry brush to wash down any sugar crystals that form on the sides of the pot, dipping brush back into hot water before wiping down another part of pot Continue washing down the sides of pot until no sugar crystals remain. Attach candy thermometer to side of pot and continue to cook until syrup boils; about 2 to 3 minutes.
  6. Boil sugar for 30 minutes until it reaches 236 degrees, then start to test for doneness. Avoid stirring the fudge once it has reach the boiling stage, unless you notice that a thick edge of syrup that is not boiling, briefly stir the syrup with a clean wooden spoon.
  7. To test for doneness, dip the wooden spoon’s handle (from ice bath) into syrup, sweep and twist a few times to coat the end of the handle times until enough chocolate adheres to the spoon handle. Dunk into ice bath and wait 5 to 10 seconds to cool down (twist the handle as necessary so that syrup doesn’t fall off), then gather the syrup with your fingers and attempt to roll up into a ball. The syrup will be done when it forms a soft ball that will flatten when lightly pressed between two fingers. Continue to cook until syrup forms a soft ball, checking every 2 degrees. (Total cooking time should be about 40 minutes). Meanwhile, make sure your kitchen sink has 1″ of room-temperature tap water.
  8. Remove Dutch oven from burner and immediately put into prepared sink. Sprinkle frozen butter cubes, chocolate and vanilla over the fudge. Cool in sink for 5 minutes, then move to counter and allow to cool, without stirring, for another 25 to 35 minutes until the fudge reaches 110 to 120 degrees.
  9. Use the wooden spoon to combine all the ingredients, then once or twice clean the perimeter of the pot. Lift a spoonful of mixture 1 foot above pot and allow to drip back into the pot, repeating the lifting process 5 times. Allow to rest for 1 minute.
  10. Repeat the lifting/resting process in step 9 for between 8 to 12 minutes until the fudge loses its shine and becomes difficult to stir.
  11. Quickly empty the fudge into the prepared pan and use a spatula to spread into an even layer. If the fudge sets too soon and crumbles when you try to spread it into the pan, reheat it over medium-low heat, stirring constantly, until some of the sugar melts and the fudge becomes more fluid.
  12. Cool fudge at room temperature for 4 hours until it becomes firm. Use the foil overhang to remove the fudge from the pan and cut into squares. Tightly wrapped in waxed paper or plastic, the fudge can be stored for up to 2 weeks in a cool cabinet or 3 months in the freezer.

Sweet and Tangy Oven-Barbecued Chicken

December 21, 2013

While looking for a quick midweek meal, this recipe seemed to tick all my boxes; kid-friendly, ready in under an hour, not too fussy, and most of the ingredients were already in my kitchen. Unfortunately the final results were extremely disappointing. The very light browning of the chicken in step 4 was far too little to build up any real flavor. Overall, the chicken was extremely one-dimensional, with an over-powering bbq sauce. To make matters worse, the sauce didn’t adhere to the skin, making the chicken seem slimy. As I was taking the internal temperature of the chicken, the tongs would remove all the sauce/crust leaving bare spots. At least the chicken was perfectly cooked; 165-degrees. Just 2-stars; Edible, but not much more to say than that.

Too slimy; just 2-stars

Too slimy; just 2-stars

Comments:

  1. The results were slimy. The sauce slid right off chicken as I picked it up using tongs to take the internal temperature.
  2. While I prepared the extra sauce for serving in step 8, the chicken was already so overpoweringly dominated by the bbq sauce that adding any more was completely out-of-the-question.
  3. I’d recommend using a splatter-screen when you brown the chicken, so saving a big mess on your stovetop. If you don’t have one, its not a big deal, but will mean a little more cleanup.

Rating: 2-stars.
Cost: $8.50
How much work? Medium.
How big of a mess?  Medium/High.
Start time 5:00 PM. Dinner time 5:45 PM.

Chris Kimball’s original recipe is here. The descriptions of how I prepared the recipe today are given below:

1 cup ketchup
2 tablespoons grated onion (from 1/2 small onion)
2 tablespoons Worcestershire sauce
2 tablespoons Dijon mustard
3 tablespoons molasses
2 tablespoons maple syrup
3 tablespoons cider vinegar
1 teaspoon chili powder
1/4 teaspoon cayenne pepper
4 boneless, skinless chicken breasts
Salt and ground black pepper
1 tablespoon vegetable oil

  1. Set an oven rack about 5 inches from the broiler element, and pre-heat (using bake) to 325-degrees.
  2. In a small bowl, add 1 cup ketchup, 2 tbsp grated onion, 2 tbsp Worcestershire sauce, 2 tbsp Dijon mustard, 3 tbsp molasses, 2 tbsp maple syrup, 2 tbsp cider vinegar, 1 teaspoon chili powder and 1/4 teaspoon cayenne pepper. Whisk together and set aside.
  3. Trim away any excess fat from chicken, pat dry using paper towels, and season both sides of chicken with salt and pepper.
  4. Put a 12″ oven-proof skillet (non-reactive) over high burner. Add 1 tablespoon vegetable oil and pre-heat until the oil begins to smoke. Brown the chicken, skin-side down, for 2 minutes until lightly golden. Use a splatter screen if you have one. Flip the chicken, using tongs, and brown the second side for another 2 minutes. Remove skillet from heat, and place chicken breasts on a clean plate and set aside.
  5. Discard any fat from the skillet, add sauce mixture (off heat) and use to deglaze the pan. Put skillet over medium burner and simmer sauce for 4 minutes. The sauce will thicken and a spatula run through the sauce will leave a clear trail.
  6. Again, remove the skillet from burner and add chicken back to pan, flipping with tongs to thickly coat the chicken with sauce. With the skin-side up, spoon a few extra spoons of sauce over each piece and bake at 325-degrees for 11 to 12 minutes. The internal temperature of the chicken should be 130-degrees.
  7. Set oven to broil and cook for another 6 to 12 minutes, until the internal temperature of the chicken should be 160-degrees.
  8. Remove the chicken to a serving platter. While the chicken rests for 5 minutes, whisk the sauce and put in a small bowl.

Vanilla Extract – Week 2

December 17, 2013

2 weeks ago I started a new batch of homemade vanilla extract. It’s starting to look a little better. Mostly as I have already surmised; more beans means more flavor. Oddly, there is one exception. My recipe #4, the double-strength extract, seems paler than recipe #3 (even similar to recipe #2). This seems so counter-intuitive that I will make a second jar of recipe #4, because that jar used exceptionally fat beans. When making my “control jar” I will use more average-sized beans (but still my super-sized 68-beans-per-pound).

After 2 weeks, it's looking a little cloudier

After 2 weeks, it’s looking a little cloudier

My Four Vanilla Extract Recipes for Round 2:

  1. 60% of the minimum FDA-strength: Based upon Chris Kimball’s 1993 recipe using super-size beans. I used 2 beans (1/2-ounce) and 8-oz of vodka. The cost is 25-cents per ounce of vanilla extract.
  2. 120% of the minimum FDA-strength: The recipe is slightly more potent than the minimum FDA-Strength. I used 1 ounce of beans and 8-oz of vodka, whereas the FDA requires only 0.83-oz beans per cup. The cost is 46-cents per ounce of vanilla extract.
  3. 166% of the minimum FDA-strength: I am hoping that this recipe gives me the big vanilla flavor that I am searching for. I used 6 beans weighing 1-3/8-ounces plus 7-1/3-oz vodka. The cost is 75-cents per ounce.
  4. 211% of the minimum FDA-strength: Gives me a full double-strength vanilla extract. The recipe used 7 beans weighing 1-3/4-oz plus 7-oz vodka. The cost is $1.03 per ounce.

Crispy-Skinned Chicken Breasts

December 13, 2013

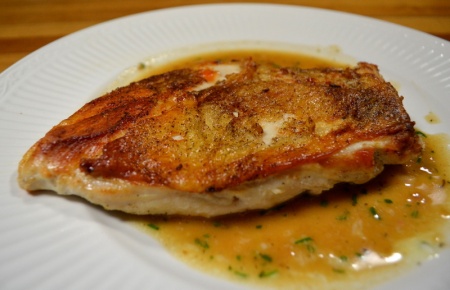
This is my first recipe from the January / February 2014 issue. Because I didn’t already have the pickled, hot cherry peppers called for in the base recipe, I instead made the Crispy-Skinned Chicken Breasts with Lemon-Rosemary Pan Sauce. Both recipes can be made on a weeknight with about 40 minutes of effort (plus an hour of waiting). If you don’t have the hour to wait, you can de-bone and salt the chicken in the morning before work. The secret of this recipe is to start the chicken in a cold-skillet with a Dutch oven weighing down the chicken to ensure firm contact with the skillet. The trick paid off and the nicely crisp and rendered skin was absolutely delicious. The sauce was good, but pretty standard, and I ended up with twice as much sauce as necessary. 4-stars, which based upon the level-of-effort is a great payoff. I would still like to try the Hot Cherry Pepper version, and maybe even the Maple–Sherry Vinegar variation.

Perfectly crisp skin.

Perfectly crisp skin.

The recipe requires you to de-bone the bone-in chicken, because boneless chicken isn’t generally sold with the skin on. I saved the bones and tenderloins in a gallon-sized freezer bag for making my periodic batch of homemade chicken stock.

Comments:

  1. While the recipe doesn’t remind you, I would definitely recommend using your splatter screen (if you have one). The skin renders a lot fat and the 10 minutes in Step 5 will make a big mess on your stove-top.
  2. I estimated the price at $5.50 based upon $1.50/lb bone-in chicken. But actually I got my chicken for free, because of a scanning error at the supermarket. In actuality, I paid less than $1 to make the recipe, because I also have free homemade chicken stock and my own rosemary bush.
  3. If you are defrosting frozen Chicken stock in Step 4, I would recommend 1m15s per cup in the microwave. But beware that many of the cartons you buy in the supermarket are not microwave compatible.

Rating: 4-stars.
Cost: $5.50 (serves only 2 people)
How much work? Low.
How big of a mess?  Medium.
Start time 5:00 PM. Dinner time 6:40 PM.

Chris Kimball’s original recipe is here. The descriptions of how I prepared the recipe today are given below:

Chicken Ingredients:
2 (10-to-12-oz) bone-in split chicken breasts
1 teaspoon kosher salt
1/2 teaspoon pepper
2 tablespoons vegetable oil

Pan Sauce Ingredients:
1 shallot
1 teaspoon all-purpose flour
3/4 cup chicken broth (5-1/2 ounces)
2 tablespoons lemon juice (from 1/2 lemon)
1 tablespoon unsalted butter
1 teaspoon minced fresh rosemary
1/8 teaspoon table salt
1/8 teaspoon ground black pepper

  1. Remove the chicken breasts from the bone but leave the skin intact. Put the chicken on a cutting board with the skin-side down. Start by running the tip of a boning knife, between the breastbone and the meat. As the meat pulls away from the bone, angle the blade to follow the rib cage and cut away from the ribs. You will still see that the meat is connected via the wishbone. Run your knife along both sides of the wishbone until it becomes free from the meat. Finally, the tenderloin needs to be removed (and saved for another use) and any excess fat should be trimmed away. Repeat with second breast.
  2. On the skin-side, evenly poke each breast with the tip of a paring knife 30 to 40 times. Flip over and poke the thicker end of each breast between 5 and 6 times. Working with one breast at a time, lay plastic wrap on-top of one breast, and use a meat pounder to pound to an even 1/2″ thickness. Sprinkle meaty side of each breast with 1/2 teaspoon kosher salt. Set breasts on a wire rack set over a rimmed baking sheet. Loosely cover with plastic wrap and refrigerate for at least 1 hour (but up to 8 hours).
  3. Use paper towels to pat your breasts dry, then sprinkle both sides of each breast with 1/4 teaspoon pepper per breast. Add 2 tablespoons vegetable oil to cold 12″ skillet, and swirl until evenly coated. Put breasts in the skillet with the skin-side down, and set a heavy skillet or Dutch oven on-top of the chicken to flatten the chicken while it cooks. Turn on the burner and set it to medium heat. Cook chicken for 8 minutes, using a splatter screen if you have one.
  4. Meanwhile, mince your shallot and rosemary. I had to defrosted my frozen chicken stock in microwave for 1m15s per cup.
  5. After 8 minutes remove the Dutch oven and continue to cook for another 6 to 8 minutes, until the skin is very crispy. Use a splatter screen if you have one. Use a metal spatula to flip the chicken, then reduce the burner to medium low. Cook until meat is cooked through, and the internal temperature reaches 165 degrees. Move to two individual serving plates while preparing the sauce.
  6. Pour off all but 2 teaspoons (not TABLEspoons) of oil from the plan. Turn up burner medium, and saute shallot for 2 minutes. Add 1 teaspoon all-purpose flour and cook, stirring constantly, for 30 seconds.  Turn up burner medium-high, and use 3/4 cup chicken broth and lemon juice to deglaze the pan. Once the sauce has reached a simmer cook for 2 to 3 minutes until thickened, adjusting burner to maintain an aggressive simmer. Add back and accumulated juices from the serving plates, cooking for 30 seconds.
  7. Remove the pan from the heat and add butter, minced rosemary, 1/8 teaspoon table salt and 1/8 teaspoon ground black pepper. To maintain the crispy skin, spoon the sauce around the chicken instead of on top of it. Serve.

Better Homemade Vanilla Extract

December 8, 2013

A few years ago, I made a quart of homemade vanilla extract, based upon 4 different recipes. I considered all 4 recipes a failure, and abandoned the project after a few months. I added a bunch more vanilla beans, and was able to salvage my investment and produce enough “acceptable” vanilla extract, which has lasted for a few years. The last of my homemade vanilla extract is now gone, and I am ready to revisit my efforts to make a better vanilla extract.

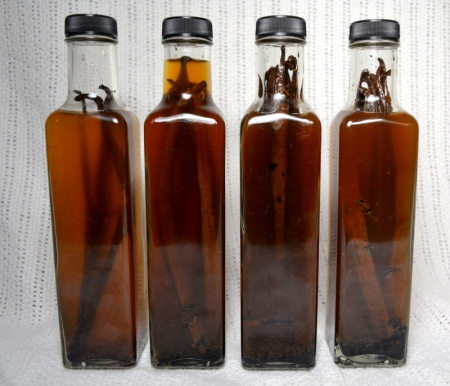
After just 4 days, only Chris Kimball's recipe looks weak.

After just 4 days, only Chris Kimball’s recipe looks weak.                  (Recipe 1 to 4 are in order left to right)

The lessons I learned from my first experiment are:

  1. MORE BEANS EQUALS MORE FLAVOR. Within a few short weeks it became clear that the only real determinant in the strength of the extract is the amount of beans used. More beans equals more flavor. While I had tried Chris Kimball’s 2009 method of heating the vodka prior to adding the vanilla beans, that technique had absolutely no affect on the final outcome. Because the extract process takes three to six months, any increase in temperature lasting only a few hours will obviously have no real effect.
  2. AVOID EXTRACT-GRADE BEANS. While the consensus on the internet is that “Extract-Grade” or “Grade B” beans are most suited to make vanilla extract (mostly for cost reasons), I was so disappointed with their quality that I will probably never buy extract-grade beans again. Last time my extract-grade beans (150 beans per pound) cost $16 per 1/2-lb. “Grade A” beans require approximately 100 beans to make one pound. Even better, the beans that I am using today are 68 beans per pound, which cost me $28 per 1/2-lb.  While costing 75% more, I definitely wanted to see if the higher-quality beans were worth the extra cost. So far, I am thrilled with them. Here is a link showing the description of the beans I bought.
  3. USE FRESH BEANS. While vanilla extract can last forever, the beans themselves seem to remain fresh for about a year. They tend to dry out, but there are still additional steps you can take to re-hyrdate them. Vanilla extract can be made from dry-ish beans, but it is a question of the quality of the final extract that most concerns me. My experience with old and tough beans was terrible, so I wanted to try making the extract from the current year’s crop (2013).

Just as last time, I am making four recipes to evaluate how to obtain the best vanilla extract. The recipes that I am making now are generally much stronger than my last attempt. You can see the summary of this second round here. The four recipes I am follow are here:

  1. Recipe 1: (60% of FDA):  I wanted to give Chris Kimball’s 1993 recipe another try, using my high-quality beans. These super-size beans mean that his recipe represents 60% of the minimum FDA-strength, whereas using two extract-grade beans represented just 25% of the FDA-minimum. Today, I used 2 beans (1/2-ounce) and 8-oz of vodka. Using my half-pound of beans, I could make a total of 1 gallon vanilla extract (or 32 four-ounce-bottles).  The cost is 25-cents per ounce, or $1 for a 4-oz bottle.
  2. Recipe 2: (120% of FDA) It’s the closest to regular FDA-Strength, and want to see if the higher quality beans make this recipe acceptable. I used 1 ounce of beans and 8-oz of vodka, whereas the FDA requires only 0.83-oz beans per cup. Using my half-pound of beans, I could make a total of 64-ounces of vanilla extract; sixteen 4-oz-bottles. The cost is 46-cents per ounce, or $1.86 for a 4-oz bottle.
  3. Recipe 3: (166% of FDA)  Of the four recipes, this is the one that I’m most hoping works out. I want big vanilla flavor, but still to keep the cost down. I used 6 beans weighing 1-3/8-ounces plus 7-1/3-oz vodka. Using my half-pound of beans, this recipe will yield a total of 48-ounces of vanilla extract; or twelve 4-oz-bottles. The cost is 75-cents per ounce, or $3 for a 4-oz bottle.
  4. Recipe 4: (211% of FDA). Because recipe 3 does not represent a full doubling of the FDA requirements, and I know that bakers especially love to use double-strength vanilla, I wanted to include this option as an upper end. The recipe used 7 beans weighing 1-3/4-oz plus 7-oz vodka. Using my half-pound of beans, I could make a total of 32-ounces of vanilla extract; or eight double-strength 4-oz-bottles. The cost is $1.03 per ounce, or $4.13 for a 4-oz bottle.

Additional comments and considerations:

  1. Chris Kimball’s 1993 and 2009 recipes have both been removed from his website. Good riddance! While I’m still including a version of the 1993 recipe in this experiment, it is only remotely feasible based upon these super-sized beans. Realistically I think recipe 2 or 3 will be the ultimate victor in this shoot out.
  2. McCormick’s won Chris Kimball’s 2009 taste test, and is the most important company with regards to vanilla production (not just commercial brands). They control about 40% of the world trade of vanilla. I will use McCormick’s in my taste tests as this experiment continues.
  3. There are two main varieties on beans used to produce vanilla extract: Bourbon and Tahitian. Most vanilla extract is made using Bourbon beans. The Bourbon refers to Reunion Island, located near Madagascar, which was mostly called Bourbon Islands between 1649 and 1848. Bourbon beans do not typically use bourbon (the alcohol) to extract the vanilla flavor.
  4. Many commercial extracts also add sugar, which takes away the natural bitter aftertaste. Buying/making it without sugar will allow the extract to keep indefinitely. Plus all recipes in which you use your extract also add sugar, so there’s absolutely no reason to incorporate sugar into your extract.
  5. Vanilla keeps for at least 10 years without any loss in potency or flavor; though McCormick’s puts an expiry date about 2 years out. If properly stored in cool, dark place, most say that it only improves with age, and any fine red wine.
  6. I recommend contacting your seller about bean size before placing your order. If a potential bean vendor won’t tell you how many beans per pound, then don’t buy it. “Extract Grade” (a.k.a. “Grade B”) vanilla beans should be 140 to 160 per pound. “Grade A” requires about 100 beans to equal one pound.
  7. The FDA defines Vanilla Extract to contain at least 35% alcohol. I used 80 proof (40%) Vodka because of its neutral flavor, but theoretically any alcohol can be used; rum, bourbon or brandy is sometimes used. There is no benefit to using expensive vodka; I used 1.75 liter bottle of Svenka that cost me $13. I have read using significantly higher proof will hinder, rather than help, the extraction process.
  8. The perfect bottles for gift are here. The amber helps protect the vanilla from light.
  9. Cost of McCormick’s is about $4 per ounce, but most others are $2 per ounce. Based upon these super-high-quality beans, my FDA-strength cost about 50-cents per ounce, and my double-strength cost just $1 per ounce.

Finally, after you’ve finished your with your extract, you’re beans still have more to give. You have a couple of choices:

  1. You don’t need to filter your vanilla after the 6-month extraction process. You can just leave the beans in your extract for years, and it will only improve the flavor. The only downside is that there will be seeds floating around and included in your recipes. That isn’t a bad thing, but visually it is more pleasant to see the pure, dark liquid without anything floating around.
  2. After my last batch, I added some new vodka to a mason jar containing the used beans, then let it steep for nearly three years. I ended up with an extra 12-ounces of 60%-strength vanilla extract, pictured below.
  3. Chris Kimball tried to dry and grind the spent pods, but he was unhappy with malty flavor that the vanilla powder gave. He recommends sticking to extract and “new” beans.
  4. Lastly, people make vanilla sugar out of their spend beans. After slowly drying the beans in a very low oven, simply bury them in granulated sugar for a month. Here is an article, and Cook’s Country has a related article here.
Made re-using beans after they had already been extracted.

Made re-using beans after they had already been extracted.


Honey Fried Chicken

December 3, 2013

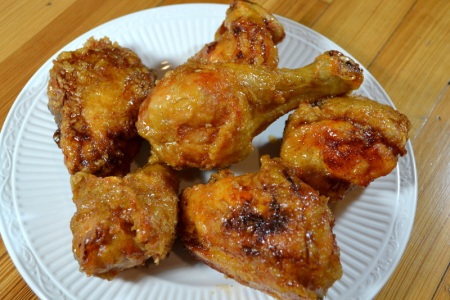
Every year Cook’s Country introduces a new fried chicken recipe, and each year Chris Kimball declares that new recipe to be the “best fried chicken recipe ever”. It seemed impossible to surpass this Spicy, Extra-Crunchy Fried Chicken from a few years ago. But Cook’s Country removed the milk, and the problem of brown-spots completely disappears. Later, I thought this Korean Fried Chicken was the pinnacle of fried chicken, which used pure corn starch (i.e. no flour). This year it was Honey Fried Chicken; “AAA, number one, best recipe of all-time for fried chicken”, Chris Kimball proclaimed. I was skeptical. This year’s chicken recipe includes all the past innovations; water instead of milk, corn starch instead of flour, liquid batter instead of dry coating. This year’s innovation: Twice frying the chicken, using a classic french fry technique.; to fully-crisp the exterior without overcooking the interior. 5-stars.

Delicious, Kid-friendly Fried Chicken

Delicious, Kid-friendly Fried Chicken

Actually, this recipe most closely resembles the Korean Fried Chicken, except that it is seasoned with sweet honey instead of sugar/soy sauce. Considering my audience; five teenaged boys; the sweetness made this a perfect meal.

Overall innovations:

  1. Use water instead of milk: The sugars in the milk solids browned too fast (not enough to adversely affect the flavor but it’s definitely visible; see photos here and here)
  2. Use corn starch instead of flour: This is a trick used by Chris Kimball to keep his shrimp tempura tender. The gluten-free results will be more tender than a coating made with flour.
  3. Use liquid batter instead of dry breading. This produces a more even coating, that is more prone to slicking on the chicken. A dry breading tends to lose a lot of breading during cooking.
  4. Twice frying the chicken, using a classic french fry technique: This allows the skin to fully-crisp, without overcooking the interior.

Comments/Issues:

  1. Because of the limitations of the number and size of my mixing bowls, I ended up using a small bowl to just the chicken in Step 3. But I had a hard time working with the steeper curves and am wondering if it would have been easier to use a pie plate.
  2. When cooking any fried chicken, you should try to use a splatter screen to make your stove-top cleanup a little easier.

Rating: 5-star.
Cost: $10 for 3 pounds.
How much work? Medium.
How big of a mess?  Huge
Start time 5:00 PM. Dinner time 6:40pm

Chris Kimball’s original recipe is here. The descriptions of how I prepared the recipe today are given below:

Brine Ingredients:
1/2 cup salt (4 ounces)
1/2 cup sugar (4 ounces)
2 quarts cold water (4 ounces)
3-lbs bone-in chicken pieces

Batter Ingredients:
1-1/2 cups cornstarch (6-3/4 ounces)
3/4 cup cold water
2 teaspoons pepper
1 teaspoon salt
3 quarts vegetable oil

Honey Glaze Ingredients:
3/4 cup honey
2 tablespoons hot sauce

  1. Cut your split breasts cut in half so that they are approximately the same size as your drumsticks and thighs, then trim away any excess skin or fat. In a large bowl filled with 2 quarts cold water, add 1/2-cup salt and 1/2-cup sugar. Stir until dissolved; add chicken, cover with plastic wrap, and allow to sit in refrigerate for between 30 minutes to 1 hour.
  2. In a medium bowl, add 1 cup cornstarch, water, pepper, and salt. Whisk until smooth and refrigerate while the chicken brines.
  3. Sift 1/2-cup of cornstarch into a third, medium-sized bowl or pie plate. After chicken is done brining, remove and pat dry using paper towels. Coat chicken one piece at a time with cornstarch, then shake to remove any excess, and set on a clean platter.
  4. Add 3 quarts vegetable oil to a Dutch oven, which should measure about 2″ deep. Put over medium-high burner and begin to pre-heat oil.
  5. After about 6 to 7 minutes as the oil approaches 350-degrees, whisk batter to recombine ingredients and put half the chicken into batter and turn until entirely coated. Remove the chicken allowing the excess batter to drip back into the bowl, then add to 350-degree oil. Adjust burner as required to maintain the temperature between 325-and-350-degrees. The first batch you will need to crank up the heat, but during later batches that probably won’t be necessary.
  6. Fry for 6 to 7 minutes, until the chicken begins to become crispy. Remove partially cooked chicken from oil and set on a clean plate lined with paper towels. Once the oil is again approaching 350-degrees, repeat steps 5 and 6 with remaining raw chicken. While the chicken cooks, line a rimmed backing sheet with Aluminum foil and put a wire rack ontop.
  7. Again, heat the oil back up to 350-degrees and re-fry the fist batch for 5 to 7 minutes until the chicken is fully cooked; breasts reach 160-degrees and thighs/drumsticks are 175-degrees. Remove chicken back to wire rack, and repeat the second fry with the second batch.
  8. While the second batch is in it’s final frying, add together honey and hot sauce to a large bowl, stir to combine, and microwave for 1-1/2 minutes. Working one piece at a time, dip chicken in honey and turn until coated, then return to wire rack with the skin-side up, and allow to briefly drain before serving.