I understand what Cook’s Illustrated tried to do; make a gourmet pizza. Everybody loves gourmet pizza. Because the sauce is only lightly simmered, the recipe yields deliciously bright sauce. The end result was a delicious pizza. However, there are so many flaws that nobody should bother making this pizza. This recipe a complete disaster. Still, the pizza is 4-star, but so is pizza cooked in your oven.
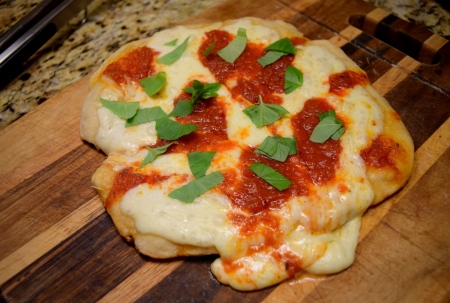
Tasty, but not worth the extra trouble
FLIMSY DOUGH: The high-water content of this recipe makes the dough difficult to work with. For my first crust I press the dough out into an 12″x16″ oval, as called for in the recipe. But it was impossibly flimsy to transfer to the grill; even with my son holding the dough a few inches from the grill.
INCONSISTENT GRILL MARKS: The first pizza dough had great grill marks. While the recipe says to replace the lid will you prep the next pizza crust, the grill did not sufficiently reheat. I think the recipe should say to wait 5 minutes
WASTE OF TIME: Because the recipe makes three small-ish pizzas, and the recipe requires me to make each of the three pizzas one at a time. I ended up spending more than an hour outside; flipping, rotating, transferring; it’s far too fussy.
NO GRILLED FLAVOR: The recipe uses a strictly charcoal grill, mostly without the lid. The pizza has no smokiness. Aside from the grill marks on the underside of your crust, there is nothing that would make me think that the pizza was made on a grill.
BIG MESS: Of course I expect to dirty a sauce pan, pizza peel, grater and cutting board. But this recipe makes a much bigger mess than expected; a strainer, bowl, food processor, 3 baking sheets. In some case needlessly so. I am not sure why drain the tomatoes before putting them in the food processor, but it dirtied a bowl and a strainer.
Comments:
- If you will use a gas grill, pre-heat by turning all burners to high, cover, and pre-heat for 15 minutes. Leave all burners on high during cooking, and maintain the cover down during the entire cooking process.
Rating: 4 star.
Cost: $11.
How much work? Medium.
How big of a mess? Medium/High.
Start time: 5:00PM. Dinner time: 6:00 PM.
Cook’s Illustrated original recipe is here. The recipe as I cooked it today is as follows:
Dough Ingredients:
3 cups King Arthur bread flour (16-1/2 ounces)
1 tablespoon sugar
1/4 teaspoon rapid-rise yeast
1-1/4 cups + 2 tablespoons ice water (11 ounces)
1 tablespoon vegetable oil, plus extra for counter
1-1/2 teaspoons table salt
- Add flour, sugar, and yeast to a food processor and process for 2 seconds to combine. With processor running, slowly add ice water; processing 10 seconds until the dough is just combined and there is no more dry flour. Allow to rest for 10 minutes.
- Add oil and salt to dough and process for 30 to 60 seconds. The dough will form a satiny, sticky ball that clears sides of bowl. Empty dough out onto a lightly oiled counter and knead for 1 minutes until smooth.
- Divide dough into 3 equal pieces (about 9-1/3 ounces each). Shape each piece into a tight ball, and set on a well-oiled baking sheet (or into well-oiled individual bowls). Lightly coat the tops with oil. Tightly cover with plastic wrap (being careful not to compress dough). Refrigerate for between 24 hours and 3 days.
- An hour before cooking the pizza, remove dough from refrigerator and allow to sit at room temperature.
Sauce Ingredients:
14-oz can whole peeled tomatoes
2 tablespoons extra-virgin olive oil
2 teaspoons minced fresh oregano
1/2 teaspoon sugar
1/2 teaspoon table salt
1/4 teaspoon red pepper flakes
- Drain the juice from your can of tomatoes directly into a medium bowl.
- Put the whole tomatoes in a food processor, pulsing 12 to 15 times until they become finely chopped. Add to the medium bowl with the reserved tomato juice, olive oil, oregano, sugar, salt, and pepper flakes. Adjust seasoning with extra sugar and salt according to your taste, cover with Plastic wrap, and refrigerate until ready to use.
Pizza Toppings:
1/2 cup plus 1 tablespoon extra-virgin olive oil, plus extra for drizzling
3 ounces Parmesan cheese, grated (1 ½ cups)
8 ounces fresh whole-milk mozzarella cheese, torn into bite-size pieces (2 cups)
3 tablespoons shredded fresh basil
Coarse sea salt
- If you are using a charcoal grill; open the bottom and top vents halfway. Ignite a chimney starter 3/4 full of charcoal briquettes (about 4-1/2 quarts). When the top-most coals are partially covered with grey ash, empty into a ring around the perimeter of grill; leave an 8″ clearing in center. Put cooking grate in place, cover grill, and allow grill until to pre-heat for 5 minutes.
- While the grill is pre-heating, Put the sauce into a small saucepan, bring up to a simmer over medium burner. Cover and keep warm.
- Clean and oil cooking grate. Pour 1/4 olive oil cup oil onto center of rimmed baking sheet. Put 1 piece of dough onto baking sheet and flip to coat both sides of dough with oil. Use your fingertips and palms to gently press and stretch the dough to form rough 16″x12″ oval that is evenly thick. Use both your hands, carefully lift dough and put on the center of the grill. (Cooks Illustrated says the the dough will droop slightly to form half-moon or snowshoe shape, but in my case the dough fell apart. If yours also falls apart make the next pizza dough smaller and thicker)
- Cook over clearing for 2 to 3 minutes until grill marks form (covered if using gas) . Use tongs and spatula to carefully peel dough from grate, and rotate dough 90-degrees. Continue cooking until second set of grill marks appears, 2 to 3 minutes longer. Flip dough and cook (covered if using gas) the second side of dough for 2 to 3 minutes until is lightly charred in some spots. Using tongs or pizza peel, move crust to cutting board, inverting so side that was grilled first is facing down. Repeat the cooking process with remaining 2 dough rounds, adding 1 tablespoon oil to sheet for each round. Keep grill cover closed and allow to pre-heat for 5 minutes between pizza crusts.
- Evenly drizzle the top of 1 crust with 1 tablespoon oil. Evenly sprinkle 1/3 of Parmesan over pizza. Arrange 1/3 of mozzarella pieces, evenly spaced on pizza. Dollop 1/3 of sauce in evenly spaced 1-tablespoon mounds over entire pizza. Using pizza peel (or an overturned rimmed baking sheet), put the pizza on the grill; cover, and cook for 3 to 5 minutes until bottom is well browned and mozzarella is melted. Check bottom and turn frequently to prevent burning. Remove pizza to cutting board, sprinkle with 1 tablespoon basil, drizzle lightly with extra oil, and season with salt to taste. Cut into wedges and serve. Repeat with remaining 2 crusts.


 Posted by My Year With Chris Kimball