Holiday Scalloped Potatoes

December 30, 2011

My youngest son loves mashed potatoes, so I have never rocked the holiday boat by making scalloped potatoes for him. But for Christmas dinner this year I made these holiday scalloped potatoes. At first Nico refused to eat them. But eventually after a bit of cajoling he tried them. After declaring that he loved them, he reminded me that I have made them before. His culinary memory is amazing, almost 2 years ago I made this similar mashed potato casserole. Overall, I’d give these scalloped potatoes 4-stars, a nice alternative to mashed potatoes (especially when there’s no gravy). The heavy creams gives them a richness perfect for a Christmas dinner.

Scalloped potatoes made rich with heavy cream

The original recipe, which is double what I’ve listed below, says it will feed 8 to 10 people. I cut the recipe in half, because I wasn’t feeding a crowd.

Rating: 4-stars.
Cost: $4.
How much work? Low.
How big of a mess?  Medium.
Start time 4:45 PM. Finish time 6:15 PM.

Chris Kimball’s original recipe is here. The descriptions of how I prepared the recipe today are given below:

1 tablespoons unsalted butter
1/2 small onion
1 clove garlic
1-1/2 cups heavy cream
1/2 cup whole milk
2 sprigs fresh thyme
1 bay leaf
1 teaspoons salt
1/4 teaspoon ground pepper
2 pounds russet potatoes
1/2 cup shredded cheddar cheese

  1. Peel 2 pounds of potatoes. For faster and more consistent slices, cut them into 1/8″ thick slices using a food processor. Mince your 1/2 onion.
  2. Adjust and oven rack to Pre-heat oven to 350 degrees.
  3. Melt butter in large Dutch oven for 1 minute over a medium-high burner, until the foaming begins to subside. Saute the minced onion for 4 minutes, until they soften and begin to brown. Press garlic clove directly into Dutch oven and saute for only 30 seconds. Add cream, milk, thyme sprigs, bay leaves, table salt, ground pepper, and sliced potatoes. Bring up to a simmer. Cover the Dutch oven and cook for between 20 and 30 minutes, until the potatoes are just tender. You may need to adjust the burner in order to keep the potatoes cooking at a light simmer.  You can test doneness by inserting a paring knife into the center of potato; it should meet just a little resistance.
  4. Find and remove sprigs of thyme and bay leaves. Put the potato mixture into a 3-qt gratin or Pyrex baking dish. Sprinkle with grated cheddar with cheese, and bake for 20 minutes. The cream will have thickened and the cheese will be bubbling and slightly browned. Allow to cool for 5 minutes prior to serving.

Apple Cider-Baked Christmas Ham

December 27, 2011

This wonderful Christmas dinner was a great exclamation point to a happy and relaxing and day with family. The ham came out good, but not great. Of course the real treasure was spending such a wonderful day with family, napping, and watching Christmas movies with the boys.

Delicious apple flavor; but don't use spiral sliced ham.

The recipe calls for a “bone-in, uncut, cured ham”. However, Cook’s Country also says that you can substitute a spiral-sliced ham, and the only required adjustment is to skip the trimming and cross-hatch in step 2. While the bark was still delicious, I would have to categorize this substitution as a mistake. The ham dried out and was tough. You will be much better served by following a recipe specifically tailored to a spiral sliced ham, such as this one.  It uses a warm-water-bath while still wrapped in plastic to warm the ham before baking, and also calls for a shorter bake at just 250-degrees, which is better suited to a delicate spiral-sliced ham.

Rating: 3-1/2 stars.
Cost: $18.
How much work? Low/Medium.
How big of a mess?  Low/Medium.
Start time 2:00 PM. Finish time 6:15 PM.

Chris Kimball’s original recipe is here. The descriptions of how I prepared the recipe today are given below:

1 cinnamon stick
1/4 teaspoon whole cloves
13 cups apple cider
8 cups ice cubes
1 ham (between 7 and 10-lbs)
2 tablespoons dijon mustard
1 cup dark brown sugar, packed
1 teaspoon ground black pepper

  1. Use a knife to cut cinnamon stick into rough pieces.  Add cinnamon and cloves to a saucepan and toast for 3 minutes over medium burner. Add 4 cups of apple cider to the pan and bring to a boil. Pour spiced cider into a stockpot or clean bucket wide enough to accommodate the ham, flat-side down. Add 4 more cups of apple cider and 8 cups of ice cubes. Stir until ice has melted.
  2. Remove the skin from the ham and trim away fat leaving the fat cap 1/4″ thick. Cut a cross-hatch into fat at 1″ interval.  Put ham, flat-side down, into large container with chilled cider mixture. The brine will not quite cover the ham, but the exposed portion has very little meat. Place in refrigerator for to 12 hours.
  3. About 4 to 4-1/2 hours before dinner, throw away the brine and put ham in a large oven bag; flat-side down. Add 1 cup apple cider in bag, and tie securely using the supplied plastic closures (or kitchen twine). Use a paring knife to make 4 slits in top of bag to allow the steam to escape. Place in large roasting pan and allow to stand on the counter-top for 1-1/2 hours. This will allow the ham to come up to temperature without overcooking.
  4. Adjust an oven rack to the lowest position and pre-heat to 300-degrees. Bake for between 1-1/2 and 2-1/2 hours until an instant-read thermometer reads 100-degrees. Meanwhile, add 4 cups of apple cider and 2 teaspoons dijon mustard to a saucepan and bring to a boil.  Once boiling, reduce burner to medium-low and allow to reduce and simmer for about 1-1/2 hours until it reduced to 1/3 cup. Stir often to prevent scorching.
  5. Remove ham from oven and increase oven to 400-degrees.  Allow ham to rest for 5 minutes, then roll bag back to expose the ham. Use a pastry brush to evenly paint ham with the reduced cider mixture.
  6. Combine brown sugar and pepper in small bowl.  Carefully use your hands to press sugar mixture onto the ham. Bake for 20 minutes ; the exterior will become dark brown.
  7. Remove from oven and loosely tent ham with aluminum foil and allow to rest on a cutting board for 15 minutes.
  8. Carve and serve.

Rosemary Focaccia

December 23, 2011

For anyone who doesn’t have a standing mixer, this recipe is perfect. It is my all time-favorite breads; rich with olive oil and topped with freshly chopped rosemary. I usually serve it beside a plate of olive oil and balsamic vinegar for dipping. Given the ease with which it’s made, I can’t believe that I haven’t made this bread in more than 16-months. It has the wettest dough of any bread I’ve made. With an 80% hydration level your hands must be well-floured when initially shaping the dough (in step 7); but after coating with olive oil you’ll have no such worries. This is definitely 5-star bread, and very forgiving (as are most flatish breads).

Deliciously rich topped with fresh rosemary.

Comments:

  1. This is the best of about three of Chris Kimball’s bread recipes that doesn’t require a standing mixer (or lots of manual kneading). Instead it uses a process called “Autolyse” to develop gluten; replacing kneading with a long fermentation process.
  2. Another noteworthy element is to briefly delay adding the salt by 15 minutes, which will hastened the gluten development by a full hour. This is because salt inhibits flour’s ability to absorb water thus slowing down the activity of the enzymes that break down protein to form gluten. If you add the salt when first mixing the dough, then just be sure to give the dough some extra time.
  3. My blog site just informed me that this is my 250-th post. Wow..that’s a lot of food.

Rating: 5 stars.
Cost: 80-cents.
How much work? Low.
How big of a mess?  Low/Medium.
Start time 2:00 PM. Finish time 6:00 PM.

Chris Kimball’s original recipe is here. The descriptions of how I prepared this today are given below:

Biga:
1/2 cup (2-1/2 ounces) unbleached all-purpose flour
1/3 cup (2-2/3 ounces) water
1/4 teaspoon instant or rapid-rise yeast

Dough:
2-1/2 cups (12-1/2 ounces) unbleached all-purpose flour , plus extra for shaping
1-1/4 cups (10 ounces) water
1 teaspoon instant or rapid-rise yeast
2 + 1 teaspoons kosher salt
4 tablespoons extra-virgin olive oil
2 tablespoons chopped fresh rosemary

  1. Make the biga the night before. Microwave water on high for 15 seconds to bring water to 110-degrees. In a large bowl, combine flour, warm water, and yeast. Using a wooden spoon stir for 1 minute until there is no more dry flour. Tightly cover the bowl with plastic wrap. Allow to stand at room temperature (about 70 degrees) overnight. If your overnight kitchen is closer to 60-degrees you can use a warmed (but turn-off) oven to help.
  2. The next day, microwave 10-oz water on high for 40 seconds to bring water to 110-degrees. Use a wooden spoon to stir flour, warm water, and yeast into biga for 1 minute until there is no more dry flour. Cover with plastic wrap and let rise for 15 minutes.
  3. Sprinkle 2 kosher teaspoons salt over dough, stirring into dough for 1 minute until completely incorporated. Withholding the salt for 15-minutes will hasten gluten development by a full hour.  Re-cover with plastic wrap and let rise for 30 minutes.
  4. Spray a rubber spatula with non-stick cooking spray. Fold the dough over onto itself; gently lift one edge of the dough and fold it over towards the center of the bowl. Rotate the bowl 90-degrees and repeat folding process for a total of 8 folds. Re-cover the dough with plastic wrap and let rise for 30 minutes. This process will stretch the gluten and help it more fully develop.
  5. Repeat folding, turning, and rising 2 more times, for total of three 30-minute rises. Meanwhile, adjust an oven rack to the upper-middle position, place a baking stone on rack, and pre-heat oven to 500-degrees at least 30 minutes before baking. If you don’t have a baking stone than you can use an overturned heavy-duty baking sheet.
  6. Coat two 9″ round cake pans with 2 tablespoons olive oil each. Sprinkle each pan with 1/2-teaspoon kosher salt.
  7. Carefully pour out dough onto a floured counter. Dust the top of dough with flour and divide in half using a bench scraper of chef’s knife. With floured hands, form each piece into a rough 5″ round by gently tucking the edges underneath.  Put each piece of dough in pan, smooth-side down. Slide it around pan to coat the bottom and sides. Flip dough over, then cover tightly with plastic wrap; repeat with second piece of dough. Allow dough to relax for 5 minutes, which will make it easier to stretch.
  8. Use your finger tips to stretch dough to the edges of pan. (If dough resists too much then allow it to rest for another 5 to 10 minutes). Poke surface with a dinner fork between 25 to 30 times; especially to pop any large bubbles. Evenly sprinkle chopped rosemary over the top of dough. Allow dough to rest another 5 to 10 minutes.
  9. Place cake pans on baking stone and reduce oven to 350-degrees. Bake for 23 to 25 minutes or until the tops are golden brown; rotating pans halfway through baking.
  10. Allow pans to cook on a wire rack for 5 minutes, before removing loaves from pan. Brush the loaf tops with any oil remaining in pan. Allow bread to cool on wire racks for 30 minutes before serving.

Sweet Cherry Pie

December 21, 2011

Suddenly, out of the blue, the strangest thing happened. Northwest Bing Cherries went on sale for $3/lb. Having coincidentally been in Washington State, I can assure you that the idea of cherries being on any of Washington’s trees right now is crazy. Perhaps they were mislabeled and came from South America. In any case, I took the opportunity to buy some for my cherry-loving-son and baked him a Sweet Cherry Pie. Overall, my son loved the cherry pie, but otherwise it wouldn’t have been worth the $9.

December surprise (but this photo is from my prior attempt)

After several failed attempts at Chris Kimball’s “foolproof” pie dough, I finally succeeded and discovered the problem all along. It was the lack of a bench scrapper that prevented me to un-sticking the pie dough from the counter in one piece. Now I can sprinkle a little more flour underneath whenever necessary.  Here is more discussion on the keys to Foolproof Pie Dough, but I won’t discuss how foolish I feel that it took me so many attempts to get this foolproof recipe right. Suffice it to say that “bench scrapper” should be on his list.

Issues:

  1. I used too much lemon, from 1/2 lemon, and should have measured out 1 tablespoon more closely.
  2. Use foil-lined baking sheet to ease clean-up. Undoubtedly, some filling will leak out onto the baking sheet.

Rating: 4 stars.
Cost: $9.
How much work? Medium.
How big of a mess?  Medium/High.
Start time 11:00 AM.  Dessert at 6:00 PM

Chris Kimball’s original recipe is here. The descriptions of how I prepared this today are given below:

Pie Dough:
2-1/2 cups (12-1/2 ounces) all-purpose flour
1 teaspoon salt
2 tablespoons sugar
1-1/2 sticks (12 tablespoons) cold unsalted butter
1/2 cup cold vegetable shortening
1/4 cup cold vodka
1/4 cup cold water

  1. Cut your butter into 1/4″ cubes, and your vegetable shortening into 4 pieces.
  2. Add 1-1/2 cups flour, salt, and sugar in food processor, process for two 1-second pulses until it’s just combined. Add butter cubes and shortening pieces, and process for 15-seconds until there is no un-coated flour and the dough begins to form uneven clumps ; kind of like cottage cheese curds.
  3. Use a rubber spatula to scrape down sides and redistribute dough evenly around processor blade. Add the final 1 cup of flour and pulse 4 to 6 times until the mixture is evenly distributed and the dough mas is broken up. Transfer the mixture to medium bowl.
  4. Sprinkle the cold vodka and water over mixture. Use your rubber spatula to fold and mix the dough, pressing down until slightly tacky and sticks together. Divide into 2 balls of equal size and flatten into two 4″ disk. Cover with plastic wrap and refrigerate from 1 hour.
  5. Remove 1 disk at a time from refrigerator and roll it out on liberally floured work surface into a 12″ circle, measuring 1/8″ thick. Use your rolling pin to lift the dough by loosely draping it around the rolling pin, then un-roll it over pie plate; leave at least 1″ overhang. Gently form the dough to plate by carefully lifting edge of dough and using your other hand to pressing the dough to the bottom of the plate. Refrigerate for 40 minutes until the dough is firm.

Cherry Filling:
2 red plums
2 pounds (6 cups) sweet cherries
1/2 cup sugar (3-1/2 ounces)
1/8 teaspoon table salt
1 tablespoon juice from 1 lemon
2 teaspoons bourbon (optional)
2 tablespoons instant tapioca
1/8 teaspoon ground cinnamon
2 tablespoons unsalted butter
1 large egg
1 teaspoon water

  1. Cut your plum in half and remove the pit. Remove the seeds from your cherries, and cut them in half. Use a clean coffee grinder to grind instant tapioca into a fine powder. Cut your cold butter into 1/4″ cubes.
  2. Place a foil-lined baking sheet on oven rack set to the lowest position, and pre-heat your oven to 400-degrees.
  3. Add plums halves and 1 cup of cherries to food processor and process for 1 minute until smooth. You will need to scrape down the sides of bowl once or twice.  Set a fine-mesh strainer over a large bowl, pour mixture into strainer and use a rubber spatula to press down and extract as much liquid as possible, discarding the solids.
  4. Stir the remaining 5 cups of cherries, sugar, salt, lemon juice, bourbon (if using), powdered tapioca, and cinnamon into bowl containing the puree, and allow to stand for 15 minutes.
  5. Pour cherry mixture and juices into to dough-lined pie plate. Scatter 1/4″ butter cubes evenly over filling.
  6. Roll the second dough disk out on liberally floured work surface into a 11″ circle, measuring 1/8″ thick. Use your rolling pin to lift the dough by loosely draping it around the rolling pin, then un-roll it over pie plate; leave at least 1/2″ overhang.  Use you thumb and forefinger to flute edges or you can use the tines of fork to seal the two pie crusts together.
  7. In a small bowl, lightly beat your egg and combine with 1 teaspoon water. Use a pastry brush to top with egg mixture. Use a sharp knife to make 8 evenly spaced 1″-long vents in top of pie; then freeze for 20 minutes.
  8. Transfer pie to pre-heated baking sheet and bake 30 minutes. Then reduce temperature to 350-degrees and continue to bake for another 30 minutes until the juices are bubble around the edges and crust is deeply golden brown.
  9. Allow pie to cool on wire rack for 3 hours before serving, so that the juices can thicken. The filling will only become firm after it has been chilled.

    Sorry for the cell phone photo


Pork Wiener Schnitzel

December 19, 2011

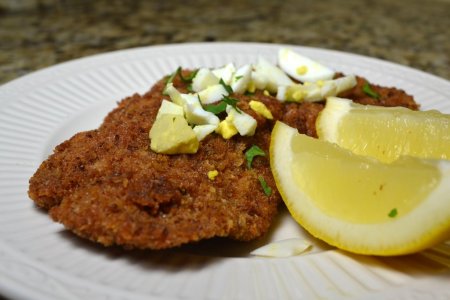
Thanks to Oscar Mayer, when I told my kids I was making Wiener Schnitzel they thought they’d be eating hot dogs. I gave them a quick German lesson; Pronounce your German”W” as a “V”; take “Vienna” and drop the “a”, and add the “-er” suffix).  So, Wiener means either something or someone from Vienna; in this case it’s a Viennese Schnitzel. While traditionally made from veal, this recipe from Cook’s Country uses pork, which is a common substitution. While many pork cutlets can be tough if overcooked, using the tenderloin ensures just as tender a meal as if veal were used. The results were similar to a Milanese. It was kid-friendly and delicious; 4-stars.

Wiener Schnitzel vom Schwein

Issues:

  1. Chris Kimball’s original recipe calls for cooking two whole pork tenderloins; but that is more than my family can possible eat. One tenderloin yields 4 good-size cutlets.
  2. The egg yolk can optionally be put through a sieve, but for simplicity’s sake I chose to serve it merely crumbled.
  3. It would have been perfect had I served it with a potato salad.

Rating: 4 stars.
Cost: $7.
How much work? Medium.
How big of a mess?  Medium/High.
Start time 5:15 PM. Finish time 6:00 PM.

Chris Kimball’s original recipe is here. The descriptions of how I prepared this today are given below:

7 large high-quality sandwich bread
1/2-cup all-purpose flour
2 eggs
2-cups plus 1 tablespoon vegetable oil
1 pork tenderloin (about 1-1/4 pounds).
Salt and ground black pepper

Garnishes:
1 lemon
2 tablespoon chopped fresh parsley leaves
2 tablespoons capers
1 large hard-cooked egg

  1. If you plan to garnish with hard-boiled egg. Place egg in pan of cold water, slowly bring to boil over medium-high heat, let boil for 10 minutes. Remove the pan from heat and let sit in hot water for 20 more minutes. They will be perfectly cooked without the green ring around the yolk.
  2. Remove crust and slice bread into 3/4″ cubes. Place bread cubes on large microwave-safe pie plate. Microwave on high power for 4 minutes, stirring well halfway through cooking time.
  3. Reduce power on microwave to medium power. Cook for 5 additional minutes or until the bread is dry. Stir every minutes to ensure that the bread on the bottom will dry out and an equal pace. Some of the bread will begin to lightly brown.
  4. Process dry bread in food processor for 45 seconds. Return the very fine bread crumbs to pie plate in which you microwaved them. In another pie plate add flour. In a third pie plate, mix the eggs with 1 tablespoon vegetable oil.
  5. Trim off any fat and remove the silver skin. Cut the tenderloin on a diagonal into 4 equal pieces. Cutting on a diagonal will ensure the pieces are oblong, instead of round. Place one piece at a time inside a gallon-sized Zip-lock bag  and pound to an even thickness of between 1/8″ and 1/4″. Remove from bag and season cutlets with salt and pepper. Repeat pounding process with remaining cutlets.
  6. Working with 1 cutlet at a time, dredge thoroughly in flour, shaking off excess, then coat with egg mixture, allowing any excess egg to drip back. You want to ensure a very thin and even coating. Finally coat evenly with bread crumbs, pressing so that the crumbs adhere. Place breaded cutlets on wire rack to allow the coating to dry for 5 minutes.
  7. Meanwhile prepare your garnished. Slice a lemon into wedges, chop your parsley, rinse you capers to remove the brine, and separate your egg white and yolk (either crumble or pass separately through a fine-mesh strainer).
  8. Heat 2 cups of vegetable oil in a Dutch oven over medium-high heat. When the oil reaches 375-degrees, put 2 breaded cutlets in pan and cook for 2 minutes per side, gently shaking pan continuously so that cutlets will be wrinkled.  Flip and cook the second side for between 1 and 2 minutes. Remove and place cutlets on paper towel-lined plate and flip cutlets several times to blot excess oil. Repeat cooking process with remaining cutlets.
  9. Serve immediately with garnishes.

Grilled Beef Teriyaki

December 17, 2011

The weather has been crazily warm here in the Northeast; 60-degrees in mid-December. Of course, I took advantage and was able to BBQ a delicious meal. The beef is marinated for an hour, which helps tenderize this otherwise notoriously tough cut of beef. The recipe’s other trick is to thicken the sauce with corn starch, which cuts the preparation time of the sauce down to about 20 minutes. The results were delicious. Both my boys loved the sweet richness of the teriyaki. I’d rate it as 4-1/2 stars.

Strips were too narrow, but it was still delicious.

Comments/Issues:

  1. The instructions said to cut the steak on a 45-degree angle, which was completely inadequate. 45-degrees resulted in the narrow, inch-wide strips. In reality, I should have cut the steak practically horizontally at just a 20-degree angle to obtain strips that are several inches wide. (see desired results here)
  2. I used flank steak instead of flap meat. I’m sure flap meat is labelled something else, but I haven’t figured that out yet (Chris Kimball says it’s sometimes labeled as “sirloin tips”, but it doesn’t have the same open grain). Plus flank steak is ubiquitously available and often on sale (I paid only $6/lb).
  3. The only other change was to substitute vermouth for sake. I’m sure sake would have been better, but I have never had it in my kitchen.
  4. I would like to dedicate this meal to my niece Morgan, whom I just visited and whose favorite restaurant is Panda Express. Hopefully I will be able to visit when the weather is warmer so that I can prepare it for her. It is delicious.

Rating: 4-1/2 stars.
Cost: $14.
How much work? Medium.
How big of a mess?  Low/Medium.
Start time 5:00 PM. Finish time 6:30 PM.

Chris Kimball’s original recipe is here. The descriptions of how I prepared this today are given below:

Steak:
2 pounds flank steak (or flap meat)
1/3 cup soy sauce
1/4 cup mirin
2 tablespoons vegetable oil
3 medium garlic cloves (approx. 1 tablespoon)
1 tablespoon freshly grated ginger
1 tablespoon sugar
1 teaspoon grated orange zest
2 medium scallions

Sauce:
1/3 cup soy sauce
1/2 cup sugar
1/2 cup sake
1/2 cup mirin
1 teaspoon grated fresh ginger
1 teaspoon cornstarch

  1. Slice the steak with the grain into rectangles that are roughly 5″ x 5″. Then slice each rectangle (slicing against the grain) into 1/2″-thick strips by holding a chef’s knife almost horizontally at just a 20-degree angle.
  2. Slice scallions on the bias, putting the white part in a gallon-sized Zip-lock bag, and reserving the green part for later. Press garlic into the bag, and all all the remaining ingredients (except scallion greens) and mix until combined.  Put beef strips in bag, and remove  as much air as possible. Seal bag and refrigerate for 1 hour, flipping the bag every 15 minutes so that the beef will marinates evenly.
  3. After about 30 minutes of marinating, light a chimney starter filled with 6 quarts of charcoal and allow to ignite for about 30 minutes.
  4. While grill is heating, whisk all the sauce ingredients in a small saucepan. Bring to a boil over medium-high heat and stir  occasionally. Reduce to medium-low and allow to simmer for 15 minutes until the sauce becomes syrupy and reduces to about 1 cup.  Put 1/4 cup in a cup for brushing on the beef, and place the remaining sauce to serving bowl.
  5. Once the charcoal is fully ignited and partially covered with thin layer of grey ash, put all coals on one half of grill leaving the other half completely empty. Replace the grill grate, cover the grill, and preheat for 5 minutes; then scrape the grate clean with a grill brush. Season the grill by dipping a wad of paper towels in oil then wiping the grate clean.
  6. Remove meat strips from the marinade and pat dry with paper towels. Place on grill over hot coals and cook, uncovered, for about 5 minutes or until the first side is nicely seared. Use tongs to flip the beef and grill for about 5 more minutes or until the second side is nicely seared. Brush the top of meat with about 2 tablespoons sauce then immediately flip and cook 30 seconds. Brush the other side of the meat with 2 more tablespoons of sauce; again immediately flip and cook for the final 30 seconds.
  7. Remove from gill and put on a serving platter. Cover with aluminum foil and allow to rest for 5 minutes. Sprinkle scallion greens over beef and serve, passing the remaining sauce separately.

Pork Tenderloin stuffed with Mushroom, Artichoke and Sun-Dried Tomatoes

December 9, 2011

My supermarket sells mostly “enhanced” pork tenderloin, which is injected at the factory with a brine-like solution. Yuck. Not only does it make the pork mushy, but it’s filled with artificial flavors and colors. I prefer to add my own flavorings, and today was one of those lucky days when my supermarket had all-natural pork tenderloin. I butterflied and stuffed it. While the stuffing was very flavorful, the meat was a little dry (but still pretty tender). The recipe did not brine the pork, but the problem was mine because I accidentally followed the FDA’s old advice to cook pork to 160-degrees. Unfortunately, I missed the news a few months ago that the FDA reduced the minimum cooking temperature for lean pork to 145-degrees. Overcooked or not; it was still spectacular for a weeknight meal. 4-stars.

Pretty nice for a mid-week meal

Issues:

  1. The original recipe makes two tenderloins, so I cut everything in half because I only wanted one tenderloin. One tenderloin is enough for 3 people if served with a side-dish. If you are trying to feed 4 adults, you will need to cook two tenderloins.
  2. The recipe called for Sun-dried tomatoes packed in oil. With a poor selection at my supermarket, I ended up with “fresh” sun-dried tomatoes from the produce section. The only problem was that I had to buy 3/4-lb when I only needed about 1-oz.
  3. I searched and searched for frozen artichoke hearts, but ended up using marinated. I rinsed them to remove as much of the brine as possible.

Rating: 4-stars.
Cost: $10.
How much work? Medium.
How big of a mess?  Medium.
Start time 5:00 PM. Finish time 6:30 PM.

Chris Kimball’s original recipe is here. and the stuffing recipe is here.  The descriptions of how I prepared this today are given below:

Stuffing:
1/4-oz dried porcini mushrooms
1-1/2 frozen artichoke hearts,  (1/3 cup)
1/2-oz grated Parmesan cheese (1/4 cup)
1/4-cup sun-dried tomatoes
2 tablespoons fresh parsley leaves
1 tablespoons pine nuts, toasted
1 garlic cloves , minced
1/2-teaspoon finely grated lemon zest
1 teaspoons lemon juice
Salt and pepper

  1. Thaw your artichoke hearts. Rinsed oil from sun-dried tomatoes and chop the parsley coarsely. Also, toast the pine nuts in a small pan until lightly golden.
  2. Rinse your dried porcini mushrooms and place in a small microwave proof bowl. Add 1/2-cup of water. Cover with plastic wrap and microwave for 1 minute until steaming. Allow mushrooms to sit for 5 minutes until soft. Use a fork to remove porcini from bowl and throw away liquid. Pat the mushrooms dry using paper towels.
  3. Add mushrooms and all ingredients (except salt and pepper) to food processor. Use between 5 and 10 pulses to chop coarsely. Add salt and pepper according to taste.

Roast:
1-1/4 to 1-1/2-pound whole pork tenderloin
2 teaspoons packed dark brown sugar
1-1/8 teaspoons kosher salt
3/4-teaspoons pepper
1/2-cup baby spinach
1 tablespoons olive oil

  1. Butterfly your tenderloin. Cut into the tenderloin horizontally stopping your cut 1/2″ before you cut to the other edge. That remaining 1/2″ will act as a hinge holding the two halves together.
  2. Open up tenderloin and lay it flat on a cutting board. Cover with plastic wrap, and pound it until it is 1/4″-thick. Use a chef’s knife to trim away the ragged edges. You should be left with a 6″x10″rectangle. Sprinkle interior of the tenderloin with 1/8 teaspoon salt and 1/8 teaspoon pepper.
  3. Use a rubber spatula to evenly spread the stuffing mixture over the tenderloin, and cover with 1/2-cup baby spinach. Roll up into tight, 10″ long cylinder, being careful that the stuffing doesn’t squeeze out. Put tenderloin seam side down and tie with 5 evenly spaced pieces of kitchen twine.
  4. Adjust oven rack to middle position and pre-heat to 350-degrees.
  5. In a small bowl, mix brown sugar, 1-teaspoons salt, and 1/2-teaspoon pepper.
  6. Coat pork bundle with olive oil, and rub brown sugar mixture over entire surface. Place pork on wire rack placed over a foil-lined baking sheet. Cook for 20 minutes until center of stuffing registers 120 degrees; rotating pork to ensure even cooking. Remove roast from oven and tent with aluminum foil while pre-heating the broiler to high. Broil, rotating after a few minutes to ensure an even crust.
  7. Remove the roast when center of stuffing registers 145-degrees; transfer to carving board, and tent loosely with aluminum foil. Allow to rest for 5 to 10 minutes.
  8. Remove kitchen twine, and slice into 1/2″-thick slices. Serve immediately.

Chicken Nuggets

December 7, 2011

I’ve been making homemade Chicken Nuggets for a few years, because I’m afraid to know what McDonald’s puts in their chicken McNuggets. Recently I saw the new Cook’s Country episode where Chris Kimball touts his own variation. There are two main difference: (1) he brines the chicken pieces for 30 minutes, and (2) he does not par-bake them in the oven.  The results were significantly more tender, though less crunchy.  The kids preferred Chris Kimball’s nuggets, giving them 5-stars.

Fresh and tender; delicious even for adults.

Comments:

  1. Chris Kimball has an elaborate description of how to cut the nuggets: first slicing on the bias into thirds, the cutting into 1/2″ pieces. I read it 100 times and couldn’t figure out what he meant (and had already deleted the Cook’s Country episode from my DVR). In the end, I think all you need to do is cut them into even bite-sized nuggets. Whatever size you like your nuggets; just make them that size.
  2. In the past I had par-baked the nuggets to be sure that the chicken was fully cooked, but it turns out that Chris Kimball is right. I checked the nuggets in this recipe and after 3 minutes in the oil and they had no trouble reaching an internal temperature of 165-degrees.
  3. If you want to make them ahead of time, allow the fried nuggets to cool and put the in a gallon-size Zip-lock bag. Freeze them for up to a month. To re-heat them put the nuggets on foil-lined rimmed baking sheet on the middle rack of a 350-degreee oven. Bake for 15 minutes; flipping them after 8 minutes.

Rating: 5-stars.
Cost: $3.
How much work? Low.
How big of a mess?  Medium.
Start time 4:00 PM. Finish time 6:00 PM.

Chris Kimball’s original recipe is here. The descriptions of how I prepared them today are given below:

Brine:
2-1/2 pounds boneless, skinless chicken breasts
2 cups water
1 tablespoon plus 1 teaspoon salt
2 tablespoons Worcestershire sauce

Breading:
1-1/2 cup all-purpose flour
1-1/2 cup panko (Japanese-style bread crumbs)
3 teaspoons onion powder
1 teaspoon pepper
3/4 teaspoon garlic powder
3/4 teaspoon baking soda
3 large egg whites
4 cups peanut or vegetable oil

  1. Cut your chicken into what ever sized pieces you like your nuggets; just be sure they are all about the same size.
  2. In a large bowl, add 1 tablespoon salt and 2 tablespoons Worcestershire into two cups of water.  Whisk until the salt has dissolved. Add chicken pieces, cover with plastic wrap and refrigerate for 30 minutes. Chris Kimball reminds you to not brine any longer than 30 minutes or your chicken will be too salty.
  3. Add 1-1/2 cups panko in a Zip-lock bag and crush it with a rolling pin.
  4. You will need two pie plates. In the first, add flour, crushed panko, onion powder, 1 teaspoon salt, pepper, garlic powder, and baking soda. In the second pie plate, add whites from 3 eggs and briefly whisk.
  5. Remove chicken from brine and pat dry with paper towels.
  6. Working in 3 batches (up to 1-lb of chicken at a time), coat chicken nuggets in egg whites, and allow any extra egg white to drip back into pie plate. Then dredge in the flour mixture, and press lightly so that the breading adheres. Place coated chicken on clean plate. Repeat breading process with remaining chicken.
  7. Allow chicken to sit at room temperature for 10 minutes, then return chicken to flour mixture and re-coat, again pressing lightly so that the breading adheres.
  8. Adjust your oven rack to middle position and preheat to 200-degrees. Pour 4 cups oil into a large Dutch oven and heat over medium-high burner to 350-degrees.
  9. Cook the chicken in 2 batches for between 3 to 5 minutes until deeply golden brown; stirring occasionally so that they don’t stick and cook evenly. Drain nuggets on wire rack set over a foil-lined baking sheet and place in oven. Cook the second batch once the oil returns to 350-degrees.
  10. Serve with dipping sauces.

Ciabatta

December 3, 2011

The variety of bread that can be created with the same 4 or 5 basic ingredients is astounding.  I have made more than a dozen different breads, but this Ciabatta is my favorite (so far). Inexplicably, I haven’t made it in more than a year. Ciabatta has a flatish shape, roughly in the shape of a “slipper” (which is the literal translation of the word ciabatta). It has great, complex flavor, with a tender, airy crumb.  The crust is deeply golden, but not overly tough like the Rustic Italian Bread. This recipe makes two small loaves, but the chances are small that you’ll be able to save one loaf for the next day.

Lots of kneading

The bread is kneaded in the standing mixer for a total of 15 to 17 minutes; longer than any other bread I have made. The resulting dough is unbelievably silky. I had always thought that lots of kneading would result in tougher bread; but I see that it’s a lot more complicated than that. I guess the high level of hydration is what saves this bread.

Rating: 5-stars.
Cost: 50-cents for 2 small loaves.
How much work? Low.
How big of a mess?  Low/Medium.
Started: 2 PM.  Ready:  6:30 PM.

Chris Kimball’s original recipe is here. The descriptions of how I prepared and baked the bread today are given below:

Biga:
1 cup all-purpose flour (5 ounces)
1/8 teaspoon instant or rapid-rise yeast
1/2 cup water (4 ounces)

Dough:
2 cups all-purpose flour (10 ounces)
1/2 teaspoon instant or rapid-rise yeast
1-1/2 teaspoons table salt
3/4 cup water (6 ounces)
1/4 cup milk (2 ounces)

  1. Make the biga the night before baking the bread; combine flour, yeast, and water in medium bowl. Use a wooden spoon to stir for 1 minute until the mix appears uniform. Use plastic wrap to cover and allow to stand overnight at room temperature. If you kitchen is much below 70-degrees, then you can use a slightly warmed oven (but turned off) which will ensure there is sufficient warmth.
  2. The next day, add the biga and dough ingredients to the bowl of your stand mixer. Use the paddle attachment on the lowest speed for 1 minute, which will form a shaggy dough. You may need to scrape down sides of bowl using a spatula once or twice.
  3. Increase speed to medium-low (4 on a KitchAide) for between 4 to 6 minutes; until the dough pulls away from sides of the bowl.
  4. Use your spatula to remove the dough from the paddle attachment, and chage to your dough hook.
  5. Increase speed to medium (6 on a KitchAide) for 10 minutes; until it becomes smooth and shiny.
  6. Put the sticky dough in a large bowl. Cover with plastic wrap, and allow to rise at room temperature for 1 hour; the dough should double in size.
  7. Spray a rubber spatula with non-stick cooking spray. Use the spatula to fold the dough over onto itself; gently lift and fold the dough’s edge toward the middle. Rotate the bowl 90-degrees, and fold again. Rotate again and fold six more times (a total of eight folds).
  8. Cover the dough again with plastic wrap and allow to rise for 30 minutes. Repeat the folding process for a second time.
  9. Cover the dough again with plastic wrap and allow to rise for 30 minutes. Meanwhile, preheat your oven to 450-degrees. Place a baking stone on the lower-middle oven rack. Cut two 12″x6″ pieces of parchment paper, place on a pizza peal (or overturned baking sheet). Liberally dust the parchment with flour.
  10. Liberally dust a counter with flour. Turn the dough out carefully so as not to deflate completely. Liberally flour the top of dough. Cut in half using a dough scraper or knife.
  11. Working one piece at a time, turn the dough so that the cut-side faces up, dust with more flour, then with well-floured hands, gently press into 12″x6″ rectangle. Fold your rectangle up like a letter, which will result in a 7″x4″ loaf. Repeat with second piece of dough.
  12. Place each loaf on its side on the parchment; seam-side down. Again, dust with more flour. Cover with plastic wrap and allow the loaves to rise at room temperature for 30 minutes.
  13. Flour your fingertips, and evenly poke each loaf to form a 10″x6″ rectangle. Use a spray bottle to lightly spray the loaves.
  14. Slide loaves with parchment onto the pre-heated baking stone. Bake at 450-degrees, spraying the loaves with water two more times during the first 5 minutes of baking.
  15. Bake for a total of 20 to 22 minutes, until an instant-read thermometer reads 210-degrees in the center of the loaf. The crust should be deeply golden brown.
  16. Allow to cool for 1 hour on a wire rack.

Matt’s First Pumpkin Pie

November 29, 2011

Nobody in the family has every loved pumpkin pie more than my oldest son, Matt. This year, at age 12, he was in charge of making the pumpkin pie for the fist time. For him it was a labor of love, and the pie turned out fantastic. We took his pie to a friends’ house for Thanksgiving dinner and it quickly disappeared, while a store-bought pie sitting nearby was barely touched. 5-stars on his first attempt.

Deservedly proud of his first pumpkin pie.

In general, Matt followed the King Arthur recipe. Because my son loves traditional pumpkin pie, I have been hesitant to made Chris Kimball’s pie, which includes 1-cup of candied yams and 1/4-cup of maple syrup. Chris Kimball does have a more traditional recipe from 1993, which is here, except that I am no longer in charge of the pumpkin pie.

Rating: 5-stars.
Cost: $3.50.
How much work? Low.
How big of a mess?  Low.
Start time 11:00 AM. Ready at 11:10 AM.

King Arthur’s original recipe is here. The descriptions of Matt prepared his pie today are given below:

1/2 cup granulated sugar
1/2 cup brown sugar (3-1/8 oz)
1 tablespoon all-purpose flour
1/2 teaspoon salt
1 teaspoon ground ginger
1 teaspoon ground cinnamon
1/2 teaspoon nutmeg
1/8 teaspoon ground cloves
3 large eggs
15-oz can pumpkin
1-1/4 cups evaporated milk

  1. Whisk together the granulated and brown sugar, flour, salt, and spices in a large bowl.
  2. Whisk together the eggs, pumpkin, and evaporated milk together in a medium bowl.
  3. Whisk the egg mixture into the dry ingredients, and cover with plastic wrap. Refrigerate the mixture overnight to allow the flavors to combine. However if you want to serve the pie tonight, then waiting overnight is not absolutely required.
  4. Set an oven rack to middle position. Pre-heat to 400-degrees.
  5. When the oven reaches 400-degrees, place the pie crust on a foil-lined baking sheet, and pour filling into the unbaked pie shell.
  6. Bake for 35 to 45 minutes, or until an instant-read thermometer inserted in center of the pie reads 175-degrees. The filling should be set about 2″ in from the edge, and the center should still be a bit shaky. The center will finish cooking from the residual heat of the pie. If you wait until the center is completely set, the proteins in the eggs will seize and the center will crack.
  7. Remove from the oven and cool on a wire rack for 2 to 3 hours.

Perfectly cooked with no cracks.