Corn Chowder

July 3, 2015

Corn is so ripe right now that I can feel the fatness of the kernels right through the husk, no need to pull back the husks. Plus as a bonus, it’s on sale for just 20-cents an ear (practically free). After discovering this recipe a few years ago, corn chowder has become a delicious way for me to enjoy sweet summer corn during peak season. I’ve updated the recipe a little, to include changes to deepen the flavor and elevate this to a strong 4-1/2 stars. Chris Kimball’s original recipe calls for cooking the bacon and onions only until they soften, I now brown them a little to build up a fond on the bottom of the pan; the corn chowder is even more satisfying. Perfect for your 4th of July barbecue.

Delicious way to enjoy sweet summer corn

Delicious way to enjoy sweet summer corn

Comments:

  1. The original recipe does not brown the onions and bacon; starting the onions and the bacon at the same time, and stopping before the bacon gets crispy. While the original recipe results is a fresher tasting chowder, the richer flavors from developing a fond and crisping the bacon deliver a much more satisfying bowl.
  2. While step 1 sounds confusing, when you separate the kernels and pulp from the cob. I was worried that I might be cutting away too much pulp and I sliced off the kernels, but in the end you will throw away the solid from the pump (after extracting the juices). So the bottom line is you shouldn’t worry.
  3. When I squeeze the pulp, I only got 1/2-cup of juices; not the 2/3-cup that Chris Kimball says the pulp should yield. But the story is the same every time I make this recipe; I think you will never get 2/3-cup. Today’s corn was so fat and juicy, if it didn’t happen today I think it will never happen.


Rating: 4-1/2 stars.
Cost: $5.00
How much work? Medium.
How big of a mess?  Medium.
Start time: 5:30. Dinner time: 6:15

Chris Kimball’s original recipe is here. The descriptions of how I prepared them today are given below:

8 ears corn
3 tablespoons unsalted butter
1 onion
4 slices bacon
2 teaspoons minced fresh thyme
Salt and pepper
1/4 cup all-purpose flour
5 cups water
3/4-lb red potatoes
1 cup half-and-half
Up to 1 Tablespoon sugar
3 tablespoons chopped fresh basil

  1. Remove husks and silk from corn. Cut kernels from the cob using a chef’s knife, being careful not to cut away too much of the pulp. Then over a large bowl, use the back of a stiff butter knife to scrape the pulp into the bowl (once you try it you will see how easy the pulp comes away from the cob). Put pulp in a clean kitchen towel and tightly wring the pulp allowing the juice to fall back into your large bowl. Chris Kimball says that I should have been able to extract 2/3-cup of juice, but I was only able to extract about 1/2-cup. Throw away the dried pulp.
  2. Stack your bacon slices and slice them lengthwise, then cut them into 1/4″ pieces. Finely chop your onion, and mince you thyme.
  3. Set a Dutch oven over medium burner; Add bacon and cook for 4 minutes; a head-start before adding more ingredients.
  4. Add 3 tablespoons of butter and allow to melt. Add onions, thyme, and 2 teaspoons of salt and 1 teaspoon ground black pepper, for 10 to 12 minutes. The onion will be done when it has browned slightly, and there is a fond on the bottom of the pan. While that cooks, dice your potato into 1/2″ pieces.
  5. Mix in 1/4-cup flour and stir constantly for 1 to 2 minutes, then whisk in 5 cups of water and bring to a boil. Once boiling, add your corn kernels and diced potatoes. Bring back up to a simmer, then reduce the burner to medium-low and cook for 18 minutes until the potatoes are ready.
  6. Remove 2 cups of chowder to blender and process it for 1 minute until smooth. Return processed chowder to the pot, and add 1 cup of half-and-half, and continue to cook until the pot has again reached a simmer.
  7. Remove from burner, add corn juice, and adjust seasoning with salt and pepper and as much as 1 tablespoon sugar depending upon the inherent sweetness of your corn.
  8. Spoon into individual bowls and sprinkle each bowl with 1 teaspoon minced basil.

Pork Taquitos

February 3, 2015

When in college a person eats Ramen noodles because they are inexpensive. But there was a time in college that frozen taquitos comprised a significant part of my weekly menu, not because they were inexpensive, but because I thought they were delicious. At the time it never occurred to me that I could make them for myself; they were beyond my young culinary capabilities. Fast forward 20 years, when I tried them again, all that I could taste was their flaws; leathery tortillas, dry meat, lackluster spices (plus a bunch of chemicals and preservatives). I felt the same way when I went back to my hometown in my 30’s. It had been the focus of my life; I had known every nook and cranny of the sleepy little town. Or when I see my ex-wife; a woman who I loved just 3 years ago; but to whom I now feel nothing (opps, a little too revealing; but she never reads my blog). The bottom line is this: Life only moves forward; just as I outgrew my home town, nothing can make eating frozen taquitos appealing again. No amount of horses and men can make Humpty Dumpty whole again. If taquitos are to ever be part of my future, so that I can share them with my kids, it is up to me to figure out how.

Good Mexican food takes a lot of time to preprare

Good Mexican food takes a lot of time to prepare

Chris Kimball does not have a recipe for taquitos. Of course I don’t generally trust his yankee-palate when it comes to “Mexican food”. I have been developing this recipe over the course of the past year, and am only just giving it 3-1/2 stars because there is room for improvement. The flavors are rich and delicious, but the flavors are not completely and properly balanced. Infinitely better than frozen taquitos, and represents a good starting point. I post another recipe when this recipe goes above 4-stars. (Please feel free to offer suggestions).

Comments:

  1. To freeze taquitos, put on a waxed-paper-lined baking sheet and freeze until firm. Transfer to a resealable plastic freezer bag; they can be frozen for up to 3 months.  To use frozen taquitos: put in a single layer on a greased baking sheet. Bake at 400-degrees for 12-15 minutes or until golden brown.
  2. I used flour tortillas tonight, but generally make them using corn tortillas. There is a common (mis)belief that taquitos are made only with corn tortillas, and that flautas are only made with flour tortillas.

Rating: 3-1/2 stars.
Cost: $18
How much work? Medium.
How big of a mess?  Medium/High.
Start time 1PM. Ready at 6PM.

5-lb bone-in pork butt
1 Tablespoon vegetable oil
2 cups (16 ounces) beef broth
2 medium onion
2 jalapenos
2 teaspoon table salt
1 Tablespoon tomato paste
4 garlic cloves
2 Tablespoons chili powder
1 Tablespoon ground cumin
2 teaspoon dried oregano
2 teaspoons ground black pepper
1/4 teaspoon cayenne pepper
1-cup shredded Mexican cheese blend (4-ounces)
1 teaspoon coarsely ground pepper
1/4 cup minced fresh cilantro
1 tablespoon lime juice
12 corn tortillas (6 inches)
Serve with: Sour cream, guacamole, salsa and lime slices.

  1. Pre-heat your oven to 300-degrees. Trim away any excess fat from the pork, and remove any skin (especially if you ended up with a pernil).
  2. Pre-heat 1 tablespoon vegetable oil in Dutch oven set over medium-high burner until oil begins to shimmer. Sear pork for 5 minutes per side; about 20 minutes total.
  3. Add beef broth to Dutch Oven, bring it up to a simmer, cover and bake for 4 hours until the pork is extremely tender. Remove pork to a large bowl and allow to cool for 15 minutes.
  4. While the pork cools, strain the braising liquid into a fat separator and allow to stand for 5 minutes. Discard any solids.
  5. Pre-heat oven to 400-degrees.
  6. Pre-heat 1 tablespoon of pork fat (from fat separator) into now-empty dutch oven over medium-high burner. Add onions and jalapenos to pot, sprinkle with 2 teaspoon table salt. Saute until tender; about 5 minutes.
  7. Press garlic into the pot, and add tomato paste, cumin, oregano, chili powder, black pepper and cayenne; cook 1 minute longer.
  8. Pour 3/4 of liquid from the fat separator into the pot, using the liquid to deglaze the pan. Reduce for 5 minutes until most of the liquid has evaporated.
  9. Meanwhile, use two forks to shred pork, then pick through with your fingers to discard any clumps of fat or other unappetizing bits. Add pork to pot with sauteed vegetables.
  10. Add grate cheese, and lime juice. Cook and stir until cheese is melted.
  11. chopped cilantro,
  12. Line a baking sheet with parchment paper, and lightly spray with non-stick cooking spray.
  13. Soften tortillas by wrapping them a paper towel and microwaving them for about 30-45 seconds.
  14. Put 2 tablespoons of filling over lower third of a tortilla. Roll up tightly, using gravity to hold the taquito closed. (You can secure with toothpicks; or mix up your own paste by adding water to flour). Repeat rolling process with remaining tortillas.
  15. Bake at 400° for 8 minutes. Serve with: Sour cream, guacamole and salsa.

Mango, Orange, and Jícama Salad

February 14, 2014

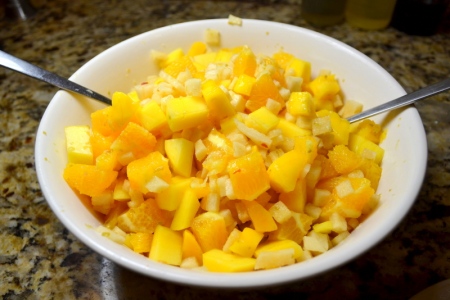
A nicely balanced, Latin-themed fruit salad. The simple flavor of the jícama nicely contrasts with the sweetness of the mango and orange. Simple to make. Unfortunately, I don’t think that my sugar transformed into a thick enough syrup. Keep cooking until it forms a thick syrup. Simple. 3-1/2 stars.

The finished salad

The finished salad

Comments:

  1. The recipe makes a lot more than just a side dish. As a side dish, 5 people at about half the salad.
  2. One of my mangos looked ripe on the outside, but was not sweet on the inside. Fortunately, my other mango was deliciously sweet and made up for it.

Rating: 3-1/2 stars.
Cost: $6.
How much work? Medium/Low.
How big of a mess?  Low.
Start time 5:15 PM. Dinner time 6:00 PM.

3 tablespoons sugar
1/4 teaspoon grated lime zest plus 3 tablespoons juice (2 limes)
1/4 teaspoon red pepper flakes
Pinch salt
12 ounces jícama
2 mangos
2 oranges

  1. Peel the jícama, and cut into 1/4″ dice (should yield 1-1/2 cups).
  2. In small saucepan, add the 3 tablespoons sugar, lime zest and juice, 1/4 teaspoon red pepper flakes, a pinch salt. Put over medium burner and cook for 1 to 2 minutes until the sugar dissolves; stirring constantly. Remove pan from burner, stir in jícama to coat, and allow the syrup to cool for 20 minutes.
  3. Meanwhile, peel the mangos, removing pit, and cut into 1/2″ dice (should yield about 4 cups). Add to a large serving bowl. Peel your oranges and cut away the pith. Slice into 1/2″ thick rounds and then into 1/2″ dice. Add to bowl with diced mango.
  4. After the syrup has cooled for 20 minutes, pour over fruit in serving bowl and toss until well combined. Cover and refrigerate for 15 minutes prior to serving.

Tabbouleh

June 24, 2012

For over 15 years I have made the best Tabbouleh I’ve ever eaten. I guess I’m biased, because I make it exactly as I like it. Restaurants always seem to stress the bulgur, and I prefer to stress the fresh ingredients; parsley, tomatoes, lemon.  Today’s recipe is somewhat of a compromise. Chris Kimball uses 6 tablespoons of Bulgur; probably a 33% decrease over an average deli. However, my own recipe used just 2 tablespoons, so that the freshness of the other ingredients really shine. Another interesting thing about today’s recipe is that the Bulgur is soaked; not cooked. This is intended to prevent the wheat from becoming mushy. Overall, it was just okay. I give it 3-stars.

Pretty good; but I think I make better

Comments:

  1. I reduced the recipe by one-third, because that is how much parsley my bunch yielded.
  2. I have only ever eaten Tabbouleh just with pita bread. However, Chris Kimball also says that it can be eating with the crisp inner leaves of romaine lettuce AND pita bread. I didn’t try.

Rating: 3-stars.
Cost: $6.
How much work? Low/Medium.
How big of a mess?  Low/Medium.
Start time 4:30 PM. Finish time 6:30 PM.

Chris Kimball’s original recipe is here. The descriptions of how I prepared and baked the bread today are given below:

2 medium round tomatoes,
Salt and pepper
1/3 cup medium-grind bulgur
3 tablespoon lemon juice (1-1/2 lemons)
1/4-cup extra-virgin olive oil
1/8 teaspoon cayenne pepper
1 cups fresh parsley, chopped
1/3 cup fresh mint, chopped
1-1/2 scallions

  1. Put bulgur in a fine strainer and rinse with cold water. Allow to drain and put in a small bowl. Add 2 tablespoons on lemon juice from 1/2 a lemon. The grains will need about 40 minutes to begin to soften.
  2. Core the tomatoes and cut them into 1/2″ pieces. Add to a large bowl and combine with 1/4 teaspoon of table salt. Put in a fine strainer placed over the large bowl, and allow to stand for 30 minutes to drain away any excess liquid.
  3. As the tomatoes exude juice, add 2 tablespoons to the bulgur.
  4. About 15 minutes later begin to chop your remaining ingredients. Chop your parsley and fresh mint. Slice your scallions thin, and give them a few chops.
  5. After tomatoes have drained and bulgur has softened, wipe the large bowl dry and which together 2 more tablespoons of lemon juice from 1/2 a lemon, plus olive oil, cayenne pepper and 1/4 teaspoons salt. Gently mix in the tomatoes, bulgur, chopped parsley, mint, scallions.
  6. Cover tightly with plastic wrap and allow to stand at room-temperature for 1 hour.  Toss to recombine the ingredients and adjust the salt and pepper according to your taste.
  7. Serve inside of sliced pita edges.

Butter Bean and Pea Dip with Mint

May 13, 2012

This is my second variation of Chris Kimball’s bean dips from the current issue of Cook’s Illustrated. It taste fresher and lighter than Pinto Bean and Corn Dip with Cilantro. Unfortunately I only had wheat-saltines for serving; I think it would have been tastier with some thinly sliced bread or pita. Overall, if you like bean dip then I think you’ll love this recipe, plus it takes only about 5 minutes of work. However, I have never before served bean dip, having been to too many parties where canned bean dip was offered. While Chris Kimball does prove that not all bean dip is disgusting. This is very fresh tasting, but it is not enough to resurrect the genre in my mind. 3-stars.

Fresh and minty

Comments:

  1. I looked everywhere and couldn’t find canned butter beans, so I substituted petit lima beans.
  2. I used regular plain yogurt rather than Greek yogurt, because that’s what I already had in my kitchen.

Rating: 3 stars.
Cost: $3.
How much work? Low.
How big of a mess? Low.
Started: 3:00 PM.  Ready at:  4:00 PM.

Chris Kimball’s original recipe is here. My descriptions of how I prepare it today are given below:

1 small garlic clove
1/4 teaspoon grated lemon zest
2 tablespoons lemon juice
1 cup frozen baby peas
1 can butter beans (15-ounce)
1 scallion
1/4 cup fresh mint leaves
Table salt
1/4 teaspoon coriander
Pinch cayenne pepper
1/4 cup plain Greek-style yogurt
Extra-virgin olive oil

  1. Remove your baby peas from the freezer and allow to thaw.
  2. Peel the garlic and press it into a small bowl, then mix together with lemon juice and zest. Set aside for 15 minutes.
  3. Pat your thawed peas dry with paper towels, and reserve 2 tablespoons for later as a garnish. Reserve 2 tablespoons of the bean packing liquid by adding to the bowl of a food processor, then rise the beans. Cut your scallions in two ways, first cut the white and light-green parts into 1/2″ pieces. Second, slice the darker green part thin and on a bias.
  4. Add the following to the bowl of the food processor: rinsed beans, peas (except for the reserved garnish), white and light-green parts of scallion, mint, 3/4 teaspoon table salt, coriander, cayenne pepper and lime/garlic mixture. Pulse between 5 and 10 times until completely ground. Scrape down sides of food processor with a rubber spatula. Continue processing for 1 minutes, scraping down sides of food processor two more times.
  5. Add yogurt and process for 15 more seconds.
  6. Empty into a serving bowl and allow to sit at room temperature for 30 minutes prior to serving.
  7. Sprinkle with salt according to your taste. Top with remaining peas and scallion greens. Drizzle with a little olive oil and serve.

Pinto Bean and Corn Dip with Cilantro

May 10, 2012

Chris Kimball has five bean dip recipes in this month’s issue of Cook’s Illustrated. As I mentioned earlier, I made this Latin version of a bean dip for Cinco de Mayo. It came out fabulous, and was not a lot of work. This recipe included enough fresh ingredients; corn, cilantro and lime; to prevent it from becoming dense and pasty like most bean dips. 4-stars. I still plan to try another of his bean dip recipes, probably his Butter Bean and Pea Dip with Mint or Pink Bean and Lima Bean Dip with Parsley.

Latin-style bean dip

Comments:

  1. I already had 1/2 bag of dried pinto beans in my cupboard, which I used in lieu of the canned pinto beans specified in the original recipe. I soaked the dried beans in salt water overnight, rinsed them the next afternoon and cooked them for about 45 minutes until they were tender. I substituted some olive oil for the two tablespoons of reserved bean liquid. However, I still left the canned beans in the recipe below, because canned beans make more sense in a recipe that lacks a long cooking time.
  2. I used regular plain yogurt rather than Greek yogurt, because that’s what I already had in my kitchen.

Rating: 4 stars.
Cost: $3.
How much work? Low.
How big of a mess? Low.
Started: 3:00 PM.  Ready at:  4:00 PM.

Chris Kimball’s original recipe is here. My descriptions of how I prepare it today are given below:

1 small garlic clove
1/4 teaspoon grated lime zest
2 tablespoons lime juice
1 cup frozen corn
1 can pinto beans (15-ounce)
1 scallion
1/4 cup fresh cilantro leaves
Table salt
1/4 teaspoon chipotle chile powder
1 teaspoon ground cumin
Pinch cayenne pepper
1/4 cup plain Greek-style yogurt
Extra-virgin olive oil

  1. Remove your corn from the freezer and allow to thaw.
  2. Peel the garlic and press it into a small bowl, then mix together with lime juice and zest. Set aside for 15 minutes.
  3. Pat the corn dry with paper towels, and reserve 2 tablespoons for later as a garnish. Reserve 2 tablespoons of the bean packing liquid by adding to the bowl of a food processor, then rise the beans. Cut your scallions in two ways, first cut the white and light-green parts into 1/2″ pieces. Second, slice the darker green part thin and on a bias.
  4. Add the following to the bowl of the food processor: rinsed pinto beans, corn (except for the reserved garnish), white and light-green parts of scallion, cilantro, 3/4 teaspoon table salt, chili powder, cumin, cayenne pepper and lime/garlic mixture. Pulse between 5 and 10 times until completely ground. Scrape down sides of food processor with a rubber spatula. Continue processing for 1 minutes, scraping down sides of food processor two more times.
  5. Add yogurt and process for 15 more seconds.
  6. Empty into a serving bowl and allow to sit at room temperature for 30 minutes prior to serving.
  7. Sprinkle with salt according to your taste. Top with remaining corn and scallion greens. Drizzle with a little olive oil and serve.

Crab Cakes with Remoulade

May 3, 2012

These were the first crab cakes I’ve ever made at home. So when the recipe calls for using pasteurized lump crab-meat from a can, I was skeptical and tried using the frozen craws I found in the supermarket. But about 5 minutes later I realized what a tremendous amount of work it would require. 40 minutes later, I resolved never to complain about the high price of crab-cakes in restaurants again: assuming, of course, that they use fresh crab-meat.

My first homemade crab cakes

These crab cakes use ground shrimp as a binder in lieu of mayonnaise, so there is very little to dilute the taste of crab. The soaking in milk may have helped remove some of the excess fishiness, but the final crab cakes still needed some lemon of offset the slightly-too-strong taste of the sea. Because these are my first homemade crab cakes I can only compare to those that I’ve eaten in restaurants. While they are delicious, 4-stars, they are still not as good as crab cakes that I have eaten in nice restaurants in Manhattan. I assume it’s because they use fresh crab-meat. Of course, 8 enormous crab cakes for $14 is a tremendous bargain compared to a similarly priced tiny appetizer in a restaurant.

Rating: 4 stars.
Cost: $14.
How much work? Medium/High.
How big of a mess?  Medium.
Started: 4:00 PM.  Dinner:  6:30 PM.

Chris Kimball’s original crab cake recipe is here., and his Remoulade recipe is here. My descriptions of how I prepare it today are given below:

Crab Cakes:
1 pound lump crabmeat
1 cup milk
1-1/2 cups panko bread crumbs
Salt and pepper
2 celery ribs
1/2 cup chopped onion
1 garlic clove
1 tablespoon unsalted butter
4-oz shrimp
1/4 cup heavy cream
2 teaspoons Dijon mustard
1/2 teaspoon hot pepper sauce
1 teaspoon lemon juice
1/2 teaspoon Old Bay seasoning
4 tablespoons vegetable oil

  1. Put crab-meat in a small bowl and pick it over to remove any pieces of shell that your find. Add enough milk to completely submerge, about 1 cup. Cover with plastic wrap and all to stand in refrigerator for between 20 and 30 minutes.
  2. Meanwhile put 3/4-cup Panko in a small zip-lock bag and use a rolling-pin to crush it until fine, then empty into a dry 10″ non-stick skillet. Add an additional 3/4-cup Panko. Toast over medium-high burner for 5 minutes until golden brown; stirring bread crumbs every 30 seconds for even toasting. Empty into a pie plate and add 1/4 teaspoon salt and ground black pepper to taste.
  3. Roughly chop celery ribs and onion and add to bowl of a food processor. Peel and smashed the garlic and add to food processor. Pulse 6 to 7 times until finely chopped. It may be necessary to scrape down the bowl using a rubber spatula. .
  4. Wipe out skillet, place over medium burner and melt butter. Saute the chopped vegetables, adding 1/2 teaspoon table salt, and 1/8 teaspoon ground black pepper, for about 5 minutes until the vegetables have dried out. Empty to a large bowl and allow to cool down for 10 minutes.
  5. Strain the crab-meat to remove the milk, pressing down with a rubber spatula.
  6. Wipe out bowl of food processor using paper towels. Peel the shrimp and pulse about 12 times until it becomes finely ground. Add cream and pulse again 3 or 4 times. Empty the ground shrimp into the bowl with the vegetables. Stir together the Dijon, hot pepper sauce, lemon juice, and Old Bay seasoning until evenly combined. Add crab-meat and carefully fold together trying to preserve the lumps of crab-meat.
  7. Divide into 8 equal size piles and press into 1/2″-thick patties. Transfer to a parchment-lined baking sheet, cover with plastic wrap, and place in refrigerator for 30 minutes.
  8. Place each crab cake in pie plate with panko and press so that crumbs adhere to the crab cakes.
  9. Place the skillet over a medium burner, and pre-heat 1 tablespoon vegetable oil until it begins to shimmer. Cook 4 at a time for 3 or 4 minutes without moving them. Carefully flip them over using two spatulas. Reduce the burner to medium-low and add 1 more tablespoon oil. Cook for another 5 to 7 minutes. Remove to a serving plate. Use paper towels to wipe out the skillet, and repeat this step with the rest of the crab cakes.
  10. Serve immediately with lemon wedges and remoulade.

Remoulade:
1/2 teaspoon capers
1 small clove garlic
1 teaspoon minced parsley leaves
1/2 cup mayonnaise
1/2 teaspoon Dijon mustard
1-1/2 teaspoons sweet pickle relish
1 teaspoon hot sauce
1 teaspoon fresh lemon juice
Salt and pepper

  1. Drained and rinse your capers. Peel your garlic gloves. Mince your parsley leaves.
  2. Add all remaining ingredients (except the salt and pepper) to the food processor. Pulse about 10 times until well combined, but so much so that it becomes smooth.
  3. Adjust seasoning with salt and pepper according to your taste. Serve.

7 Rules to the Best Onion Soup

March 23, 2012

Every time I see a particular friend of mine she always reminds me how much she loves this onion soup. So I made this recipe for her again, following all my tips/suggestions from the last time I made it. I even splurged on a full pound of Gruyere cheese. While the soup was delicious and universally praised by my guests as “better than the last time”, I was unhappy with this attempt because of my pet peeve; soggy bread.  Ideally, I want the bread to absorb just enough of the soup to soften and become flavorful, but not to absorb so much liquid that it becomes a mushy and begins to disintegrate. Today I offer more specific suggestions to reliably avoid this common pitfall. Hopefully.
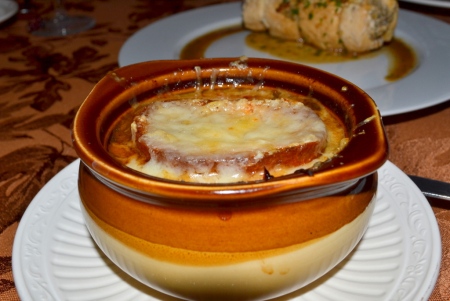
Came out good, except for the soggy bread.

The 7 Rules to the Best Onion Soup are:

  1. First and foremost, A weakness in Chris Kimball’s recipe is that the most important flavor-building step happens near the end of cooking. The first time I made this soup, the onions over-cooked in the oven and I had to skip the triple de-glazing the pan in Steps 7 and 8.  I recommend erring on the side of caution. Lower the oven temperature from 400-degrees to 375-degrees (with convection turned off). That will mean a little more time on the stovetop, so maybe you can even quadruple de-glaze. Rule #1. Cooking the onions for 4+ hours will build lots of flavor, but be careful they don’t burn.
  2. It’s easy to ruin your flavorful soup with soggy bread. You need to limit the time that the bread makes direct contact with the soup. This requires planning, making sure that your table is set, that you have saucers at the ready, and that your guests are ready for dinner. This was my first problem; everybody was still in party mode and took 10 minutes to get to the dinner table. An extra 5-minutes saved will make an enormous difference. Rule #2. Never put the toast on the soup until the table is set and the guests have been told it’s dinner time.
  3. Once your guests take their first bite of soup the onus is on them to manage their own bread. Your responsibility is to insulate the bread from the soup to slow down the rate of absorption before your guests being to eat. The only way to do that is with an even layer of finely grated cheese between the soup and the toast. So to be clear, you need two layers of cheese. The “primer” layer of cheese will keep your bread floating above the soup’s surface, safe from the liquid ravages of the cauldron below. Melt and brown your first layer of cheese too (because it will taste better) and to ensure your cheese has complete coverage. Sprinkle a little raw cheese to cover any bare spots. In my haste, I used a food processor to grate the cheese, which was too coarse and let too much liquid through. My downfall was certain when the toast partially submerged. Rule #3. Top your soup with an even layer of finely grated cheese before adding the toast.
  4. Make sure the baguette you buy is light and airy. You need an open crumb so that the crouton won’t become sponge-like. You want a thick, crispy crust that will stand up better to the soup. Don’t worry so much about the diameter of the bread. By changing the bias on which you cut your 3/8″-thick slices, you can adjust the diameter of the bead to fit your bowls. I bought the baguette from a new bakery and the crumb was much to fine (similar to sandwich bread). Rule #4. Buy a baguette with a light and airy crumb.
  5. Many people advise to use day-old bread, but you should toast your fresh bread slices in an oven until deeply golden brown. Chris Kimball did some tests and found that stale bread become hard, but does not properly dry out. Toast both sides until they become evenly and deeply golden brown. Chris Kimball’s recommendation of 10 minutes is insufficient; it’ll take at least 15 minutes. Rule #5. Don’t let your bread slices become so dark at to adversely affect their flavor, but toast them as long as you possibly can.
  6. Begin toasting your bread slices at least 40 minutes before dinner time. This will give you enough time to make a second batch, should that contingency become necessary. I’m the first to admit, I routinely forget that I have croutons in the oven and ruin at least half my batches. Aim for success the first time, but also recognize that you will be extremely busy as your dinner is coming together. You may forget and you probably used less than half your baguette anyway. Rule #6. Your toast will be successful only 50% of the time; plan accordingly.
  7. A shameful confession: For some recipes I use bouillon cubes instead of real broth. It’s cheaper and easier to keep a box of small cubes than a case of liquid broth. But this is not the occasion to use bad broth. Rule #7. Don’t skimp on the broth; a high-quality broth makes a big difference.

I’m am going to give another attempt at following my Rules #2 through #6 very closely. If I still cannot reliably avoid soggy bread, then I am going to try the tip for those without broiler-safe crocs: simply broil the cheese and bread slices on a baking sheet, then slip onto the soup just before serving. Julia Child recommends adding 2 to 3 tablespoons of Cognac, something I still want to try but haven’t had any cognac.  While the recipe says it will make 8 bowls, I was able to  stretched this recipe to the maximum and got 9 bowls. I wanted to make 10 servings, but it just wouldn’t stretch any farther. And finally a few comments about the cheese. My local supermarket sells Gruyere for $24/lb, but there is a gormet supermarket 10 miles away that sells superior French Gruyere Comte. Officially the proper cheese is Swiss Gruyere, but I really like the French Comte. If you can’t afford imported Gruyere made with raw cows milk, then substitute 70% Jarlsberg with 30% fresh Parmesan. Don’t resort to domestic Gruyere made with pasteurized milk; it’s flavorless.

Rating: 4-stars.
Cost: $16 for eight servings.
How much work? Medium.
How big of a mess? Medium.
Started: 1:00 pm  Ready:  6:00 pm.

Chris Kimball’s original recipe is here.  The descriptions of how I prepared the soup today are given below:

4 tablespoons unsalted butter
6-lbs yellow onions
2-1/2 teaspoon table salt
3 cups water (plus up t0 1 cup more for deglazing)
3/4 cup dry sherry
6 cups chicken broth
3 cups beef broth
9 sprigs fresh thyme, tied together using kitchen twine
2 bay leaf
Ground black pepper

Cheese Croutons:
1/2 small baguette , cut into 3/8″ slices on the bias to match the diameter of your soup bowls.
12 ounces finely grated Gruyère cheese

  1. Cut your onions in half from pole to pole, and slice off the root end of onion. Peel and discard the the skin. Placing each onion half with the flat side down on cutting board, slice each onion half from pole to pole into 1/8″-thick slices.
  2. Set an oven rack to the lower middle position in your oven. Preheat to 375-degrees (with convection fan turned off).
  3. Spray the inside of a large Dutch oven with non-stick cooking spray. Place 4 tablespoons of butter, and onion slices into your dutch oven. Sprinkle with 1-1/2 teaspoon salt.
  4. Place the lid on to fully cover your dutch oven for the first hour of cooking. Then remove from oven and stir and scrape the bottom and sides. Return to oven, but with the lid slightly ajar, and cook for another 1-1/2 hours; stir and scrape the onions after 45 minutes. The onions should be very soft and lightly golden brown.
  5. Remove the onions from the oven and put on stove-top over medium to medium-high burner. Cook the onions for 15 to 20 minutes until all the liquid has evaporated and the onions have browned; stir and scrape the bottom and sides frequently. Adjust the heat if your onions are browning too quickly. It is easy to forget that the handles are 375-degrees; be very careful to use oven mitts.
  6. Meanwhile, slice baguette on the diagonal into 3/8″-thick slices. Match the diameter of your soup bowls by adjusting the angle on which you slice the bread. Place bread slices on foil-lined baking sheet, and bake for between 12 to 18 minutes in a 400-degree oven until the bread becomes crispy and golden brown. Also take advantage of any free moments to finely grate your cheese using the fine holes of a box grater (or ideally a microplane).
  7. Continue to cook onions without stirring for another 6 to 8 minutes until the pot’s bottom becomes coated with a dark crust. You may need to adjusting the burner to avoid burning the fond.
  8. To loosen the fond, stir in 1/4-cup water and scrape the bottom and sides. Continue to cook without stirring for another 6 to 8 minutes until the pot’s bottom becomes coated with a dark crust. Repeat this process of deglazing until the onions become very dark brown; 2 or 3 more times.
  9. Stir in 3/4-cup dry sherry to deglaze the pan. Cook for 5 minutes until the sherry has evaporated; stirring frequently.
  10. Now add both chicken and beef broth, 3-cups of water, thyme bundle, bay leaf, and 1 teaspoon table salt. Bring to a simmer over high heat, then cover and reduce to low heat and simmer for 30 minutes.
  11. Remove and discard herbs, then season with pepper (and adjust salt if necessary).
  12. Adjust an oven rack so that it is 6″ from the broiler element. Preheat broiler on high for 5 to 10 minutes.
  13. Fill each broiler-safe crocks with soup and place on your foil-lined baking sheet.  Sprinkle soup with finely grated Gruyère so that it completely covers the soup. Broil for 3 to 5 minutes about 6″ from the broiler element until the cheese has melted and is bubbling around edges. If any spots show soup coming through, plus the holes with a little more raw cheese.
  14. Place 1 or 2 baguette slices with the crispy side down, being careful not to overlap your slices. Sprinkle with shredded Gruyère and broil for 3 to 5 minutes about 6″ from the broiler element until the cheese has melted and is bubbling around edges. Allow to cool for 5 minutes before serving.

Buffalo Chicken Nuggets

March 8, 2012

OK, so this isn’t a new recipe, but a combination of two older ones; Buffalo Wings and these Chicken Nuggets. The combination turned out fantastic; just as good as regular Buffalo Wings, but so easy to eat using a knife and fork. There was no mess and my fingers weren’t tingling from all the spices. The sauce recipe below is a slight variation on Chris Kimball’s. First, I reduced the total amount of sauce made, because I found that there was always too much. The second secret is to add some Worcester sauce, adding some great depth.

Just as tasty as wings, but easier to eat.

Comments:

  1. I love spicy food. But if you don’t, then you can leave out the cayenne pepper to soften the heat. If it’s still too hot then you can reduce the Tabasco. By itself, Frank’s wing sauce is not all that hot.

Rating: 4-1/2-stars.
Cost: $5.
How much work? Medium.
How big of a mess?  Medium.
Start time 4:00 PM. Finish time 6:00 PM.

Chris Kimball’s original Chicken Nugget recipe is here, and his Buffalo wing recipe is here. The descriptions of how I prepared the chicken nuggets is here, and the descriptions of how I prepared the Buffalo Sauce are given below:

3 tablespoons butter
1/2 cup Frank’s Louisiana Hot Sauce
1 tablespoon Tabasco
1 teaspoon dark brown sugar
2 teaspoon cider vinegar
2 teaspoon Worcester sauce
1/8 teaspoon cayenne pepper

  1. With 5 minutes remaining until chicken is ready to serve, begin to make the sauce. Melt the butter in 12” regular (i.e. not non-stick) skillet over a medium low burner, whisk in the Frank’s sauce, Tabasco, brown sugar, Worcester, cayenne and cider vinegar. Mix well and allow to cook for 2 minutes. Reserve 1/4 cup of sauce to serve separately at table, and to ensure that your nuggets aren’t too spicy.
  2. Put chicken nuggets into skillet and use a rubber spatula to toss until evenly coated.

Beer-Battered Onion Rings

February 24, 2012

In the past, I have made these oven-fried onion ring. They use crushed saltines and potato chip to substitute for deep frying. While tasty, they just aren’t the same as genuine onion rings. So when I saw these onion rings on a new episode of Cook’s Country, I was excited to give them a try. The recipe solves some of my biggest complaints, when I take a small bite the entire onion comes out leaving just the hollowed ring of batter. Chris Kimball solves this by soaked the raw onions in a mixture of beer, malt vinegar, and salt. Not only are the rings are softened, but this technique also enhances their flavor.

Delicious battered onion rings; but a big mess

But these onion rings are not without their own set of problems. Without breading they stick too each other too easily, stripping away the batter in places. In the end, the results were mixed; some rings were 4-1/2 stars while others were barely 3-stars.

Issues:

  1. The batter is extremely runny, and without breading they stick very easily to one another while frying.
  2. While Chris Kimball says to fry them in small batches, his recommended size is still too big. The onion rings still stuck together. I think it is better to add the rings one at a time, and do not treat them as “batches” at all. Rather treat each ring individually, though it will take more vigilance. There will always be a ring going in or out.
  3. I made this recipe with 2 large onions and ended up with way more onions rings than we could possible eat. I’ve scaled back the recipe below to use only one large onion. If you are making for a crowd, the you can follow his original ingredient list.

Rating: 3-stars
Cost: $2.50.
How much work? Low.
How big of a mess?  Medium.
Started: 1:00 PM.  Ready:  2:45 PM

Chris Kimball’s original recipe is here.  The descriptions of how I prepared it today are given below:

1 large sweet onions (but can use regular yellow onions)
1-1/2 cups beer
1 teaspoons malt vinegar (or cider vinegar is unavailable)
Salt and pepper
2 quarts peanut or vegetable oil
1/3 cup all-purpose flour
1/3 cups cornstarch
1/2 teaspoon baking powder

  1. Peel your onion and slice 1/2″ thick. Place the onion slices (without separating into individual rounds) in a zip-lock bag with 1 cup beer, 1 teaspoons malt vinegar, 1/4 teaspoon salt and 1/4 teaspoon ground black pepper. Place in refrigerator for 1 hour.
  2. Pour oil into a Dutch oven set over medium-high burner. While oil is heating to 350-degrees, prepare mixture in a large bowl by whisking together flour, cornstarch, 1/4 teaspoon salt, 1/4 teaspoon ground black pepper. Add 1/3 cup beer and continue whisking until there are just a few lumps remaining; adding a tablespoon of beer at a time until your obtain the proper consistency. You know you have the proper consistency when the batter that drips from the whisk leaves a bit of a trail as it falls back into the batter.
  3. Set an oven rack to the middle position, and pre-heat to 200-degrees.
  4. Drain onions and use paper towels to pat them dry. Separate onions into individual rounds, discarding any that are too small.
  5. Put 1/2 of rings in batter, and place them one-at-a-time into the hot oil. Do not treat them as “batches”, but rather you should try to fry each ring for 2-1/2 minutes per side.
  6. As you remove the rings, place them in a baking sheet lined with paper towels, sprinkle with salt and pepper, and keep them warm in the 200-dergee oven.  Repeat with second set of onion rings, but wait until the oil reaches 350-degrees before you begin to fry again.